

• Step-by-Step: Implementing Zero-Downtime Database Schema Migrations in Production
    Renaming a database column or altering a schema constraint is one of the highest-risk operations in backend engineering. Executing a standard ALTER TABLE statement in SQL often acquires an exclusive write lock, queueing incoming transactions until the operation times out or causes cascading failure.

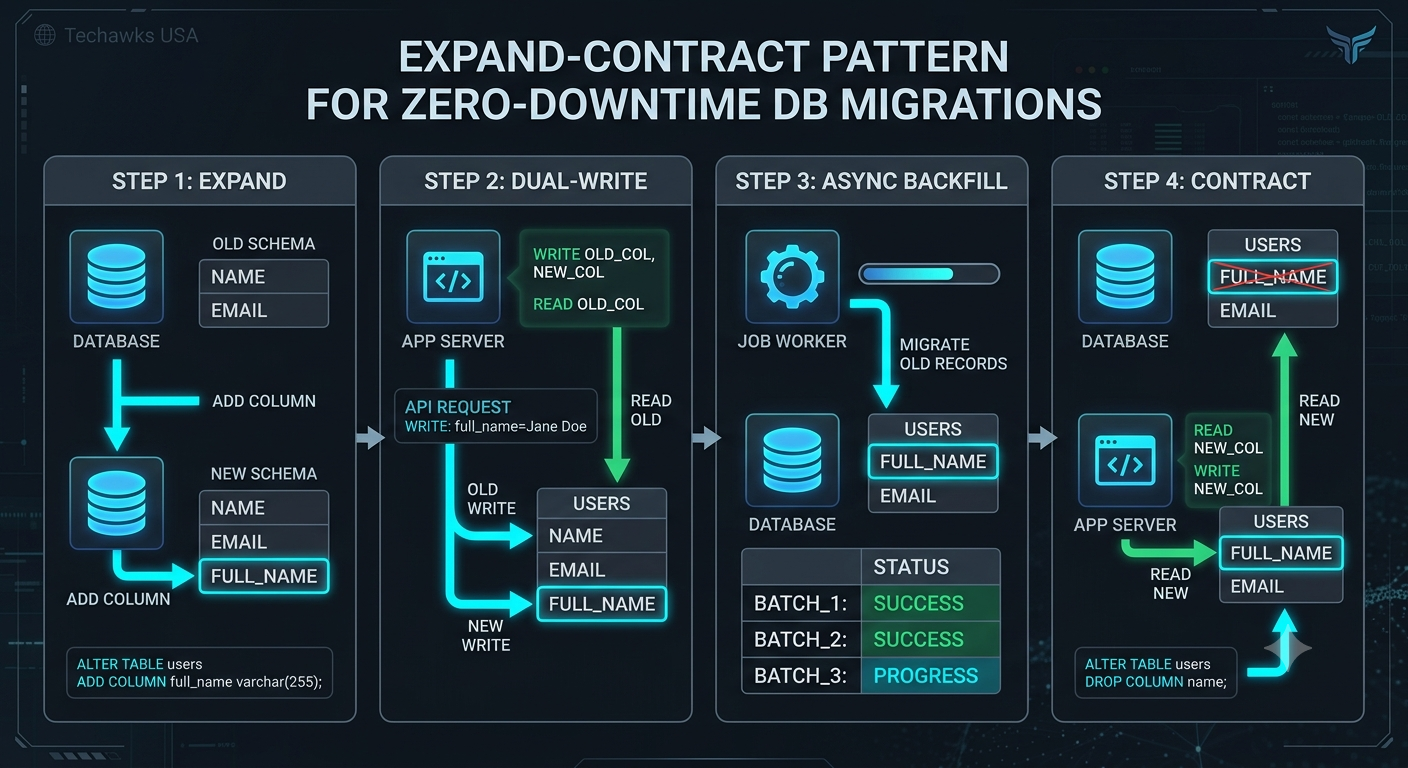
    To roll out schema changes safely without downtime, use the Expand-Contract (Parallel Change) Pattern. Here is a 4-step tutorial on implementing it:

    Step 1: Expand (Add the New Column alongside the Old One)
    Never rename or modify an existing column in place. First, deploy a migration that adds the new column as nullable, keeping the original column intact.
    SQL
    Step 1: Add new column without blocking existing writes
    ALTER TABLE users ADD COLUMN full_name VARCHAR(255) NULL;

    Step 2: Dual-Write (Update Application Code)
    Deploy application code that writes to both the old and new columns simultaneously (name and full_name), while reading strictly from the old column. This ensures all incoming updates populate both fields without breaking existing reads
    .
    Step 3: Backfill Historical Data
    Run a background script or asynchronous batch job to migrate existing records from the old column to the new column in small, controlled batches (e.g., 1,000 rows at a time) to prevent table locks and high I/O utilization.

    Step 4: Contract (Cut Over Reads and Drop the Old Column)
    4A: Deploy code that switches reads to the new full_name column.
    4B: Deploy code that stops writing to the old name column.
    4C: Execute a final cleanup migration to drop the legacy column.
    SQL
    Step 4C: Safe cleanup after full application cutover
    ALTER TABLE users DROP COLUMN name;

    Key Takeaways
    Direct schema mutations on live databases risk table locks and application downtime.
    The Expand-Contract pattern decouples database migrations from code deployments.
    Batching backfills prevents high I/O consumption and memory exhaustion during data migration.

    CTA (Join Techawks USA)
    Building zero-downtime, high-availability architecture is a essential skill for backend engineers. Join Techawks USA today to access practical guides, architectural deep dives, and system design insights built for US tech professionals.
    Step-by-Step: Implementing Zero-Downtime Database Schema Migrations in Production Renaming a database column or altering a schema constraint is one of the highest-risk operations in backend engineering. Executing a standard ALTER TABLE statement in SQL often acquires an exclusive write lock, queueing incoming transactions until the operation times out or causes cascading failure. To roll out schema changes safely without downtime, use the Expand-Contract (Parallel Change) Pattern. Here is a 4-step tutorial on implementing it: Step 1: Expand (Add the New Column alongside the Old One) Never rename or modify an existing column in place. First, deploy a migration that adds the new column as nullable, keeping the original column intact. SQL Step 1: Add new column without blocking existing writes ALTER TABLE users ADD COLUMN full_name VARCHAR(255) NULL; Step 2: Dual-Write (Update Application Code) Deploy application code that writes to both the old and new columns simultaneously (name and full_name), while reading strictly from the old column. This ensures all incoming updates populate both fields without breaking existing reads . Step 3: Backfill Historical Data Run a background script or asynchronous batch job to migrate existing records from the old column to the new column in small, controlled batches (e.g., 1,000 rows at a time) to prevent table locks and high I/O utilization. Step 4: Contract (Cut Over Reads and Drop the Old Column) 4A: Deploy code that switches reads to the new full_name column. 4B: Deploy code that stops writing to the old name column. 4C: Execute a final cleanup migration to drop the legacy column. SQL Step 4C: Safe cleanup after full application cutover ALTER TABLE users DROP COLUMN name; Key Takeaways Direct schema mutations on live databases risk table locks and application downtime. The Expand-Contract pattern decouples database migrations from code deployments. Batching backfills prevents high I/O consumption and memory exhaustion during data migration. CTA (Join Techawks USA) Building zero-downtime, high-availability architecture is a essential skill for backend engineers. Join Techawks USA today to access practical guides, architectural deep dives, and system design insights built for US tech professionals.
    0 Comments 0 Shares 2K Views 0 Reviews
  • Designing GDPR-Compliant Data Retention Pipelines: 4 Engineering Standards.
    Complying with the Right to Erasure (Article 17 under UK GDPR) is not just a legal requirement; it is a backend engineering challenge. Naive deletion strategies often lead to broken foreign key constraints, incomplete data purges across microservices, and compromised analytics pipelines.


    To build an automated, auditable, and reliable data retention architecture, implement these four technical standards:


    Adopt Soft Deletes with Automated Purge Schedules
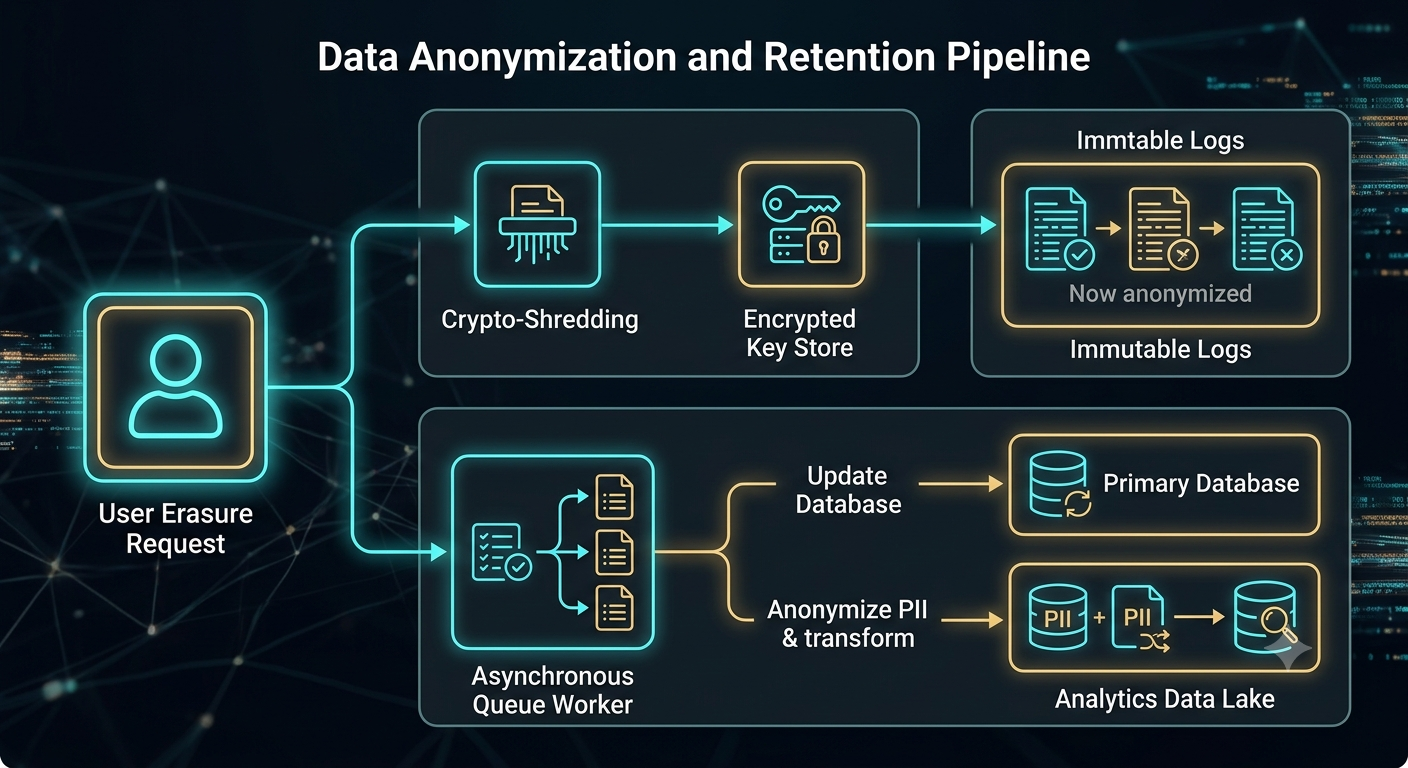
    Avoid performing instant DELETE queries upon user request. Flag records with a deleted_at timestamp and transition user status to pending_purge. Schedule an asynchronous worker (e.g., via Celery or Temporal) to run batch purges during low-traffic windows, enforcing a hard retention deadline (such as 30 days).


    Decouple Personally Identifiable Information (PII) from Transactional Records
    Instead of deleting non-identifying transaction history needed for financial audits, isolate PII (names, emails, phone numbers) into a dedicated User Identity Service. When an erasure request executes, replace the user's PII with cryptographic hashes or anonymous UUIDs while preserving system logs and aggregated reporting.


    Handle Event Stream and Log Anonymization
    Logs written to Kafka, Elasticsearch, or cloud storage (AWS S3, Azure Blob) should never contain raw PII. Use pseudonymous identifiers in log payloads and maintain a separate, encrypted key-value mapping for PII. Purging a user's data then becomes a simple act of deleting their encryption key ("Crypto-Shredding"), rendering all historical log entries unreadable instantly.


    Automate Backup Expiration Compliance
    Database backups do not need to be modified instantly upon a deletion request—doing so risks backup corruption. Instead, set clear backup TTL (Time-to-Live) retention policies (e.g., 14 to 30 days) ensuring that overwritten or restored backups naturally drop deleted user records within an acceptable compliance window.


    Key Takeaways
    Crypto-shredding key management simplifies data erasure across immutable event logs and backups.
    Anonymizing transactional data preserves business intelligence while fulfilling privacy obligations.
    Asynchronous batch purges prevent database lockups caused by synchronous CASCADE deletions.


    CTA (Join Techawks UK)
    Architecting compliant, high-scale infrastructure requires sharing battle-tested strategies. Join Techawks UK today to connect with lead engineers, security architects, and CTOs across the UK tech ecosystem.
    Designing GDPR-Compliant Data Retention Pipelines: 4 Engineering Standards. Complying with the Right to Erasure (Article 17 under UK GDPR) is not just a legal requirement; it is a backend engineering challenge. Naive deletion strategies often lead to broken foreign key constraints, incomplete data purges across microservices, and compromised analytics pipelines. To build an automated, auditable, and reliable data retention architecture, implement these four technical standards: Adopt Soft Deletes with Automated Purge Schedules Avoid performing instant DELETE queries upon user request. Flag records with a deleted_at timestamp and transition user status to pending_purge. Schedule an asynchronous worker (e.g., via Celery or Temporal) to run batch purges during low-traffic windows, enforcing a hard retention deadline (such as 30 days). Decouple Personally Identifiable Information (PII) from Transactional Records Instead of deleting non-identifying transaction history needed for financial audits, isolate PII (names, emails, phone numbers) into a dedicated User Identity Service. When an erasure request executes, replace the user's PII with cryptographic hashes or anonymous UUIDs while preserving system logs and aggregated reporting. Handle Event Stream and Log Anonymization Logs written to Kafka, Elasticsearch, or cloud storage (AWS S3, Azure Blob) should never contain raw PII. Use pseudonymous identifiers in log payloads and maintain a separate, encrypted key-value mapping for PII. Purging a user's data then becomes a simple act of deleting their encryption key ("Crypto-Shredding"), rendering all historical log entries unreadable instantly. Automate Backup Expiration Compliance Database backups do not need to be modified instantly upon a deletion request—doing so risks backup corruption. Instead, set clear backup TTL (Time-to-Live) retention policies (e.g., 14 to 30 days) ensuring that overwritten or restored backups naturally drop deleted user records within an acceptable compliance window. Key Takeaways Crypto-shredding key management simplifies data erasure across immutable event logs and backups. Anonymizing transactional data preserves business intelligence while fulfilling privacy obligations. Asynchronous batch purges prevent database lockups caused by synchronous CASCADE deletions. CTA (Join Techawks UK) Architecting compliant, high-scale infrastructure requires sharing battle-tested strategies. Join Techawks UK today to connect with lead engineers, security architects, and CTOs across the UK tech ecosystem.
    0 Comments 0 Shares 1K Views 0 Reviews
  • Centralised Platform Teams vs. Embedded DevOps: What Works for Scaling UK Tech Teams?
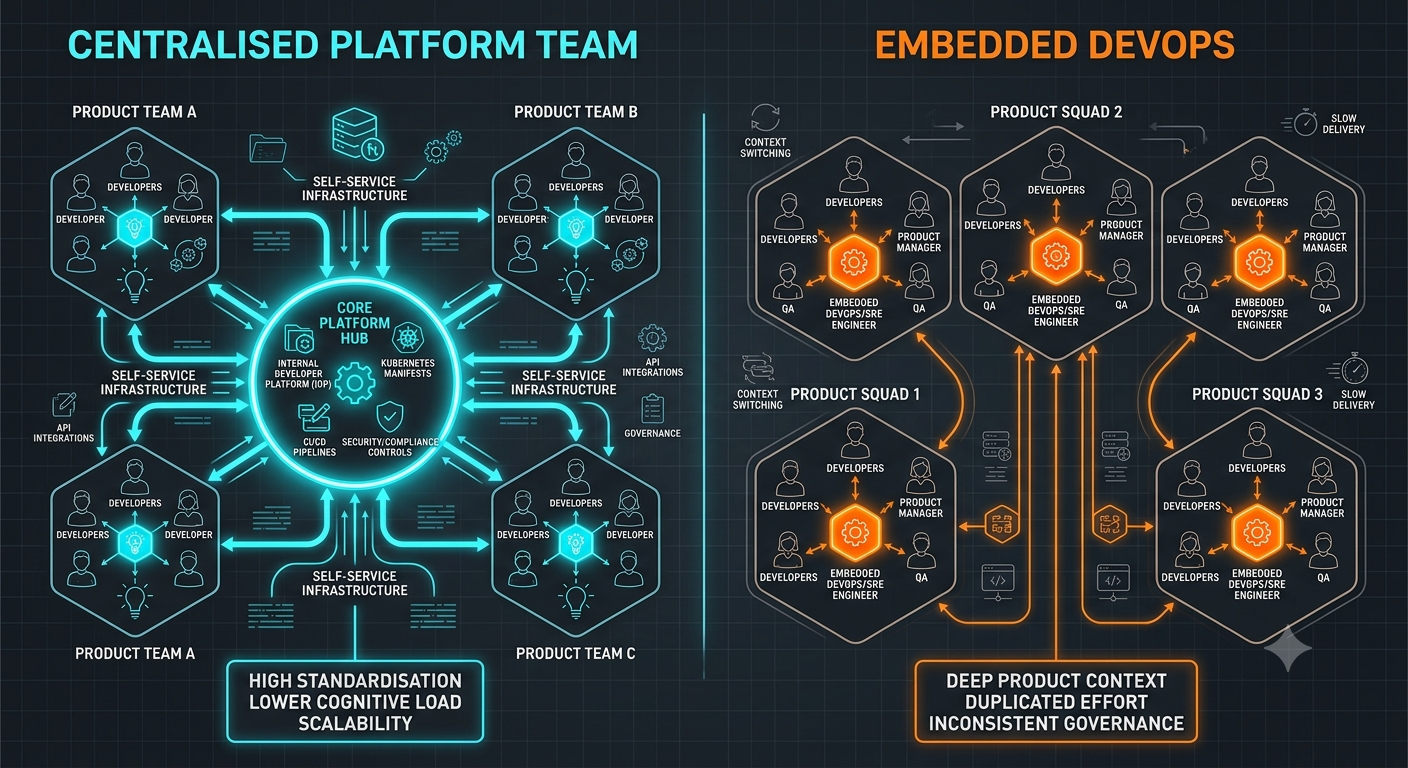
    As UK tech scale-ups grow beyond 30+ engineers, the traditional "everyone does DevOps" approach rapidly hits a wall. Developers get bogged down by Kubernetes manifests, IAM permission headaches, and deployment scripts, leading to context switching and slower feature delivery.


    To solve this, engineering leaders generally pivot toward one of two operational models:


    The Centralised Platform Engineering Model
    In this approach, a dedicated platform team builds an Internal Developer Platform (IDP) that abstracts cloud complexity away. Developers interact with self-service APIs or internal portals (like Backstage) to spin up environments, databases, and pipelines instantly.
    Pros: High standardization, centralized security/compliance controls, lower cognitive load on product developers.
    Cons: Risk of creating an isolated "ivory tower" team that builds tools nobody actually wants to use.


    The Embedded DevOps Model
    Here, specialized DevOps or Site Reliability Engineers (SREs) are embedded directly into cross-functional product squads.
    Pros: Deep context on product requirements, tight alignment with feature delivery goals, faster immediate feedback loops.
    Cons: Inconsistent infrastructure choices across squads, duplicated operational effort, and difficulty maintaining company-wide governance.


    Finding the Right Balance
    The most effective UK engineering teams often start with embedded engineers to establish initial patterns, then transition to a centralized platform team once common infrastructure bottlenecks are clearly identified across multiple squads.


    Key Takeaways
    Embedded DevOps speeds up early-stage feature delivery but risks infrastructure fragmentation at scale.
    Centralized Platform Engineering reduces cognitive load, provided the platform is treated as a product built for internal developers.
    The transition between models should be driven by measurable developer friction, not organizational trends.


    CTA (Join Techawks UK)
    How is your engineering organization structuring its platform and DevOps capabilities? Are you building a dedicated platform team or embedding operational specialists into squads? Share your experiences below, and Join Techawks UK to connect with CTOs, principal engineers, and tech leaders driving software delivery across the UK.
    Centralised Platform Teams vs. Embedded DevOps: What Works for Scaling UK Tech Teams? As UK tech scale-ups grow beyond 30+ engineers, the traditional "everyone does DevOps" approach rapidly hits a wall. Developers get bogged down by Kubernetes manifests, IAM permission headaches, and deployment scripts, leading to context switching and slower feature delivery. To solve this, engineering leaders generally pivot toward one of two operational models: The Centralised Platform Engineering Model In this approach, a dedicated platform team builds an Internal Developer Platform (IDP) that abstracts cloud complexity away. Developers interact with self-service APIs or internal portals (like Backstage) to spin up environments, databases, and pipelines instantly. Pros: High standardization, centralized security/compliance controls, lower cognitive load on product developers. Cons: Risk of creating an isolated "ivory tower" team that builds tools nobody actually wants to use. The Embedded DevOps Model Here, specialized DevOps or Site Reliability Engineers (SREs) are embedded directly into cross-functional product squads. Pros: Deep context on product requirements, tight alignment with feature delivery goals, faster immediate feedback loops. Cons: Inconsistent infrastructure choices across squads, duplicated operational effort, and difficulty maintaining company-wide governance. Finding the Right Balance The most effective UK engineering teams often start with embedded engineers to establish initial patterns, then transition to a centralized platform team once common infrastructure bottlenecks are clearly identified across multiple squads. Key Takeaways Embedded DevOps speeds up early-stage feature delivery but risks infrastructure fragmentation at scale. Centralized Platform Engineering reduces cognitive load, provided the platform is treated as a product built for internal developers. The transition between models should be driven by measurable developer friction, not organizational trends. CTA (Join Techawks UK) How is your engineering organization structuring its platform and DevOps capabilities? Are you building a dedicated platform team or embedding operational specialists into squads? Share your experiences below, and Join Techawks UK to connect with CTOs, principal engineers, and tech leaders driving software delivery across the UK.
    0 Comments 0 Shares 1K Views 0 Reviews
  • Step-by-Step: Implementing Zero-Trust Authentication in Microservices
    Traditional perimeter security assumes that everything inside the internal network is trustworthy. Zero-Trust Architecture replaces this passive trust model with explicit, continuous verification for every inter-service request.
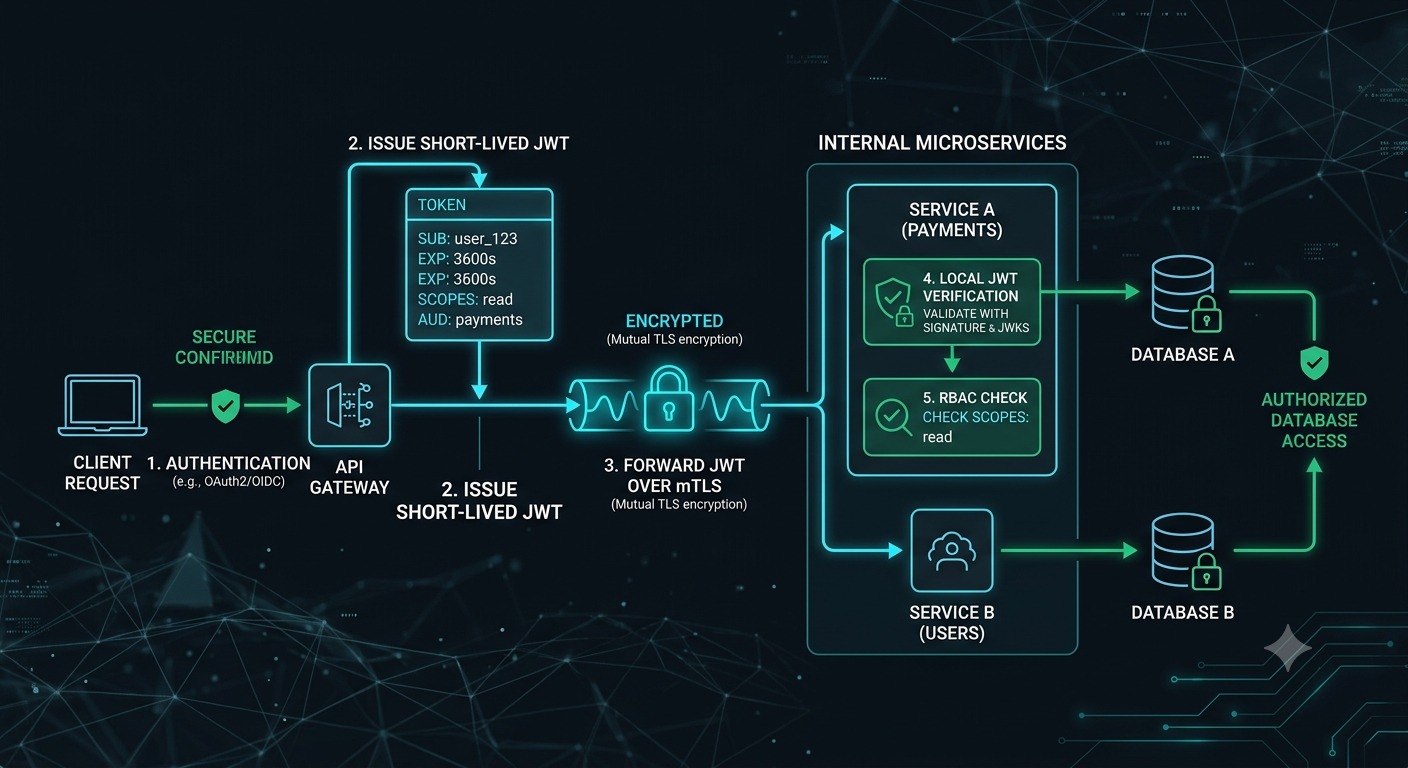
    Here is a step-by-step tutorial for implementing Zero-Trust authentication between microservices using mTLS (Mutual TLS) and short-lived JWTs:


    Enforce Mutual TLS (mTLS) at the Transport Layer
    Configure your service mesh (such as Istio or Linkerd) or reverse proxies (Envoy/Nginx) to mandate mTLS for all internal communication.
    Mechanism: Every microservice presents an X.509 certificate to authenticate its identity.
    Result: Traffic between services is fully encrypted in transit, and unauthorized services cannot establish TCP connections.


    Issue Short-Lived User Context Tokens (JWTs) at the Edge
    When a client request hits your API Gateway, authenticate the user and issue a cryptographically signed, short-lived JSON Web Token (JWT) containing the user’s identity, roles, and scope.
    JSON
    {
    "sub": "usr_987654321",
    "iss": "https://auth.techawks.co.uk",
    "aud": "order-service",
    "exp": 1785787200,
    "roles": ["customer"]
    }
    Pass and Validate Context Across Service Boundaries
    Forward the user token in the HTTP Authorization header for all downstream service calls. Every downstream service must independently verify:
    Signature: Validated using the Public Key Set (JWKS) fetched from the Identity Provider.
    Expiration: Reject any tokens where exp has passed.
    Audience/Scope: Ensure the target service is authorized to perform the action on behalf of that user.


    Implement Fine-Grained Role-Based Access Control (RBAC)
    Do not delegate access control solely to the API Gateway. Enforce authorization checks locally inside each microservice endpoint (e.g., verifying roles or specific permission claims before executing database reads or writes).


    Key Takeaways
    mTLS authenticates service identity and encrypts internal network traffic.
    Downstream services must explicitly validate user tokens rather than trusting upstream calls implicitly.
    Local authorization checks at the service level prevent lateral movement during a perimeter breach.


    CTA (Join Techawks UK)
    Security and resilience are core pillars of modern backend engineering. Join Techawks UK today to access practical security tutorials, architecture blueprints, and insights shared by UK tech professionals
    Step-by-Step: Implementing Zero-Trust Authentication in Microservices Traditional perimeter security assumes that everything inside the internal network is trustworthy. Zero-Trust Architecture replaces this passive trust model with explicit, continuous verification for every inter-service request. Here is a step-by-step tutorial for implementing Zero-Trust authentication between microservices using mTLS (Mutual TLS) and short-lived JWTs: Enforce Mutual TLS (mTLS) at the Transport Layer Configure your service mesh (such as Istio or Linkerd) or reverse proxies (Envoy/Nginx) to mandate mTLS for all internal communication. Mechanism: Every microservice presents an X.509 certificate to authenticate its identity. Result: Traffic between services is fully encrypted in transit, and unauthorized services cannot establish TCP connections. Issue Short-Lived User Context Tokens (JWTs) at the Edge When a client request hits your API Gateway, authenticate the user and issue a cryptographically signed, short-lived JSON Web Token (JWT) containing the user’s identity, roles, and scope. JSON { "sub": "usr_987654321", "iss": "https://auth.techawks.co.uk", "aud": "order-service", "exp": 1785787200, "roles": ["customer"] } Pass and Validate Context Across Service Boundaries Forward the user token in the HTTP Authorization header for all downstream service calls. Every downstream service must independently verify: Signature: Validated using the Public Key Set (JWKS) fetched from the Identity Provider. Expiration: Reject any tokens where exp has passed. Audience/Scope: Ensure the target service is authorized to perform the action on behalf of that user. Implement Fine-Grained Role-Based Access Control (RBAC) Do not delegate access control solely to the API Gateway. Enforce authorization checks locally inside each microservice endpoint (e.g., verifying roles or specific permission claims before executing database reads or writes). Key Takeaways mTLS authenticates service identity and encrypts internal network traffic. Downstream services must explicitly validate user tokens rather than trusting upstream calls implicitly. Local authorization checks at the service level prevent lateral movement during a perimeter breach. CTA (Join Techawks UK) Security and resilience are core pillars of modern backend engineering. Join Techawks UK today to access practical security tutorials, architecture blueprints, and insights shared by UK tech professionals
    0 Comments 0 Shares 1K Views 0 Reviews
  • Building Cross-Border Fintech Architecture: 4 Non-Negotiable System Design Rules
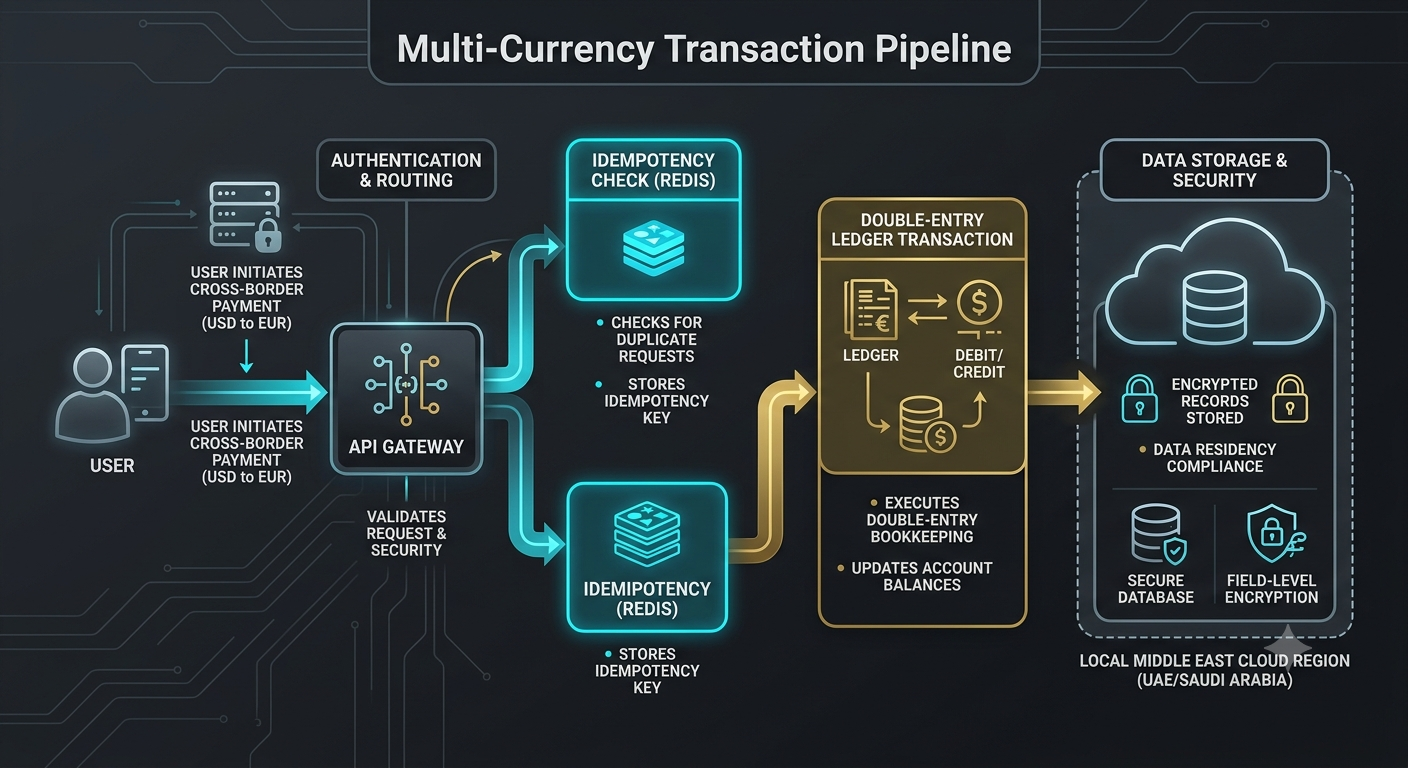
    As the UAE solidifies its position as a global tech hub connecting Middle Eastern, Asian, and European markets, engineering teams frequently face the challenge of processing multi-currency transactions across distributed nodes. Handling high-frequency payments across different monetary networks requires absolute data consistency and fault-tolerant architecture.


    Whether you are building ledger systems, payment gateways, or remittance rails, here are four engineering standards every team should follow:


    Enforce Double-Entry Bookkeeping Principles
    Never store user balances as a single mutable integer column (UPDATE accounts SET balance = balance + amount). Instead, implement an immutable double-entry ledger where every financial transaction consists of equal and opposite debit and credit entries. This preserves a complete audit trail and prevents balance drift.


    Mitigate Currency Conversion Race Conditions
    Exchange rates fluctuate constantly. When handling multi-currency conversions, snapshot the exchange rate at the exact moment a transaction quote is generated, sign the quote with a cryptographic HMAC, and attach an explicit expiration time (TTL) to prevent front-running or arbitrage during execution.


    Design for Distributed Idempotency
    Network blips across cross-border API calls are common. Ensure every transaction payload carries a unique client-generated Idempotency Key stored in Redis or a distributed lock service. If a payment request is retried due to a timeout, your backend returns the original status without double-charging the user.


    Implement Local Data Residency and Encryption Controls
    Store and process sensitive financial and customer data in accordance with local cloud region requirements (e.g., using UAE-based cloud regions like me-central-1 or me-south-1). Ensure field-level encryption for critical identifiers using hardware security modules (HSM) or dedicated key management systems.


    Key Takeaways
    Immutable double-entry ledgers ensure complete auditability and prevent balance corruptions.
    Signed, time-bound conversion quotes protect against foreign exchange rate volatility during execution.
    Distributed idempotency keys guarantee transaction safety across unstable network connections.


    CTA (Join Techawks UAE)
    Scaling fintech and enterprise systems across global markets requires battle-tested engineering. Join Techawks UAE today to connect with tech leaders, cloud architects, and software engineers driving innovation in the region.
    Building Cross-Border Fintech Architecture: 4 Non-Negotiable System Design Rules As the UAE solidifies its position as a global tech hub connecting Middle Eastern, Asian, and European markets, engineering teams frequently face the challenge of processing multi-currency transactions across distributed nodes. Handling high-frequency payments across different monetary networks requires absolute data consistency and fault-tolerant architecture. Whether you are building ledger systems, payment gateways, or remittance rails, here are four engineering standards every team should follow: Enforce Double-Entry Bookkeeping Principles Never store user balances as a single mutable integer column (UPDATE accounts SET balance = balance + amount). Instead, implement an immutable double-entry ledger where every financial transaction consists of equal and opposite debit and credit entries. This preserves a complete audit trail and prevents balance drift. Mitigate Currency Conversion Race Conditions Exchange rates fluctuate constantly. When handling multi-currency conversions, snapshot the exchange rate at the exact moment a transaction quote is generated, sign the quote with a cryptographic HMAC, and attach an explicit expiration time (TTL) to prevent front-running or arbitrage during execution. Design for Distributed Idempotency Network blips across cross-border API calls are common. Ensure every transaction payload carries a unique client-generated Idempotency Key stored in Redis or a distributed lock service. If a payment request is retried due to a timeout, your backend returns the original status without double-charging the user. Implement Local Data Residency and Encryption Controls Store and process sensitive financial and customer data in accordance with local cloud region requirements (e.g., using UAE-based cloud regions like me-central-1 or me-south-1). Ensure field-level encryption for critical identifiers using hardware security modules (HSM) or dedicated key management systems. Key Takeaways Immutable double-entry ledgers ensure complete auditability and prevent balance corruptions. Signed, time-bound conversion quotes protect against foreign exchange rate volatility during execution. Distributed idempotency keys guarantee transaction safety across unstable network connections. CTA (Join Techawks UAE) Scaling fintech and enterprise systems across global markets requires battle-tested engineering. Join Techawks UAE today to connect with tech leaders, cloud architects, and software engineers driving innovation in the region.
    0 Comments 0 Shares 2K Views 0 Reviews
  • Multi-Region Cloud vs. Local Data Sovereignty: How Are UAE Tech Leaders Balancing both?
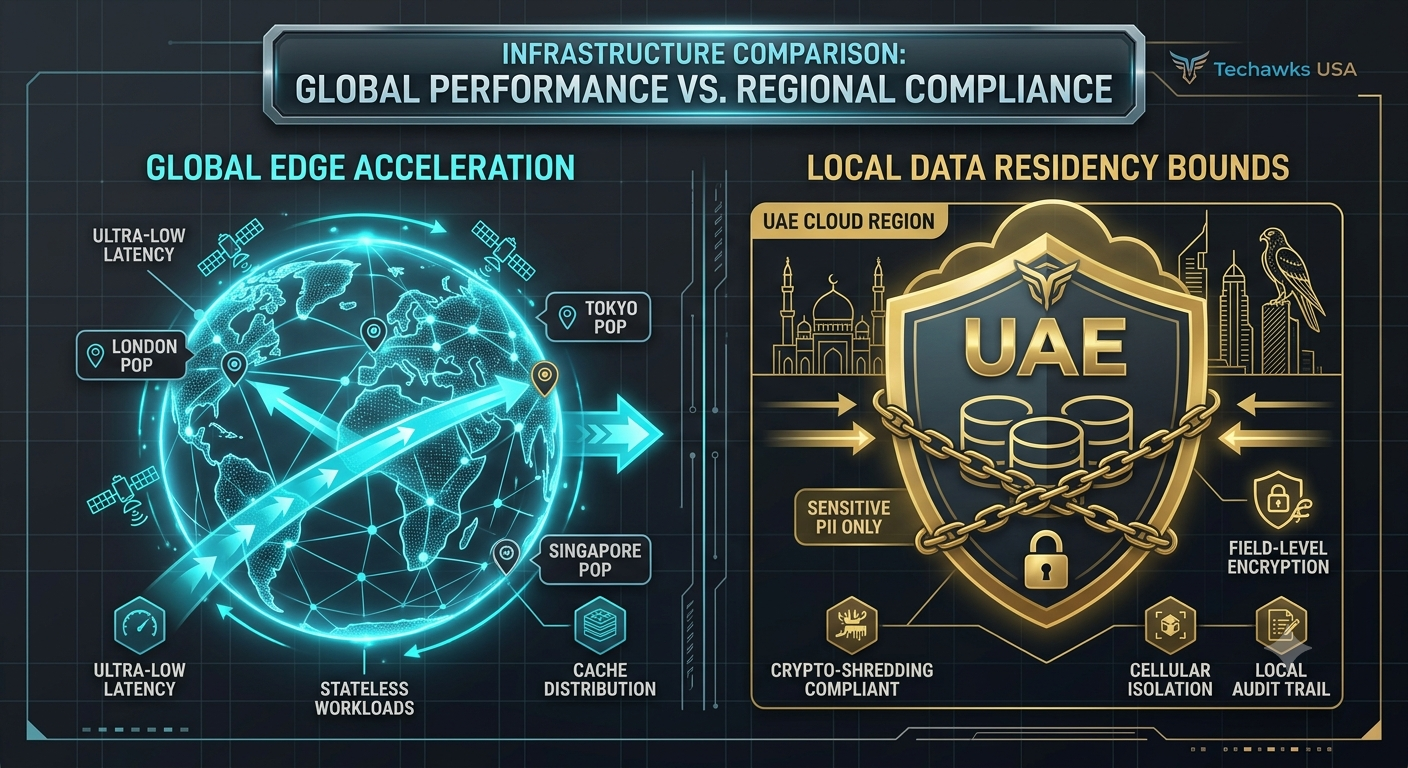
    As the UAE tech ecosystem matures into a global digital hub, engineering leaders face a unique infrastructure dilemma: meeting strict local data residency regulations while maintaining high availability and rapid response times for international users.


    Designing system architecture to satisfy both demands requires moving beyond simple multi-region deployments toward strategic data segregation:


    The Regional Data Pinning Strategy
    Instead of replicating entire databases across global cloud regions, structure your data model to isolate Personally Identifiable Information (PII) and localized records to UAE cloud regions (me-central-1 / me-south-1). Non-sensitive, stateless workloads or globally cached assets can be distributed via global edge networks.


    Decoupled Event Streaming Across Borders
    Use event brokers (like Apache Kafka or AWS EventBridge) configured with strict payload filtering. Ensure events cross-regionally contain only anonymized event IDs or operational metadata, leaving the actual customer payloads securely stored within local data boundaries.


    Managing the Cost of Multi-Region Operational Complexity
    Running active-active multi-region clusters can quickly double or triple your cloud spend. Many UAE scale-ups opt for an Active-Passive (Warm Standby) or Cellular Architecture approach, where each country or region operates as an independent, self-contained cell, minimizing blast radiuses and lowering cross-region networking fees.


    Finding the optimal trade-off between strict local compliance, latency performance, and cloud expenditure is an ongoing challenge for regional CTOs and principal architects.


    Key Takeaways
    Isolate PII to local cloud regions while serving stateless workloads via global edge locations.
    Filter cross-border event streams to ensure no sensitive customer data leaves local jurisdictions.
    Cellular architecture provides strong isolation and compliance bounds without the high cost of active-active cross-region setups.


    CTA (Join Techawks UAE)
    How is your team handling data sovereignty alongside multi-region performance requirements in the Gulf region? Share your technical strategy in the comments below, and Join Techawks UAE to connect with engineering leaders, architects, and CTOs shaping technology in the Middle East.
    Multi-Region Cloud vs. Local Data Sovereignty: How Are UAE Tech Leaders Balancing both? As the UAE tech ecosystem matures into a global digital hub, engineering leaders face a unique infrastructure dilemma: meeting strict local data residency regulations while maintaining high availability and rapid response times for international users. Designing system architecture to satisfy both demands requires moving beyond simple multi-region deployments toward strategic data segregation: The Regional Data Pinning Strategy Instead of replicating entire databases across global cloud regions, structure your data model to isolate Personally Identifiable Information (PII) and localized records to UAE cloud regions (me-central-1 / me-south-1). Non-sensitive, stateless workloads or globally cached assets can be distributed via global edge networks. Decoupled Event Streaming Across Borders Use event brokers (like Apache Kafka or AWS EventBridge) configured with strict payload filtering. Ensure events cross-regionally contain only anonymized event IDs or operational metadata, leaving the actual customer payloads securely stored within local data boundaries. Managing the Cost of Multi-Region Operational Complexity Running active-active multi-region clusters can quickly double or triple your cloud spend. Many UAE scale-ups opt for an Active-Passive (Warm Standby) or Cellular Architecture approach, where each country or region operates as an independent, self-contained cell, minimizing blast radiuses and lowering cross-region networking fees. Finding the optimal trade-off between strict local compliance, latency performance, and cloud expenditure is an ongoing challenge for regional CTOs and principal architects. Key Takeaways Isolate PII to local cloud regions while serving stateless workloads via global edge locations. Filter cross-border event streams to ensure no sensitive customer data leaves local jurisdictions. Cellular architecture provides strong isolation and compliance bounds without the high cost of active-active cross-region setups. CTA (Join Techawks UAE) How is your team handling data sovereignty alongside multi-region performance requirements in the Gulf region? Share your technical strategy in the comments below, and Join Techawks UAE to connect with engineering leaders, architects, and CTOs shaping technology in the Middle East.
    0 Comments 0 Shares 1K Views 0 Reviews
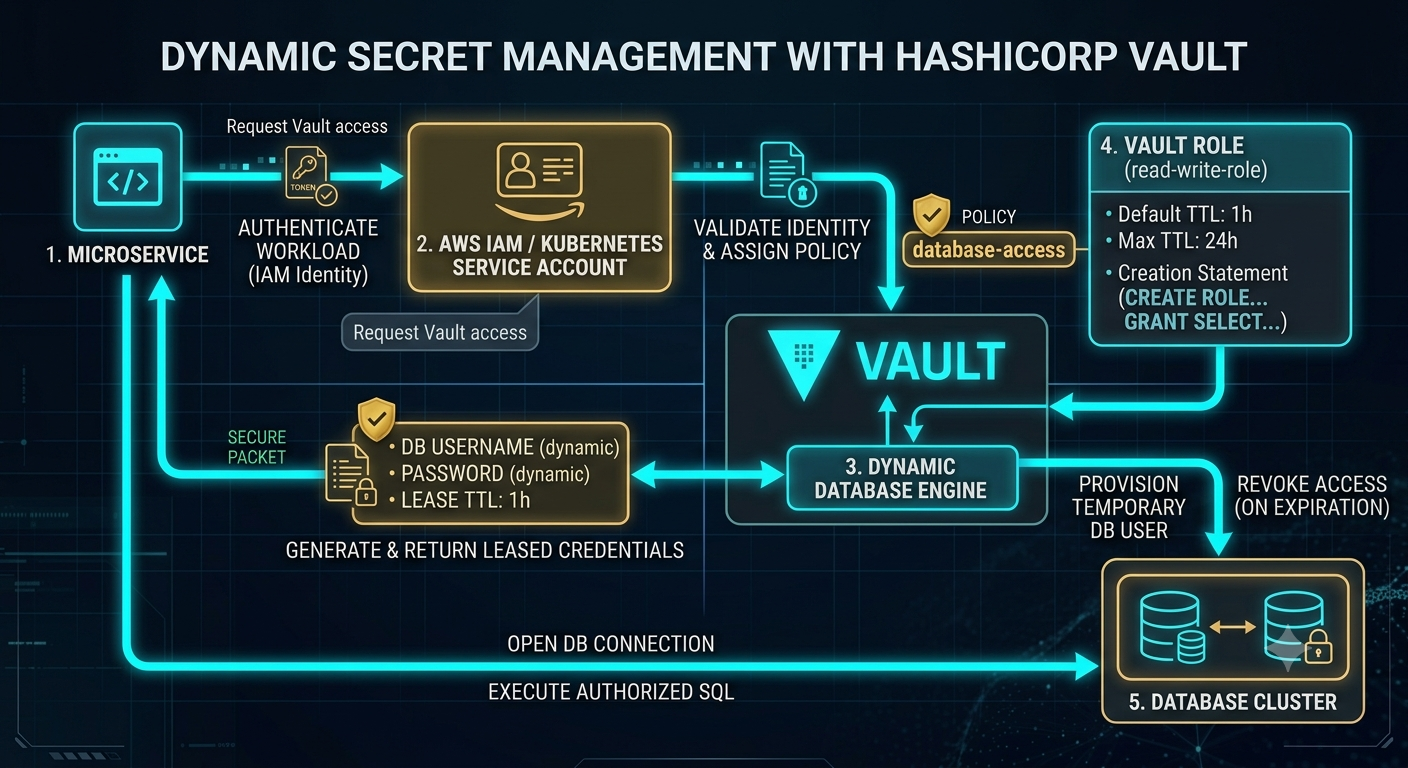
  • Step-by-Step: Implementing Cloud-Agnostic Secret Management with HashiCorp Vault
    As tech companies in the UAE scale across regional cloud infrastructure (AWS, Azure, Google Cloud), managing application secrets, database credentials, and API keys across multiple cloud accounts creates operational friction and security risks.


    Static credentials left in environment variables or configuration files are vulnerable to leakages. Implementing HashiCorp Vault with dynamic secret engines allows applications to request auto-expiring database credentials on demand.


    Here is a 4-step tutorial to implement dynamic secret management in production:


    Step 1: Authenticate Workloads using Cloud IAM Identities
    Instead of static API tokens, configure Vault to authenticate workloads using their native cloud identities (e.g., AWS IAM roles, Azure Managed Identities, or Kubernetes Service Accounts).
    Bash
    # Enable AWS authentication engine in Vault
    vault auth enable aws
    # Map an IAM role to a specific Vault access policy
    vault write auth/aws/role/backend-service \
    auth_type=iam \
    bound_iam_principal_arn=arn:aws:iam::123456789012:role/BackendRole \
    policies=database-access \
    ttl=1h


    Step 2: Enable Dynamic Database Secrets Engine
    Configure Vault to generate ephemeral database credentials rather than retrieving a static password.
    Bash
    # Mount the database secrets engine
    vault secrets enable database
    # Configure connection to primary database
    vault write database/config/production-db \
    plugin_name=postgresql-database-plugin \
    allowed_roles="read-write-role" \
    connection_url="postgresql://{{username}}:{{password}}@db.internal:5432/app" \
    username="vault_admin" \
    password="admin_password"


    Step 3: Define Dynamic Role and Provision Short-Lived Users
    Create a Vault role that automatically provisions temporary SQL users with auto-expiring Lease Time-To-Live (TTL).
    SQL
    -- Vault creates a temporary database user on demand and drops it on expiration
    vault write database/roles/read-write-role \
    db_name=production-db \
    creation_statements="CREATE ROLE \"{{name}}\" WITH LOGIN PASSWORD '{{password}}' VALID UNTIL '{{expiration}}'; \
    GRANT SELECT, INSERT, UPDATE ON ALL TABLES IN SCHEMA public TO \"{{name}}\";" \
    default_ttl="1h" \
    max_ttl="24h"


    Step 4: Fetch and Rotate Secrets Programmatically at Runtime
    Update application workloads to request database credentials via Vault's REST API or SDKs at runtime before opening database connections. Once the TTL expires, Vault automatically revokes access at the database level, eliminating risk from leaked environment variables.


    Key Takeaways
    Ephemeral credentials eliminate static passwords from application configuration files.
    Leveraging native cloud IAM for Vault authentication creates a seamless multi-cloud security identity model.
    Auto-revoking database leases drastically minimizes the blast radius of potential secret exposure.


    CTA (Join Techawks UAE)
    Building resilient, zero-trust infrastructure is key to scaling secure enterprise systems in the Gulf region. Join Techawks UAE today to access technical blueprints, expert-led tutorials, and deep dives with leading software engineers across the region.
    Step-by-Step: Implementing Cloud-Agnostic Secret Management with HashiCorp Vault As tech companies in the UAE scale across regional cloud infrastructure (AWS, Azure, Google Cloud), managing application secrets, database credentials, and API keys across multiple cloud accounts creates operational friction and security risks. Static credentials left in environment variables or configuration files are vulnerable to leakages. Implementing HashiCorp Vault with dynamic secret engines allows applications to request auto-expiring database credentials on demand. Here is a 4-step tutorial to implement dynamic secret management in production: Step 1: Authenticate Workloads using Cloud IAM Identities Instead of static API tokens, configure Vault to authenticate workloads using their native cloud identities (e.g., AWS IAM roles, Azure Managed Identities, or Kubernetes Service Accounts). Bash # Enable AWS authentication engine in Vault vault auth enable aws # Map an IAM role to a specific Vault access policy vault write auth/aws/role/backend-service \ auth_type=iam \ bound_iam_principal_arn=arn:aws:iam::123456789012:role/BackendRole \ policies=database-access \ ttl=1h Step 2: Enable Dynamic Database Secrets Engine Configure Vault to generate ephemeral database credentials rather than retrieving a static password. Bash # Mount the database secrets engine vault secrets enable database # Configure connection to primary database vault write database/config/production-db \ plugin_name=postgresql-database-plugin \ allowed_roles="read-write-role" \ connection_url="postgresql://{{username}}:{{password}}@db.internal:5432/app" \ username="vault_admin" \ password="admin_password" Step 3: Define Dynamic Role and Provision Short-Lived Users Create a Vault role that automatically provisions temporary SQL users with auto-expiring Lease Time-To-Live (TTL). SQL -- Vault creates a temporary database user on demand and drops it on expiration vault write database/roles/read-write-role \ db_name=production-db \ creation_statements="CREATE ROLE \"{{name}}\" WITH LOGIN PASSWORD '{{password}}' VALID UNTIL '{{expiration}}'; \ GRANT SELECT, INSERT, UPDATE ON ALL TABLES IN SCHEMA public TO \"{{name}}\";" \ default_ttl="1h" \ max_ttl="24h" Step 4: Fetch and Rotate Secrets Programmatically at Runtime Update application workloads to request database credentials via Vault's REST API or SDKs at runtime before opening database connections. Once the TTL expires, Vault automatically revokes access at the database level, eliminating risk from leaked environment variables. Key Takeaways Ephemeral credentials eliminate static passwords from application configuration files. Leveraging native cloud IAM for Vault authentication creates a seamless multi-cloud security identity model. Auto-revoking database leases drastically minimizes the blast radius of potential secret exposure. CTA (Join Techawks UAE) Building resilient, zero-trust infrastructure is key to scaling secure enterprise systems in the Gulf region. Join Techawks UAE today to access technical blueprints, expert-led tutorials, and deep dives with leading software engineers across the region.
    0 Comments 0 Shares 1K Views 0 Reviews
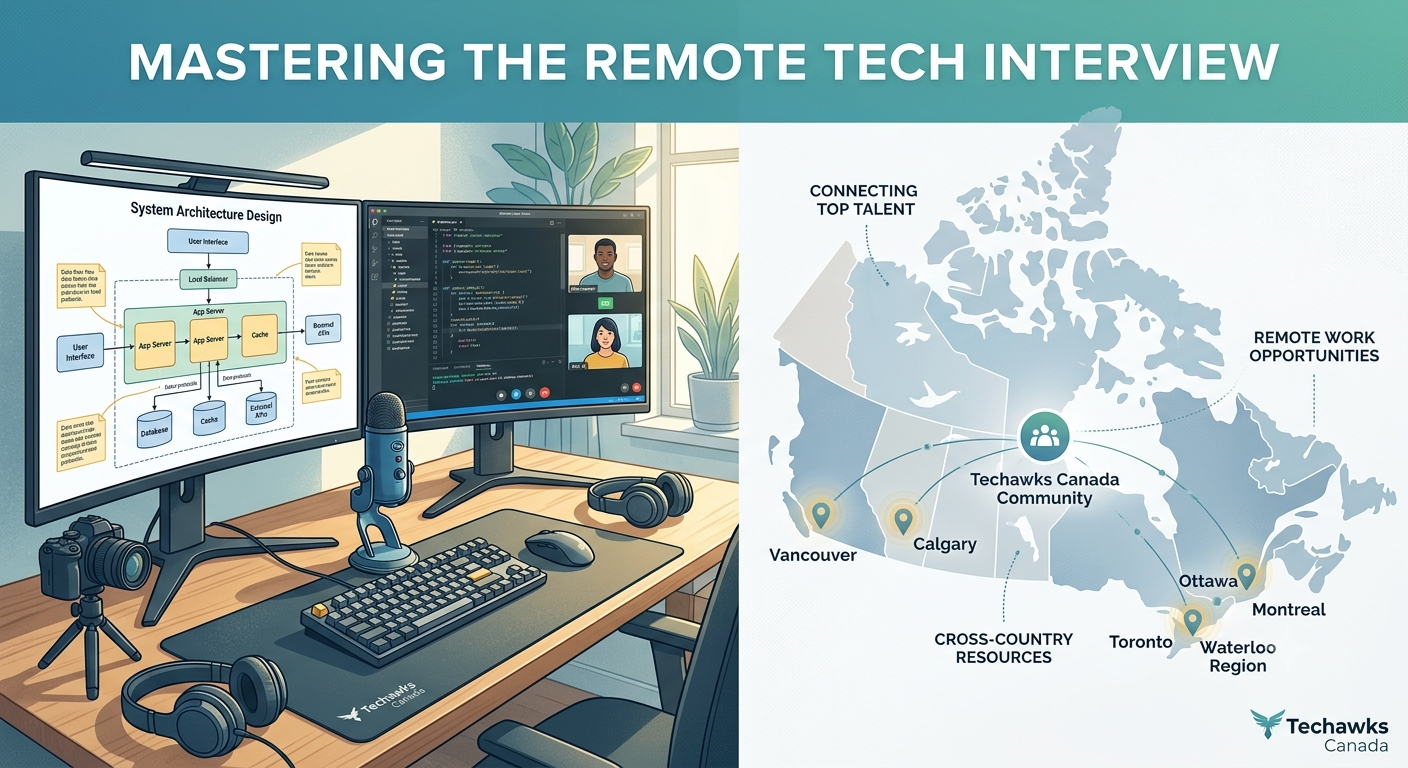
  • How to Master Remote Technical Interviews in the Canadian Tech Market
    Whether you are based in Toronto, Vancouver, Montreal, or working remotely from anywhere across Canada, technical hiring processes have largely shifted to virtual-first formats.
    Successfully landing your next role means knowing how to communicate complex technical concepts through a screen just as clearly as you write code.Here are three core strategies to elevate your technical interview performance:


    1. Talk Through Your Problem-Solving Strategy Out Loud
    In a remote interview, silence can create a disconnect. Interviewers are assessing how you think, not just your final solution.
    Break down the problem statement before writing a single line of code.State your assumptions clearly and clarify edge cases up front.
    Walk the interviewer through your thought process as you evaluate trade-offs (e.g., time complexity vs. space complexity).


    2. Contextualize Your Experience for the Canadian Ecosystem
    Canadian tech companies—ranging from early-stage startups to major enterprise hubs—prioritize scalable, cross-functional collaboration. When discussing past projects:
    Emphasize practical business impact alongside technical achievements (e.g., "Optimized API latency by 35%, which improved end-user checkout conversion")
    Highlight experience with modern cloud tooling (AWS, GCP, or Azure) and agile workflows tailored to remote environments.


    3. Treat the System Design Phase like an Interactive Architecture Review
    System design questions are designed to test real-world trade-offs.
    Use virtual whiteboarding tools efficiently. Sketch out clear components (databases, load balancers, microservices).
    Ask probing questions about scale, expected traffic, and constraints before proposing a high-level architecture.
    Address security, data privacy, and maintainability early in the discussion.


    Key Takeaways
    Communication over execution: Clearly explaining your logic is just as vital as writing functional code.Business-driven metrics: Frame your technical contributions around measurable outcomes and business value.Collaborative design: Treat system design discussions as a pair-programming session with a peer rather than an exam.


    CTA
    Looking to connect with top tech talent, industry mentors, and developers across the country? [Join Techawks Canada] today to access exclusive resources, community events, and technical discussions.
    How to Master Remote Technical Interviews in the Canadian Tech Market Whether you are based in Toronto, Vancouver, Montreal, or working remotely from anywhere across Canada, technical hiring processes have largely shifted to virtual-first formats. Successfully landing your next role means knowing how to communicate complex technical concepts through a screen just as clearly as you write code.Here are three core strategies to elevate your technical interview performance: 1. Talk Through Your Problem-Solving Strategy Out Loud In a remote interview, silence can create a disconnect. Interviewers are assessing how you think, not just your final solution. Break down the problem statement before writing a single line of code.State your assumptions clearly and clarify edge cases up front. Walk the interviewer through your thought process as you evaluate trade-offs (e.g., time complexity vs. space complexity). 2. Contextualize Your Experience for the Canadian Ecosystem Canadian tech companies—ranging from early-stage startups to major enterprise hubs—prioritize scalable, cross-functional collaboration. When discussing past projects: Emphasize practical business impact alongside technical achievements (e.g., "Optimized API latency by 35%, which improved end-user checkout conversion") Highlight experience with modern cloud tooling (AWS, GCP, or Azure) and agile workflows tailored to remote environments. 3. Treat the System Design Phase like an Interactive Architecture Review System design questions are designed to test real-world trade-offs. Use virtual whiteboarding tools efficiently. Sketch out clear components (databases, load balancers, microservices). Ask probing questions about scale, expected traffic, and constraints before proposing a high-level architecture. Address security, data privacy, and maintainability early in the discussion. Key Takeaways Communication over execution: Clearly explaining your logic is just as vital as writing functional code.Business-driven metrics: Frame your technical contributions around measurable outcomes and business value.Collaborative design: Treat system design discussions as a pair-programming session with a peer rather than an exam. CTA Looking to connect with top tech talent, industry mentors, and developers across the country? [Join Techawks Canada] today to access exclusive resources, community events, and technical discussions.
    0 Comments 0 Shares 2K Views 0 Reviews
  • Build vs. Buy in the Canadian Tech Ecosystem: How Are You Balancing Speed and Technical Debt?
    Whether your team is operating out of major hubs like Toronto and Vancouver or building remotely across Alberta and the Maritimes, scaling technical infrastructure requires a clear framework for the "Build vs. Buy" trade-off.
    Making the wrong decision can lead to bloated engineering budgets, vendor lock-in, or unsustainable technical debt. Here is a practical 3-step decision framework to help evaluate your architecture roadmap:


    1. Identify Your Core Differentiator
    Build if the technology directly creates unique intellectual property or provides a competitive moat in your specific market segment.
    Buy if the feature is a commodity service (e.g., authentication, transactional email, payment processing) where building from scratch adds no distinct business value.


    2. Factor in the True Total Cost of Ownership (TCO)
    Initial Development vs. Long-Term Maintenance: Building in-house isn't just about the initial sprint—it includes ongoing bug fixes, security patches, compliance updates, and developer onboarding.
    Opportunity Cost: Ask what critical core features your engineering team isn't building while they dedicate engineering cycles to maintaining internal tools.


    3. Evaluate Vendor Lock-In & Data Residency Constraints
    For Canadian tech companies handling user data, compliance with Canadian privacy regulations (PIPEDA/ provincial privacy laws) is mandatory.
    Ensure third-party vendors support localized data residency options or open APIs that allow seamless migration if your requirements shift down the road.


    Let's Discuss:
    Where is your engineering team currently landing on the Build vs. Buy spectrum for non-core features? Have you recently migrated from an in-house build to a SaaS vendor (or vice-versa)?
    Share your experiences, trade-offs, and lessons learned in the comments below! 👇


    Key Takeaways
    Protect core focus: Only spend engineering cycles on software that directly drives your primary product differentiator.Calculate long-term TCO: Account for maintenance, technical debt, and opportunity costs before committing to an internal build.Audit compliance early: Ensure third-party tools align with Canadian data privacy standards (PIPEDA).


    CTA
    (Join Techawks Canada)Want to join peer discussions on architecture, engineering leadership, and local tech growth? [Join Techawks Canada] today to exchange insights with developers, founders, and tech leaders across the country.
    Build vs. Buy in the Canadian Tech Ecosystem: How Are You Balancing Speed and Technical Debt? Whether your team is operating out of major hubs like Toronto and Vancouver or building remotely across Alberta and the Maritimes, scaling technical infrastructure requires a clear framework for the "Build vs. Buy" trade-off. Making the wrong decision can lead to bloated engineering budgets, vendor lock-in, or unsustainable technical debt. Here is a practical 3-step decision framework to help evaluate your architecture roadmap: 1. Identify Your Core Differentiator Build if the technology directly creates unique intellectual property or provides a competitive moat in your specific market segment. Buy if the feature is a commodity service (e.g., authentication, transactional email, payment processing) where building from scratch adds no distinct business value. 2. Factor in the True Total Cost of Ownership (TCO) Initial Development vs. Long-Term Maintenance: Building in-house isn't just about the initial sprint—it includes ongoing bug fixes, security patches, compliance updates, and developer onboarding. Opportunity Cost: Ask what critical core features your engineering team isn't building while they dedicate engineering cycles to maintaining internal tools. 3. Evaluate Vendor Lock-In & Data Residency Constraints For Canadian tech companies handling user data, compliance with Canadian privacy regulations (PIPEDA/ provincial privacy laws) is mandatory. Ensure third-party vendors support localized data residency options or open APIs that allow seamless migration if your requirements shift down the road. Let's Discuss: Where is your engineering team currently landing on the Build vs. Buy spectrum for non-core features? Have you recently migrated from an in-house build to a SaaS vendor (or vice-versa)? Share your experiences, trade-offs, and lessons learned in the comments below! 👇 Key Takeaways Protect core focus: Only spend engineering cycles on software that directly drives your primary product differentiator.Calculate long-term TCO: Account for maintenance, technical debt, and opportunity costs before committing to an internal build.Audit compliance early: Ensure third-party tools align with Canadian data privacy standards (PIPEDA). CTA (Join Techawks Canada)Want to join peer discussions on architecture, engineering leadership, and local tech growth? [Join Techawks Canada] today to exchange insights with developers, founders, and tech leaders across the country.
    0 Comments 0 Shares 1K Views 0 Reviews
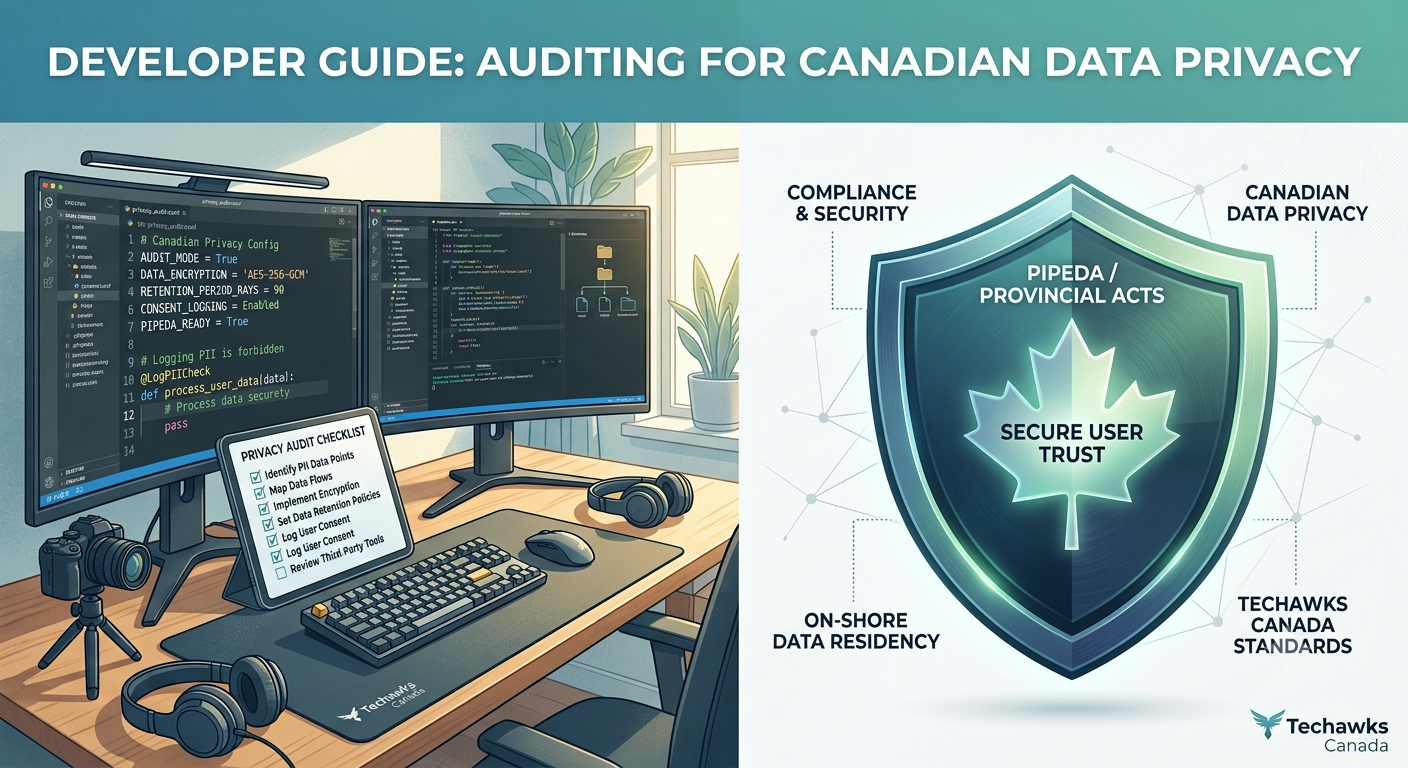
  • Step-by-Step: How to Audit Your Web Application for PIPEDA Compliance
    Under Canada’s Personal Information Protection and Electronic Documents Act (PIPEDA), organizations must follow strict guidelines regarding how user data is collected, stored, and processed. Navigating compliance can feel overwhelming, but breaking it down into actionable engineering steps makes it manageable.


    Follow this 4-step tutorial to run a privacy audit on your tech stack:
    Step 1: Map Your Data Pipeline
    Before you can secure user data, you need to know exactly where it lives and flows.
    Action: Trace every user data entry point (forms, API endpoints, third-party analytics) to its final destination (databases, cache layers, external services).
    Code Audit: Check your logging systems. Ensure Sensitive Personal Information (SPI)—such as passwords, payment details, or full addresses—is never written to plain-text application logs.


    Step 2: Implement Explicit, Granular Consent
    PIPEDA mandates that users understand and consent to the collection of their data.
    Action: Decouple your terms of service from specific data collection activities.
    UI/UX Checklist: Replace pre-checked opt-in boxes with explicit opt-in toggles for non-essential data tracking (e.g., marketing analytics or personalized recommendations).


    Step 3: Enforce Minimal Retention & Auto-Purging
    You should only retain personal data for as long as necessary to fulfill the purpose for which it was collected.
    Action: Define automated retention policies in your database tier.
    Implementation: Set up scheduled batch jobs or database triggers to anonymize or soft-delete user records that have exceeded your retention window or upon user deletion requests.


    Step 4: Audit Third-Party Integrations
    Your app's compliance is only as strong as its third-party SDKs and APIs.
    Action: Review every external library or SaaS API processing Canadian user data.
    Checklist: Verify that your cloud providers support localized data storage options (e.g., AWS ca-central-1 or GCP northamerica-northeast1) to ensure data residency alignment.


    Key Takeaways
    Data Transparency: Always know where user data flows and strip SPI from application logs.
    Explicit Consent: Build clear, opt-in UI patterns rather than relying on silent defaults.
    Automated Cleanup: Script data retention and deletion policies directly into your database workflows.


    CTA (Join Techawks Canada)
    Want to level up your engineering practices with top developers and tech leaders across the country? [Join Techawks Canada] today to access exclusive tutorials, technical discussions, and industry networking events.
    Step-by-Step: How to Audit Your Web Application for PIPEDA Compliance Under Canada’s Personal Information Protection and Electronic Documents Act (PIPEDA), organizations must follow strict guidelines regarding how user data is collected, stored, and processed. Navigating compliance can feel overwhelming, but breaking it down into actionable engineering steps makes it manageable. Follow this 4-step tutorial to run a privacy audit on your tech stack: Step 1: Map Your Data Pipeline Before you can secure user data, you need to know exactly where it lives and flows. Action: Trace every user data entry point (forms, API endpoints, third-party analytics) to its final destination (databases, cache layers, external services). Code Audit: Check your logging systems. Ensure Sensitive Personal Information (SPI)—such as passwords, payment details, or full addresses—is never written to plain-text application logs. Step 2: Implement Explicit, Granular Consent PIPEDA mandates that users understand and consent to the collection of their data. Action: Decouple your terms of service from specific data collection activities. UI/UX Checklist: Replace pre-checked opt-in boxes with explicit opt-in toggles for non-essential data tracking (e.g., marketing analytics or personalized recommendations). Step 3: Enforce Minimal Retention & Auto-Purging You should only retain personal data for as long as necessary to fulfill the purpose for which it was collected. Action: Define automated retention policies in your database tier. Implementation: Set up scheduled batch jobs or database triggers to anonymize or soft-delete user records that have exceeded your retention window or upon user deletion requests. Step 4: Audit Third-Party Integrations Your app's compliance is only as strong as its third-party SDKs and APIs. Action: Review every external library or SaaS API processing Canadian user data. Checklist: Verify that your cloud providers support localized data storage options (e.g., AWS ca-central-1 or GCP northamerica-northeast1) to ensure data residency alignment. Key Takeaways Data Transparency: Always know where user data flows and strip SPI from application logs. Explicit Consent: Build clear, opt-in UI patterns rather than relying on silent defaults. Automated Cleanup: Script data retention and deletion policies directly into your database workflows. CTA (Join Techawks Canada) Want to level up your engineering practices with top developers and tech leaders across the country? [Join Techawks Canada] today to access exclusive tutorials, technical discussions, and industry networking events.
    0 Comments 0 Shares 1K Views 0 Reviews