


• The Code Review Checklist: 10 Things to Audit Before You Approve That PR


    Effective code reviews balance strict quality standards with practical velocity. You aren't just checking if the code works—you are ensuring it is readable, performant, and easy to maintain long after it's merged.
    Bookmark this checklist for your next peer code review:


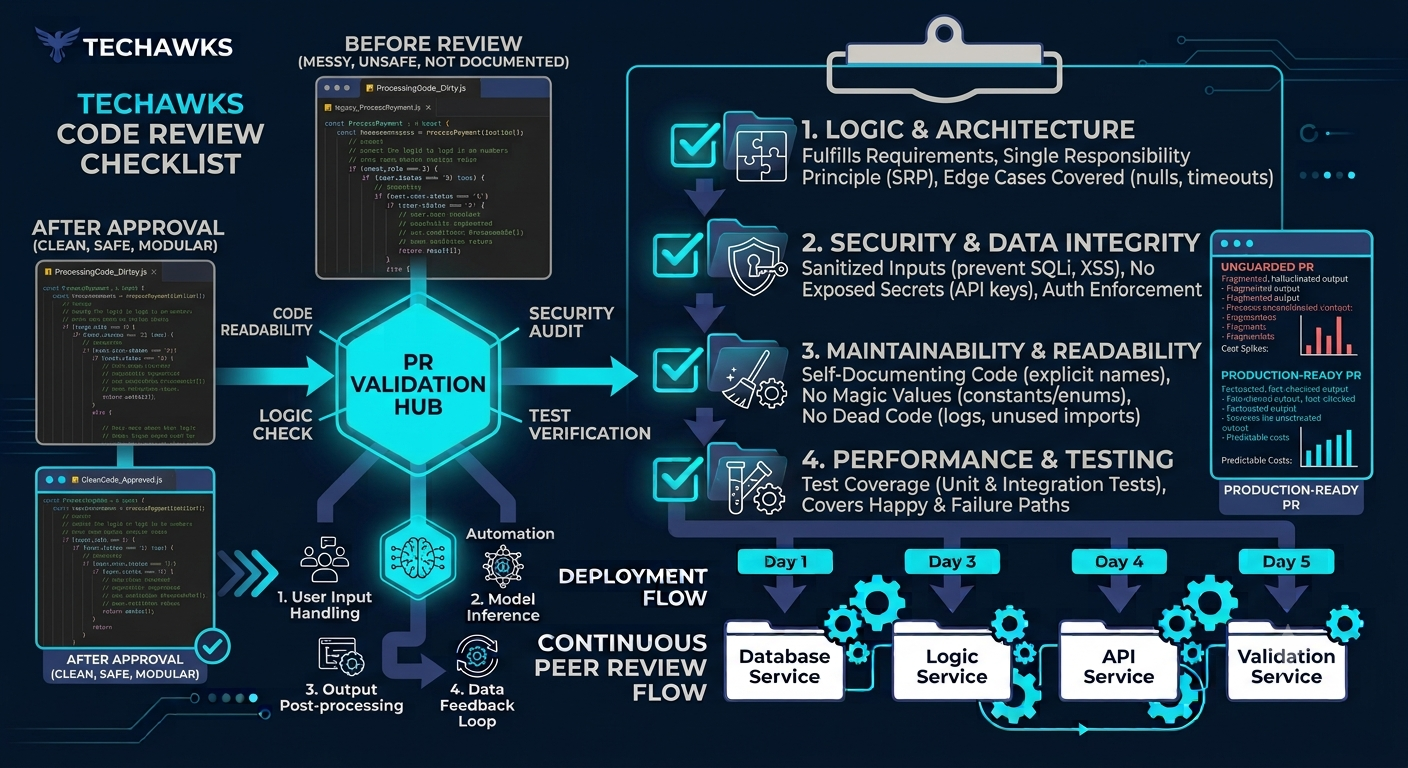
    🧩 1. Logic & Architecture
    Fulfills Requirements: Does the implementation directly address the task goals without adding scope creep or unnecessary features?


    Single Responsibility: Are functions and classes small, focused, and handling only one clear task?


    Edge Cases Covered: Does the logic handle missing parameters, empty arrays, unexpected null values, or network timeouts gracefully?


    🛡️ 2. Security & Data Integrity
    Sanitized Inputs: Are all user inputs escaped or validated to prevent SQL injection, XSS, or remote code execution?
    No Exposed Secrets: Are API keys, passwords, or sensitive environment tokens completely absent from the code and commit history?
    Auth Enforcement: Do newly added routes or endpoints enforce correct authentication and authorization checks?


    🧹 3. Maintainability & Readability
    Self-Documenting Code: Are variable and function names explicit enough that they explain their purpose without requiring inline comments?
    No Magic Values: Are hardcoded strings and status numbers refactored into named constants or configuration enums?
    No Dead Code: Is commented-out code, unused import statements, and debugging console.log/print statements removed?


    ⚡ 4. Performance & Testing
    Test Coverage: Are unit or integration tests included that cover both the happy path and key failure scenarios?


    Key Takeaways
    Look Beyond Functionality: Ensure code is secure, scalable, and readable—not just working.
    Protect the Codebase: Catch security risks like unsanitized inputs and leaked secrets during review.
    Keep It Clean: Enforce clear naming conventions and eliminate dead code to keep technical debt low.
    Verify Tests: A PR isn't complete until relevant tests cover new logic and potential edge cases.


    CTA
    Want to level up your engineering standards? Join thousands of developers, software architects, and coders sharing code review habits, refactoring guides, and language-specific patterns. Join Developers & Coding today!
    The Code Review Checklist: 10 Things to Audit Before You Approve That PR Effective code reviews balance strict quality standards with practical velocity. You aren't just checking if the code works—you are ensuring it is readable, performant, and easy to maintain long after it's merged. Bookmark this checklist for your next peer code review: 🧩 1. Logic & Architecture Fulfills Requirements: Does the implementation directly address the task goals without adding scope creep or unnecessary features? Single Responsibility: Are functions and classes small, focused, and handling only one clear task? Edge Cases Covered: Does the logic handle missing parameters, empty arrays, unexpected null values, or network timeouts gracefully? 🛡️ 2. Security & Data Integrity Sanitized Inputs: Are all user inputs escaped or validated to prevent SQL injection, XSS, or remote code execution? No Exposed Secrets: Are API keys, passwords, or sensitive environment tokens completely absent from the code and commit history? Auth Enforcement: Do newly added routes or endpoints enforce correct authentication and authorization checks? 🧹 3. Maintainability & Readability Self-Documenting Code: Are variable and function names explicit enough that they explain their purpose without requiring inline comments? No Magic Values: Are hardcoded strings and status numbers refactored into named constants or configuration enums? No Dead Code: Is commented-out code, unused import statements, and debugging console.log/print statements removed? ⚡ 4. Performance & Testing Test Coverage: Are unit or integration tests included that cover both the happy path and key failure scenarios? Key Takeaways Look Beyond Functionality: Ensure code is secure, scalable, and readable—not just working. Protect the Codebase: Catch security risks like unsanitized inputs and leaked secrets during review. Keep It Clean: Enforce clear naming conventions and eliminate dead code to keep technical debt low. Verify Tests: A PR isn't complete until relevant tests cover new logic and potential edge cases. CTA Want to level up your engineering standards? Join thousands of developers, software architects, and coders sharing code review habits, refactoring guides, and language-specific patterns. Join Developers & Coding today!
    0 Commentarii 0 Distribuiri 48 Views 0 previzualizare
  • The Production-Ready Deployment Checklist: 10 Essentials Before You Push to Main


    Deploying software shouldn't feel like a high-stakes gamble. Whether you are shipping a minor patch or a core infrastructure update, taking a systematic approach prevents fires before they start.
    Bookmark this checklist for your team's next pull request review:


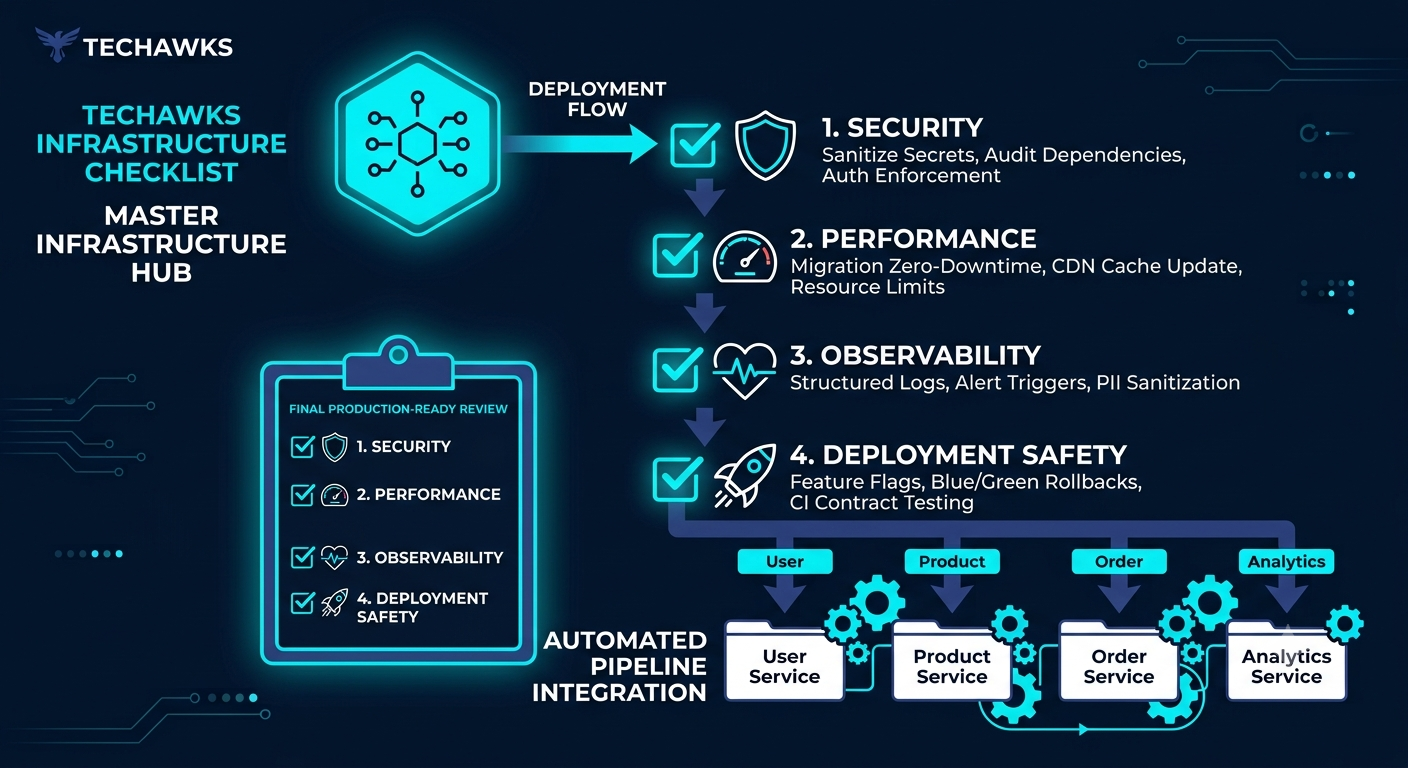
    🔒 1. Security & Compliance
    Secrets Sanitized: Confirm no API keys, private credentials, or environment variables are hardcoded in the repository.
    Dependency Audit: Run npm audit, pip-audit, or your tool of choice to catch known vulnerable packages before going live.
    Auth Check: Verify that all new endpoints enforce proper authentication and role-based access control (RBAC).


    ⚡ 2. Performance & Reliability
    Database Migration Plan: Test database migrations against a staging environment with realistic data volumes; ensure a zero-downtime rollback strategy exists.
    Caching Layer Updated: Invalidate or update relevant Redis/CDN cache keys to avoid serving stale or mismatched data post-deploy.
    Resource Limits: Confirm container CPU/Memory limits and auto-scaling rules are adjusted for expected load changes.


    📊 3. Observability & Monitoring
    Structured Logging: Ensure error logs include necessary context (trace IDs, user IDs, request paths) without leaking sensitive PII data.
    Alert Triggers: Set up or verify alerting thresholds (CPU spikes, 5xx error rate spikes, latency changes) in your monitoring platform.
    🔄 4. Deployment Safety
    Feature Flags: Wrap major new functionality in feature flags so you can toggle features instantly without requiring a re-deploy.
    Rollback Strategy verified: Ensure the CI/CD pipeline can perform an automated blue/green or canary rollback in under two minutes if health checks fail.


    Key Takeaways
    Shift Security Left: Audit dependencies and secrets before code ever hits the staging branch.
    Plan for Failure: Always have a zero-downtime database migration plan and an automated rollback strategy ready.
    Observe Everything: Contextual, structured logging makes post-deployment debugging painless.
    Decouple Release from Deploy: Use feature flags to safely control feature availability in production.


    CTA
    Want to level up your engineering workflow? Join thousands of developers, architects, and tech enthusiasts sharing actionable frameworks and industry best practices. Join the Techawks General Community today!
    The Production-Ready Deployment Checklist: 10 Essentials Before You Push to Main Deploying software shouldn't feel like a high-stakes gamble. Whether you are shipping a minor patch or a core infrastructure update, taking a systematic approach prevents fires before they start. Bookmark this checklist for your team's next pull request review: 🔒 1. Security & Compliance Secrets Sanitized: Confirm no API keys, private credentials, or environment variables are hardcoded in the repository. Dependency Audit: Run npm audit, pip-audit, or your tool of choice to catch known vulnerable packages before going live. Auth Check: Verify that all new endpoints enforce proper authentication and role-based access control (RBAC). ⚡ 2. Performance & Reliability Database Migration Plan: Test database migrations against a staging environment with realistic data volumes; ensure a zero-downtime rollback strategy exists. Caching Layer Updated: Invalidate or update relevant Redis/CDN cache keys to avoid serving stale or mismatched data post-deploy. Resource Limits: Confirm container CPU/Memory limits and auto-scaling rules are adjusted for expected load changes. 📊 3. Observability & Monitoring Structured Logging: Ensure error logs include necessary context (trace IDs, user IDs, request paths) without leaking sensitive PII data. Alert Triggers: Set up or verify alerting thresholds (CPU spikes, 5xx error rate spikes, latency changes) in your monitoring platform. 🔄 4. Deployment Safety Feature Flags: Wrap major new functionality in feature flags so you can toggle features instantly without requiring a re-deploy. Rollback Strategy verified: Ensure the CI/CD pipeline can perform an automated blue/green or canary rollback in under two minutes if health checks fail. Key Takeaways Shift Security Left: Audit dependencies and secrets before code ever hits the staging branch. Plan for Failure: Always have a zero-downtime database migration plan and an automated rollback strategy ready. Observe Everything: Contextual, structured logging makes post-deployment debugging painless. Decouple Release from Deploy: Use feature flags to safely control feature availability in production. CTA Want to level up your engineering workflow? Join thousands of developers, architects, and tech enthusiasts sharing actionable frameworks and industry best practices. Join the Techawks General Community today!
    0 Commentarii 0 Distribuiri 36 Views 0 previzualizare
  • Why your multithreaded code scales backwards: The silent killer called False Sharing.


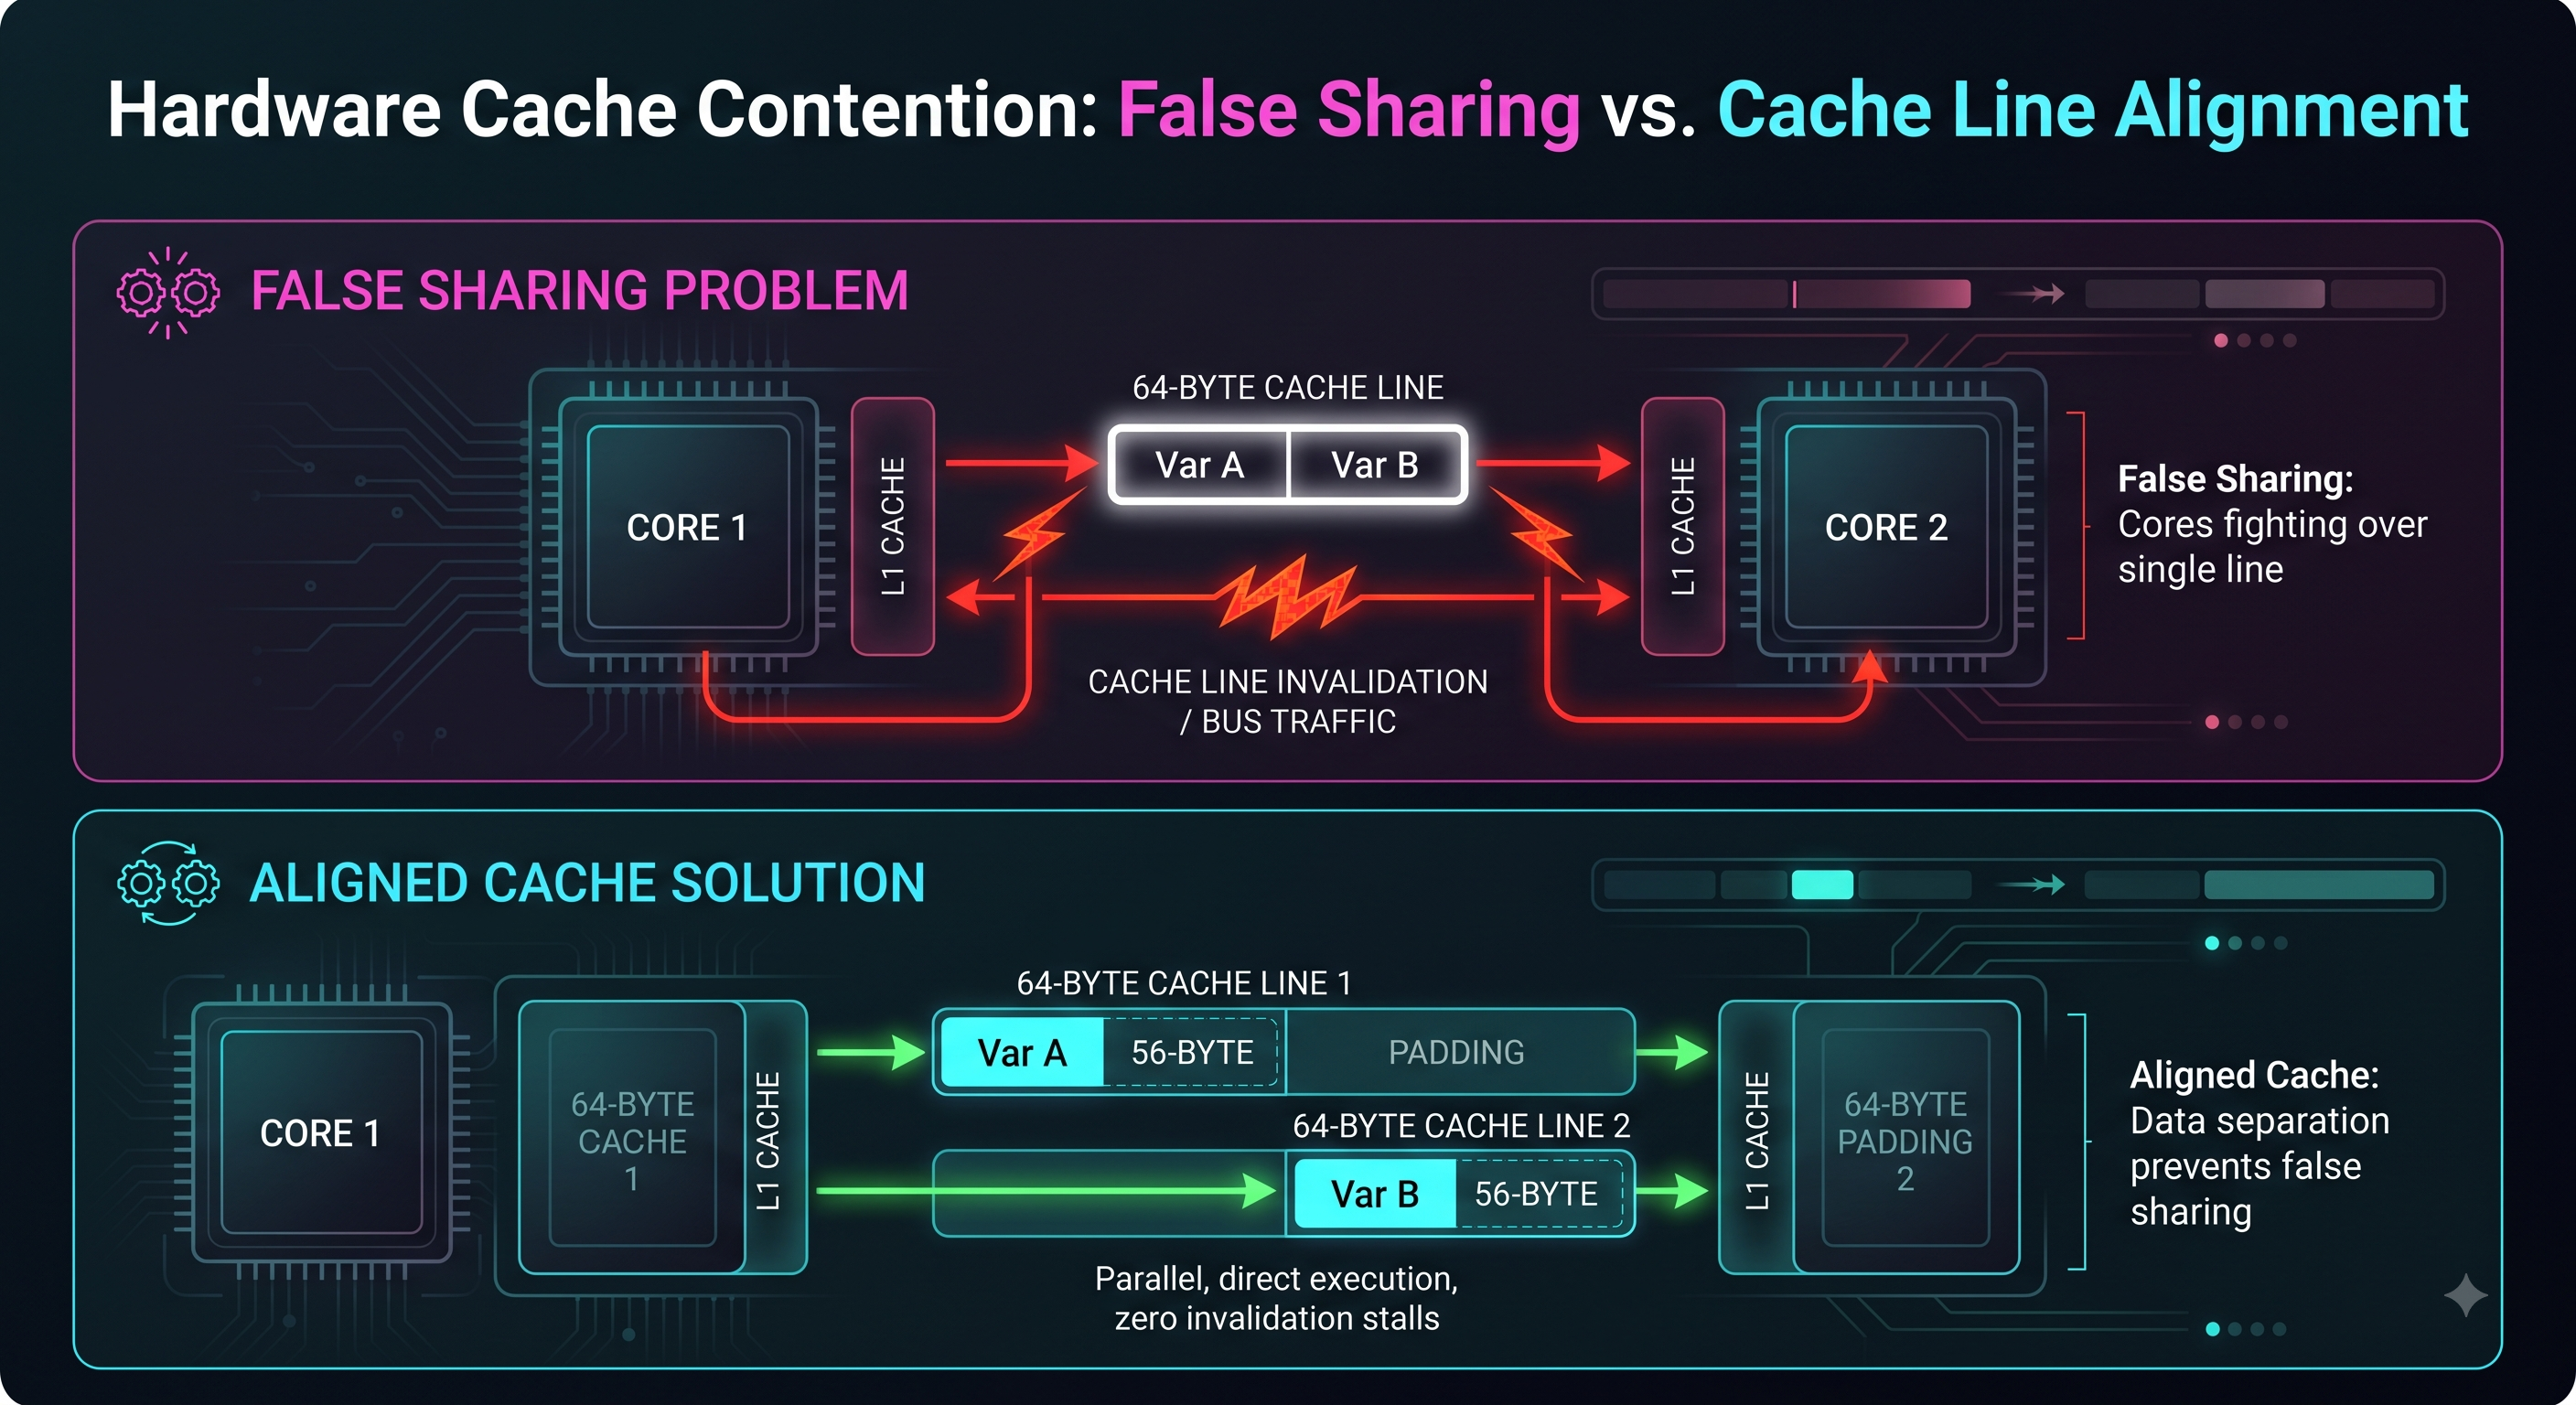
    Modern CPUs do not fetch memory byte-by-byte; they transfer data between RAM and CPU caches in fixed-size blocks called Cache Lines (typically 64 bytes on x86/ARM64).


    When two separate threads concurrently modify independent variables that happen to sit inside the exact same 64-byte cache line, the hardware cache-coherence protocol (such as MESI/MOESI) forces the cache line to bounce between CPU cores via invalidation traffic.


    C++
    // ❌ THE ANTI-PATTERN: Both counters fit within the same 64-byte cache line
    struct Metrics {
    uint64_t thread_1_counter; // 8 bytes (Offset: 0)
    uint64_t thread_2_counter; // 8 bytes (Offset: 8)
    };
    Even though Thread 1 only writes to thread_1_counter and Thread 2 only writes to thread_2_counter, every write by Core A invalidates the entire cache line in Core B's L1/L2 cache, triggering an expensive cache reload and pipeline stall.


    How to Fix It in Production Code:


    1. Explicit Alignment (alignas in C++ / #[repr(align)] in Rust):
    Pad independent data across discrete cache-line boundaries so separate threads never mutate the same line.


    C++
    // ✅ OPTIMIZED: Enforce 64-byte hardware cache line boundary
    #include <new> // std::hardware_destructive_interference_size


    struct alignas(64) WorkerSlot {
    uint64_t counter{0};
    };
    struct AlignedMetrics {
    WorkerSlot thread_1; // Aligned to 64 bytes
    WorkerSlot thread_2; // Aligned to next 64 bytes
    };


    2. Prefer Thread-Local Aggregation:
    Accumulate values in a thread-local variable (thread_local in C++, ThreadLocal in Java/Go) or registers during execution, then perform a single reduced write to the global state when the thread finishes.
    C++
    // ✅ ZERO CONTENTION: Accumulate locally in register/stack, write once
    void worker(std::atomic<uint64_t>& global_sink, size_t iterations) {
    uint64_t local_accumulator = 0;
    for (size_t i = 0; i < iterations; ++i) {
    local_accumulator += compute_work();
    }
    global_sink.fetch_add(local_accumulator, std::memory_order_relaxed);
    }
    The Architectural Rule:
    Keep read-mostly data packed densely together to maximize spatial cache locality.
    Explicitly separate and align high-frequency writable data assigned to different CPU cores.


    Discussion Question
    Have you encountered false sharing or cache contention in your profiling sessions? What tools do you use to catch it (perf c2c, VTune, or custom telemetry)? Share your debugging experiences below.


    CTA
    Write cleaner, faster, hardware-aware code with Techawks.
    Join our Developers & Coding community to dive into memory models, low-level optimization patterns, and architecture reviews with developers worldwide: [Join Techawks Developers Community]
    Why your multithreaded code scales backwards: The silent killer called False Sharing. Modern CPUs do not fetch memory byte-by-byte; they transfer data between RAM and CPU caches in fixed-size blocks called Cache Lines (typically 64 bytes on x86/ARM64). When two separate threads concurrently modify independent variables that happen to sit inside the exact same 64-byte cache line, the hardware cache-coherence protocol (such as MESI/MOESI) forces the cache line to bounce between CPU cores via invalidation traffic. C++ // ❌ THE ANTI-PATTERN: Both counters fit within the same 64-byte cache line struct Metrics { uint64_t thread_1_counter; // 8 bytes (Offset: 0) uint64_t thread_2_counter; // 8 bytes (Offset: 8) }; Even though Thread 1 only writes to thread_1_counter and Thread 2 only writes to thread_2_counter, every write by Core A invalidates the entire cache line in Core B's L1/L2 cache, triggering an expensive cache reload and pipeline stall. How to Fix It in Production Code: 1. Explicit Alignment (alignas in C++ / #[repr(align)] in Rust): Pad independent data across discrete cache-line boundaries so separate threads never mutate the same line. C++ // ✅ OPTIMIZED: Enforce 64-byte hardware cache line boundary #include <new> // std::hardware_destructive_interference_size struct alignas(64) WorkerSlot { uint64_t counter{0}; }; struct AlignedMetrics { WorkerSlot thread_1; // Aligned to 64 bytes WorkerSlot thread_2; // Aligned to next 64 bytes }; 2. Prefer Thread-Local Aggregation: Accumulate values in a thread-local variable (thread_local in C++, ThreadLocal in Java/Go) or registers during execution, then perform a single reduced write to the global state when the thread finishes. C++ // ✅ ZERO CONTENTION: Accumulate locally in register/stack, write once void worker(std::atomic<uint64_t>& global_sink, size_t iterations) { uint64_t local_accumulator = 0; for (size_t i = 0; i < iterations; ++i) { local_accumulator += compute_work(); } global_sink.fetch_add(local_accumulator, std::memory_order_relaxed); } The Architectural Rule: Keep read-mostly data packed densely together to maximize spatial cache locality. Explicitly separate and align high-frequency writable data assigned to different CPU cores. Discussion Question Have you encountered false sharing or cache contention in your profiling sessions? What tools do you use to catch it (perf c2c, VTune, or custom telemetry)? Share your debugging experiences below. CTA Write cleaner, faster, hardware-aware code with Techawks. Join our Developers & Coding community to dive into memory models, low-level optimization patterns, and architecture reviews with developers worldwide: [Join Techawks Developers Community]
    0 Commentarii 0 Distribuiri 42 Views 0 previzualizare
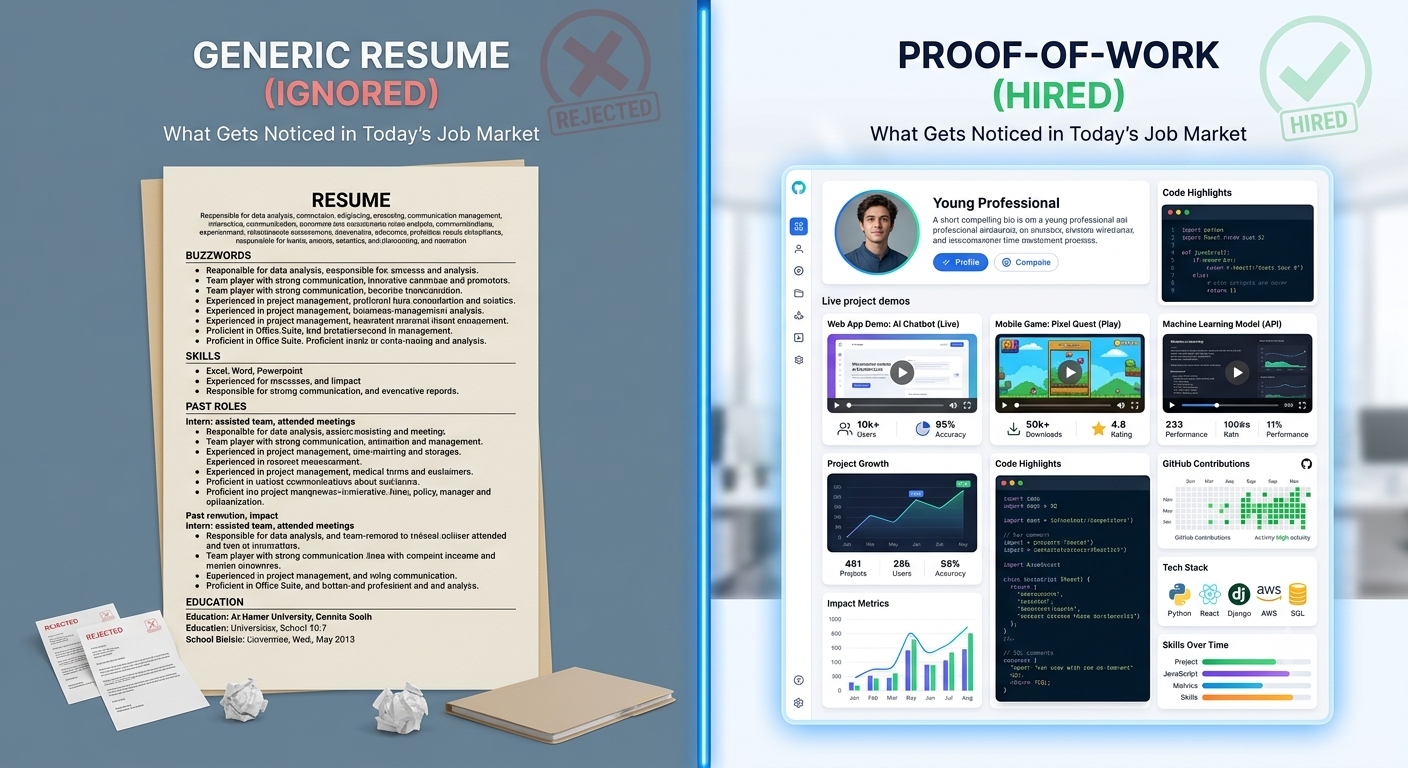
  • The Ultimate Tech Student's Blueprint: How to Build Projects That Actually Get You Hired


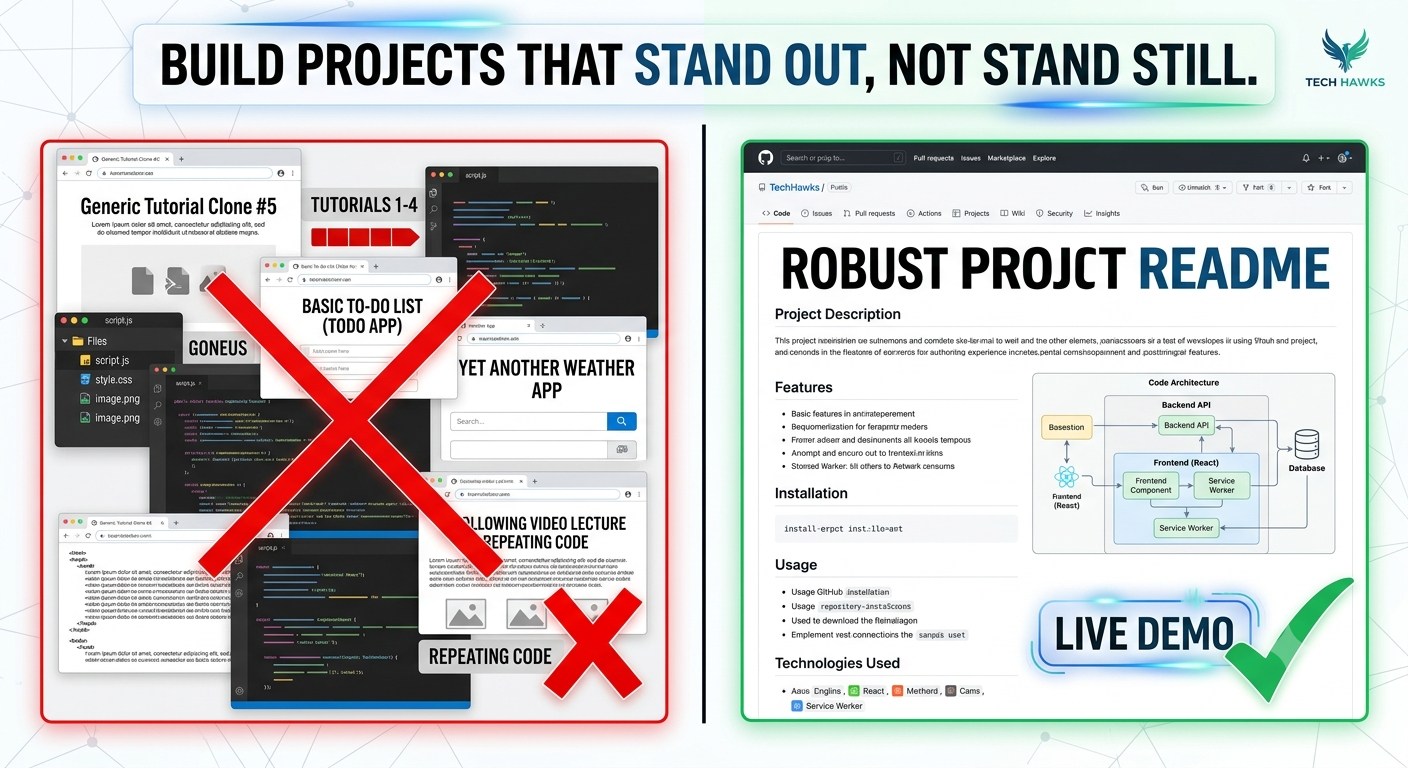
    Most tech students fall into the same trap: they follow a tutorial line-by-line, build a basic weather app or a simple to-do list, and add it to their portfolio. The problem? Thousands of other candidates have done the exact same thing.


    To land internships and tech roles, you need to showcase problem-solving, not just code-copying.


    Here is a step-by-step framework to create high-impact, evergreen portfolio projects:


    1 Solve a Hyper-Specific Problem
    Instead of: A generic e-commerce store.
    Build: A micro-inventory tracker for a local bookstore or a study-habit scheduler for your class. Real-world constraints force real problem-solving.


    2 Focus on Quality Over Quantity
    Two fully polished, well-documented projects beat ten half-baked tutorial clones every single time. Make sure your application has zero dead links, proper error handling, and clean code structure.


    3 Treat Your Readme Like a Landing Page
    Recruiters often scan your GitHub before looking at your code. Include:
    A clear summary of why you built it.
    The tech stack used and why you chose it.
    Screenshots or a live demo link.
    Setup instructions so anyone can run it locally.


    4 Document Your Failures & Learnings
    Write a short dev log or blog post explaining the biggest bug you encountered and how you fixed it. Showing your thought process proves you are a true engineer.


    Key Takeaways
    Originality > Tutorials: Custom-built tools always beat unedited tutorial code.
    Polish Matters: Dead links and missing README files kill great projects.
    Documentation is Key: Explain why you made engineering decisions, not just what you built.


    CTA (Join Students in Tech)
    Looking to collaborate on real-world projects, get code reviews, and level up your portfolio with peers?


    🚀 Join the Students in Tech community today and start building things that matter!
    The Ultimate Tech Student's Blueprint: How to Build Projects That Actually Get You Hired Most tech students fall into the same trap: they follow a tutorial line-by-line, build a basic weather app or a simple to-do list, and add it to their portfolio. The problem? Thousands of other candidates have done the exact same thing. To land internships and tech roles, you need to showcase problem-solving, not just code-copying. Here is a step-by-step framework to create high-impact, evergreen portfolio projects: 1 Solve a Hyper-Specific Problem Instead of: A generic e-commerce store. Build: A micro-inventory tracker for a local bookstore or a study-habit scheduler for your class. Real-world constraints force real problem-solving. 2 Focus on Quality Over Quantity Two fully polished, well-documented projects beat ten half-baked tutorial clones every single time. Make sure your application has zero dead links, proper error handling, and clean code structure. 3 Treat Your Readme Like a Landing Page Recruiters often scan your GitHub before looking at your code. Include: A clear summary of why you built it. The tech stack used and why you chose it. Screenshots or a live demo link. Setup instructions so anyone can run it locally. 4 Document Your Failures & Learnings Write a short dev log or blog post explaining the biggest bug you encountered and how you fixed it. Showing your thought process proves you are a true engineer. Key Takeaways Originality > Tutorials: Custom-built tools always beat unedited tutorial code. Polish Matters: Dead links and missing README files kill great projects. Documentation is Key: Explain why you made engineering decisions, not just what you built. CTA (Join Students in Tech) Looking to collaborate on real-world projects, get code reviews, and level up your portfolio with peers? 🚀 Join the Students in Tech community today and start building things that matter!
    0 Commentarii 0 Distribuiri 564 Views 0 previzualizare
  • How to Build a High-Impact Tech Resume: A 4-Step Actionable Guide


    Landing technical interviews isn't about fitting as many buzzwords as possible onto a single page. It's about demonstrating impact, ownership, and problem-solving ability.
    Whether you are a software engineer, data analyst, or product manager, follow this 4-step framework to optimize your technical resume today:


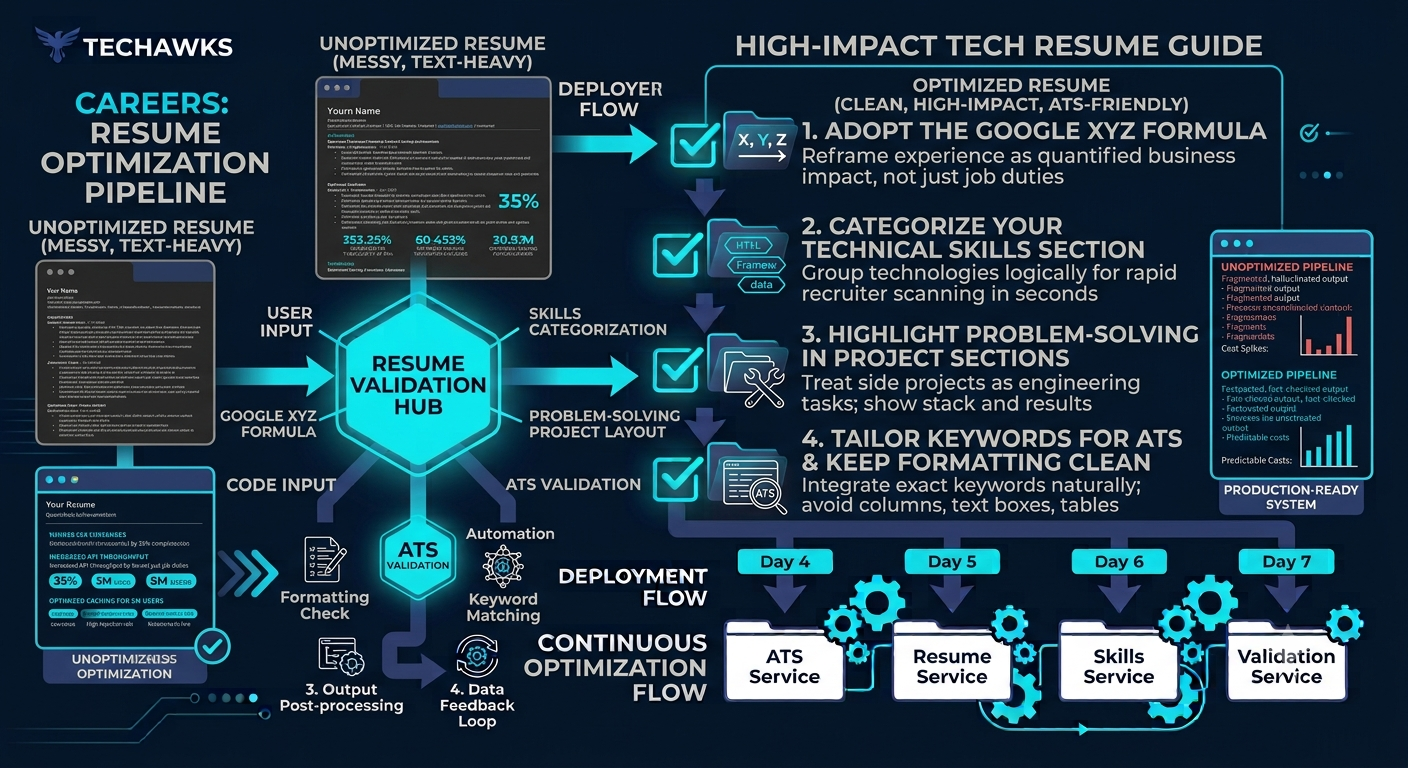
    Step 1: Adopt the Google XYZ Formula for Bullet Points
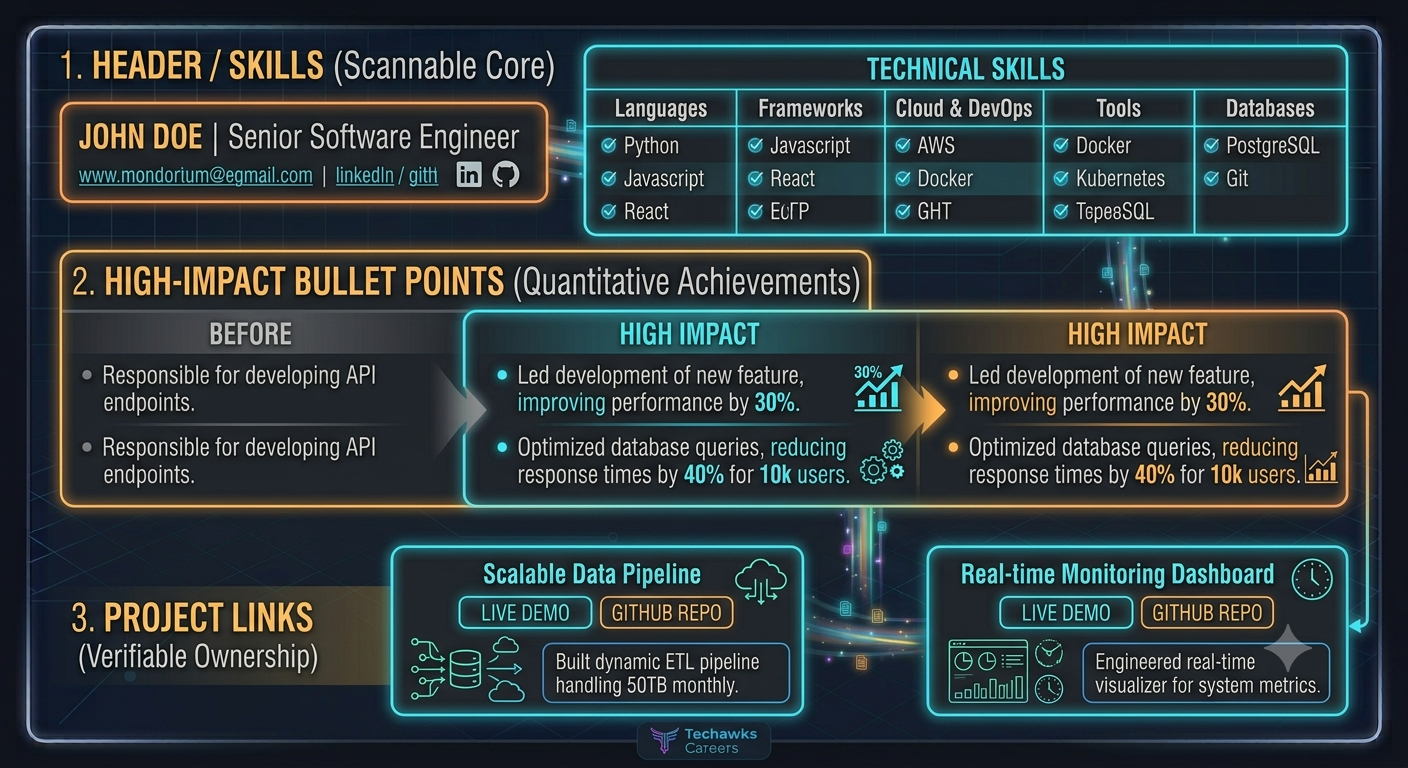
    Never list job duties (e.g., "Responsible for writing backend APIs"). Instead, reframe every achievement using the XYZ formula:
    "Accomplished [X], as measured by [Y], by doing [Z]."
    Before: "Maintained microservices and fixed performance bugs."
    After: "Optimized core checkout microservices, reducing API response latency by 35% and increasing system throughput during high-traffic events by implementing Redis caching."


    Step 2: Categorize Your Technical Skills Section
    Dense walls of uncategorized skill tags make it hard for hiring managers to identify your primary focus. Group your stack logically so it's scannable in seconds:
    Languages: JavaScript, TypeScript, Python, SQL
    Frameworks & Libraries: React, Node.js, Express, FastAPI
    Databases & Tools: PostgreSQL, Redis, Docker, Git, AWS (EC2, S3)


    Step 3: Highlight Problem-Solving in Project Sections
    If you are an entry-level candidate or transitioning roles, your project section is your strongest proof of skill. For each project, include three elements:
    Problem Statement: What real-world issue were you solving?
    Technical Architecture: Which tools and design patterns did you use?
    Outcome / Metric: What were the results (e.g., benchmark score, user count, or performance improvement)?


    Step 4: Tailor Keywords for ATS Without Keyword Stuffing
    Applicant Tracking Systems (ATS) scan resumes for core competencies mentioned in the job description.
    Highlight the top 5 technical requirements in the target job posting.
    Ensure those exact terms naturally appear in your experience bullet points and skills section.
    Keep formatting clean—avoid complex multi-column tables, text boxes, or embedded graphics that confuse ATS parsers.


    Key Takeaways
    Focus on Impact: Frame work achievements using actionable metrics and quantifiable outcomes.
    Make It Scannable: Group technical skills cleanly by category for instant readability.
    Showcase Projects: Treat side projects like real engineering tasks by explaining problem context, stack choices, and results.
    Keep Formatting Clean: Use simple single-column layouts that pass through ATS screeners seamlessly.


    CTA
    Looking for your next big role in tech? Connect with hiring managers, recruiters, and fellow job seekers sharing open roles, interview prep guides, and career growth strategies. Join Tech Jobs & Opportunities today!
    How to Build a High-Impact Tech Resume: A 4-Step Actionable Guide Landing technical interviews isn't about fitting as many buzzwords as possible onto a single page. It's about demonstrating impact, ownership, and problem-solving ability. Whether you are a software engineer, data analyst, or product manager, follow this 4-step framework to optimize your technical resume today: Step 1: Adopt the Google XYZ Formula for Bullet Points Never list job duties (e.g., "Responsible for writing backend APIs"). Instead, reframe every achievement using the XYZ formula: "Accomplished [X], as measured by [Y], by doing [Z]." Before: "Maintained microservices and fixed performance bugs." After: "Optimized core checkout microservices, reducing API response latency by 35% and increasing system throughput during high-traffic events by implementing Redis caching." Step 2: Categorize Your Technical Skills Section Dense walls of uncategorized skill tags make it hard for hiring managers to identify your primary focus. Group your stack logically so it's scannable in seconds: Languages: JavaScript, TypeScript, Python, SQL Frameworks & Libraries: React, Node.js, Express, FastAPI Databases & Tools: PostgreSQL, Redis, Docker, Git, AWS (EC2, S3) Step 3: Highlight Problem-Solving in Project Sections If you are an entry-level candidate or transitioning roles, your project section is your strongest proof of skill. For each project, include three elements: Problem Statement: What real-world issue were you solving? Technical Architecture: Which tools and design patterns did you use? Outcome / Metric: What were the results (e.g., benchmark score, user count, or performance improvement)? Step 4: Tailor Keywords for ATS Without Keyword Stuffing Applicant Tracking Systems (ATS) scan resumes for core competencies mentioned in the job description. Highlight the top 5 technical requirements in the target job posting. Ensure those exact terms naturally appear in your experience bullet points and skills section. Keep formatting clean—avoid complex multi-column tables, text boxes, or embedded graphics that confuse ATS parsers. Key Takeaways Focus on Impact: Frame work achievements using actionable metrics and quantifiable outcomes. Make It Scannable: Group technical skills cleanly by category for instant readability. Showcase Projects: Treat side projects like real engineering tasks by explaining problem context, stack choices, and results. Keep Formatting Clean: Use simple single-column layouts that pass through ATS screeners seamlessly. CTA Looking for your next big role in tech? Connect with hiring managers, recruiters, and fellow job seekers sharing open roles, interview prep guides, and career growth strategies. Join Tech Jobs & Opportunities today!
    0 Commentarii 0 Distribuiri 373 Views 0 previzualizare
  • The Software Engineer’s Resume Blueprint: How to Pass the 6-Second Recruiter Screen


    Standing out in today’s hiring environment isn't about padding your tech stack list with buzzwords. It’s about clearly communicating business impact, technical ownership, and problem-solving capability.
    Whether you are applying for your first developer role or a senior engineering position, use this actionable blueprint to structure high-converting resume bullet points:


    Adopt the Action + Context + Outcome Formula
    The Bad: "Responsible for building REST APIs in Node.js."
    The Fix: Frame every project accomplishment using the Google XYZ framework ("Accomplished [X], as measured by [Y], by doing [Z]").
    Example: "Reduced API response latency by 42% by implementing a Redis caching layer for high-volume database queries."


    Categorize Your Skills Strategy
    Don't dump 30 programming languages and frameworks into an unsorted block at the top.
    Group skills logically into categories: Languages, Frameworks & Libraries, Databases & Storage, and Cloud & DevOps. Place the tools you are most proficient with first.


    Showcase System Scale & Problem Complexity
    Metrics matter. Whenever possible, include numbers that quantify scale: throughput, active users, data volume, deployment frequency, or test coverage improvements.
    If working on a side project, quantify performance metrics (e.g., "Engineered a RAG pipeline handling 10k+ vector lookups under 200ms").


    Highlight Engineering Trade-offs & Ownership
    In project descriptions, briefly note why you chose a specific technology over an alternative.
    Highlight cross-functional collaboration, such as leading architecture reviews, mentoring junior devs, or establishing testing standards.


    Keep Formatting Aggressively Scannable
    Stick to a single-page format (two pages only if you have 8+ years of experience).
    Use clean line spacing, bold key metrics, and link directly to active GitHub repositories or live production demos.


    Key Takeaways
    Focus on impact over duties: Quantify results with specific numbers, metrics, and business outcomes.
    Format for scannability: Group your technical skills logically so recruiters can evaluate fit instantly.
    Showcase trade-offs: Prove that you understand why you chose certain tools, not just how to use them.


    CTA
    Looking to land your next technical role, polish your resume, or prepare for tough technical interviews?


    [Join Tech Jobs & Opportunities] to access curated job listings, resume teardowns, and career growth strategies from experienced tech recruiters and engineering leaders.


    Suggested Image
    The Software Engineer’s Resume Blueprint: How to Pass the 6-Second Recruiter Screen Standing out in today’s hiring environment isn't about padding your tech stack list with buzzwords. It’s about clearly communicating business impact, technical ownership, and problem-solving capability. Whether you are applying for your first developer role or a senior engineering position, use this actionable blueprint to structure high-converting resume bullet points: Adopt the Action + Context + Outcome Formula The Bad: "Responsible for building REST APIs in Node.js." The Fix: Frame every project accomplishment using the Google XYZ framework ("Accomplished [X], as measured by [Y], by doing [Z]"). Example: "Reduced API response latency by 42% by implementing a Redis caching layer for high-volume database queries." Categorize Your Skills Strategy Don't dump 30 programming languages and frameworks into an unsorted block at the top. Group skills logically into categories: Languages, Frameworks & Libraries, Databases & Storage, and Cloud & DevOps. Place the tools you are most proficient with first. Showcase System Scale & Problem Complexity Metrics matter. Whenever possible, include numbers that quantify scale: throughput, active users, data volume, deployment frequency, or test coverage improvements. If working on a side project, quantify performance metrics (e.g., "Engineered a RAG pipeline handling 10k+ vector lookups under 200ms"). Highlight Engineering Trade-offs & Ownership In project descriptions, briefly note why you chose a specific technology over an alternative. Highlight cross-functional collaboration, such as leading architecture reviews, mentoring junior devs, or establishing testing standards. Keep Formatting Aggressively Scannable Stick to a single-page format (two pages only if you have 8+ years of experience). Use clean line spacing, bold key metrics, and link directly to active GitHub repositories or live production demos. Key Takeaways Focus on impact over duties: Quantify results with specific numbers, metrics, and business outcomes. Format for scannability: Group your technical skills logically so recruiters can evaluate fit instantly. Showcase trade-offs: Prove that you understand why you chose certain tools, not just how to use them. CTA Looking to land your next technical role, polish your resume, or prepare for tough technical interviews? [Join Tech Jobs & Opportunities] to access curated job listings, resume teardowns, and career growth strategies from experienced tech recruiters and engineering leaders. Suggested Image
    0 Commentarii 0 Distribuiri 777 Views 0 previzualizare
  • How to Build a Tech Portfolio That Gets You Hired (Without Any Work Experience)


    Most students make the same mistake: they fill their GitHub or portfolio site with tutorial projects—like basic weather apps, simple to-do lists, or cloned landing pages. Hiring managers recognize these immediately and scroll right past.
    To build a portfolio that actually commands attention from recruiters and hiring managers, follow this three-step blueprint:


    1. Build "Pain Point" Projects, Not Tutorial Clones
    Instead of following a video guide step-by-step, identify a minor inconvenience in your daily student life or local community and build a software solution for it.
    Bad Example: A generic library management system from a class assignment.
    Good Example: A custom web scraper that alerts your group chat the second a closed college class section opens up.


    2. Document the "Why," Not Just the Code
    Employers hire problem solvers, not syntax memorizers. For every project featured on your portfolio, include a clear README file or project write-up that answers:
    The Problem: What specific issue were you trying to solve?
    Technical Decisions: Why did you choose framework X over framework Y?
    Trade-offs & Challenges: What broke, and how did you debug it?


    3. Deploy and Make It Accessible
    A GitHub repository with code is fine, but a live, working link is infinitely better.
    Deploy your web apps using free hosting platforms like Vercel, Render, or Netlify.
    Include a short (30 to 60-second) video demo or GIF at the top of your repository so recruiters can see your project in action instantly without having to clone and run your code locally.


    Key Takeaways
    Ditch the Clones: One unique, self-driven project easily outweighs five step-by-step tutorial projects.
    Show Your Thinking: Document your architecture choices and debugging process to demonstrate engineering maturity.
    Make It Live: Always provide a live demo or video walkthrough so non-technical screeners can see your work in seconds.


    CTA
    Ready to land your dream tech role?
    [Join Students in Tech] to get your portfolio reviewed by industry mentors, collaborate on open-source projects, and connect with fellow student builders!
    How to Build a Tech Portfolio That Gets You Hired (Without Any Work Experience) Most students make the same mistake: they fill their GitHub or portfolio site with tutorial projects—like basic weather apps, simple to-do lists, or cloned landing pages. Hiring managers recognize these immediately and scroll right past. To build a portfolio that actually commands attention from recruiters and hiring managers, follow this three-step blueprint: 1. Build "Pain Point" Projects, Not Tutorial Clones Instead of following a video guide step-by-step, identify a minor inconvenience in your daily student life or local community and build a software solution for it. Bad Example: A generic library management system from a class assignment. Good Example: A custom web scraper that alerts your group chat the second a closed college class section opens up. 2. Document the "Why," Not Just the Code Employers hire problem solvers, not syntax memorizers. For every project featured on your portfolio, include a clear README file or project write-up that answers: The Problem: What specific issue were you trying to solve? Technical Decisions: Why did you choose framework X over framework Y? Trade-offs & Challenges: What broke, and how did you debug it? 3. Deploy and Make It Accessible A GitHub repository with code is fine, but a live, working link is infinitely better. Deploy your web apps using free hosting platforms like Vercel, Render, or Netlify. Include a short (30 to 60-second) video demo or GIF at the top of your repository so recruiters can see your project in action instantly without having to clone and run your code locally. Key Takeaways Ditch the Clones: One unique, self-driven project easily outweighs five step-by-step tutorial projects. Show Your Thinking: Document your architecture choices and debugging process to demonstrate engineering maturity. Make It Live: Always provide a live demo or video walkthrough so non-technical screeners can see your work in seconds. CTA Ready to land your dream tech role? [Join Students in Tech] to get your portfolio reviewed by industry mentors, collaborate on open-source projects, and connect with fellow student builders!
    0 Commentarii 0 Distribuiri 827 Views 0 previzualizare
  • Tool Review: LinkedIn’s Native Resume Builder vs. "Save to PDF"


    When job hunting, speed matters, but sending out a generic profile dump is a major reason applications vanish into a black hole.
    LinkedIn offers two native ways to turn your profile into a document: the "Save to PDF" function and the lesser-known "Build a Resume" feature. Here is a practical breakdown of how they compare and how to use the built-in resume tool effectively.


    The Comparison: "Save to PDF" vs. "Build a Resume
    "Feature "Save to PDF" Button Built-In "Build a Resume" Tool
    Output Raw profile dump Customized 1-2 page document
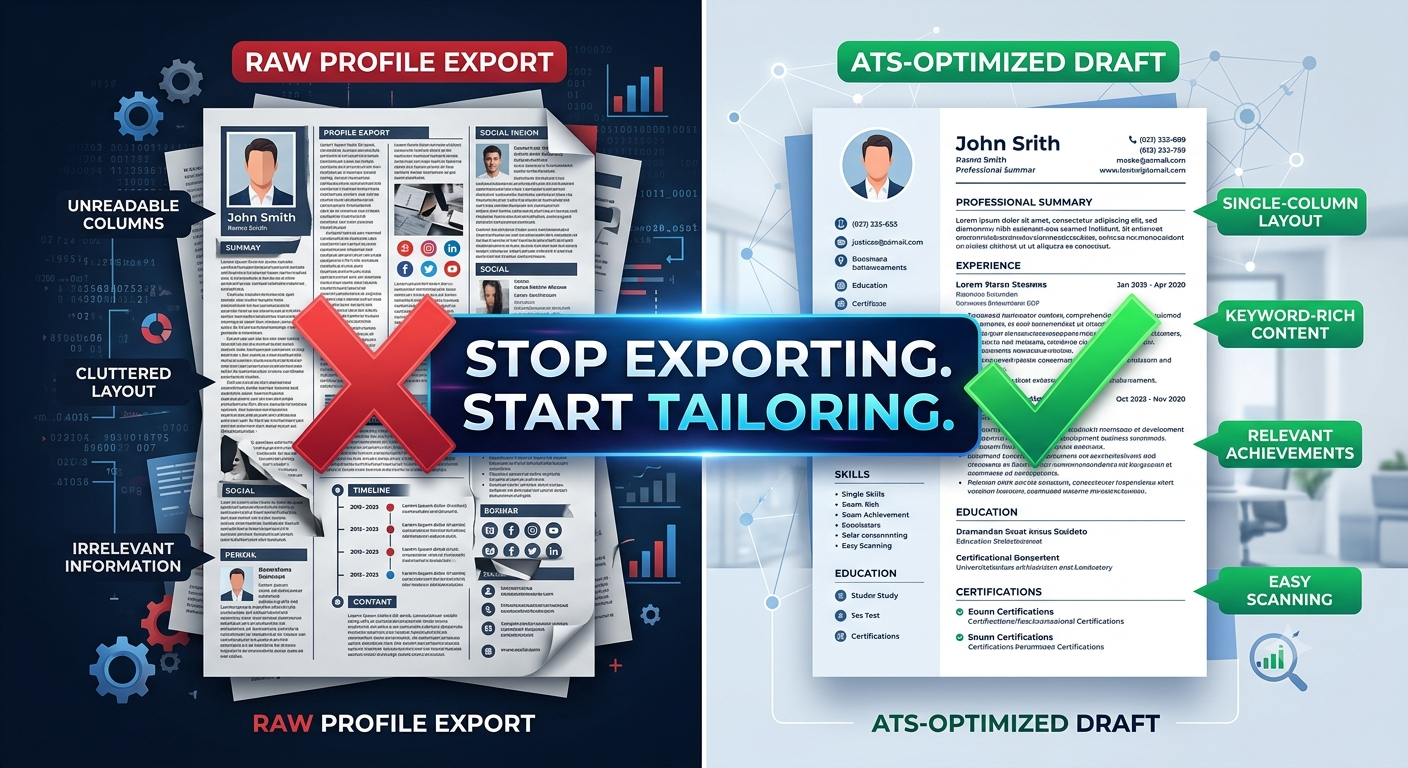
    ATS Readability Poor (multi-column structure, non-standard headers) High (single-column layout, standard headers)
    Tailoring Ability Zero (exports everything as-is) High (edit, reorder, or delete bullet points per job application)
    Keyword Match None Includes a keyword insights engine based on target job titles


    How to Use the Built-In Resume Tool (3 Actionable Steps)
    1. Access the Tool from Desktop
    Navigate to your profile on a desktop browser. Click the "More" button near your profile picture and select "Build a resume." Select "Create from profile."


    2. Set Your Target Job Title for Keyword Optimization
    The tool will prompt you to enter a target job title (e.g., "Software Engineer" or "Product Manager").
    LinkedIn compares your profile content against common recruiter search terms for that role.
    Use the "Keyword Insights" panel on the right sidebar to check which critical industry keywords are present in your draft and which ones you should add.


    3. Strip Out "Social Media Fluff"
    Your LinkedIn profile is designed for passive scrolling; your resume is designed for concise evaluation. Before downloading:
    Shorten the summary: Condense a long narrative "About" section into a 3-line elevator pitch.
    Trim bullet points: Convert paragraphs under past roles into 3–4 achievement-focused points using strong action verbs.
    Remove non-essential sections: Uncheck irrelevant items (like personal causes or hobbies) so the layout stays tightly focused on professional impact.


    Key Takeaways
    Avoid "Save to PDF" for applications: It outputs a bloated profile export that struggles with ATS parsers.
    Leverage built-in keyword checks: Use LinkedIn’s target job title feature to ensure your key skills match what recruiters search for.
    Format for the reader: Strip out social narrative text and present clean, impact-driven bullet points.


    CTA
    Looking for guidance on navigating job applications, refining your interview approach, or finding your next role? Join Tech Jobs & Opportunities on Techawks today to get expert tips and discover open positions.
    Tool Review: LinkedIn’s Native Resume Builder vs. "Save to PDF" When job hunting, speed matters, but sending out a generic profile dump is a major reason applications vanish into a black hole. LinkedIn offers two native ways to turn your profile into a document: the "Save to PDF" function and the lesser-known "Build a Resume" feature. Here is a practical breakdown of how they compare and how to use the built-in resume tool effectively. The Comparison: "Save to PDF" vs. "Build a Resume "Feature "Save to PDF" Button Built-In "Build a Resume" Tool Output Raw profile dump Customized 1-2 page document ATS Readability Poor (multi-column structure, non-standard headers) High (single-column layout, standard headers) Tailoring Ability Zero (exports everything as-is) High (edit, reorder, or delete bullet points per job application) Keyword Match None Includes a keyword insights engine based on target job titles How to Use the Built-In Resume Tool (3 Actionable Steps) 1. Access the Tool from Desktop Navigate to your profile on a desktop browser. Click the "More" button near your profile picture and select "Build a resume." Select "Create from profile." 2. Set Your Target Job Title for Keyword Optimization The tool will prompt you to enter a target job title (e.g., "Software Engineer" or "Product Manager"). LinkedIn compares your profile content against common recruiter search terms for that role. Use the "Keyword Insights" panel on the right sidebar to check which critical industry keywords are present in your draft and which ones you should add. 3. Strip Out "Social Media Fluff" Your LinkedIn profile is designed for passive scrolling; your resume is designed for concise evaluation. Before downloading: Shorten the summary: Condense a long narrative "About" section into a 3-line elevator pitch. Trim bullet points: Convert paragraphs under past roles into 3–4 achievement-focused points using strong action verbs. Remove non-essential sections: Uncheck irrelevant items (like personal causes or hobbies) so the layout stays tightly focused on professional impact. Key Takeaways Avoid "Save to PDF" for applications: It outputs a bloated profile export that struggles with ATS parsers. Leverage built-in keyword checks: Use LinkedIn’s target job title feature to ensure your key skills match what recruiters search for. Format for the reader: Strip out social narrative text and present clean, impact-driven bullet points. CTA Looking for guidance on navigating job applications, refining your interview approach, or finding your next role? Join Tech Jobs & Opportunities on Techawks today to get expert tips and discover open positions.
    0 Commentarii 0 Distribuiri 1K Views 0 previzualizare
  • The 7-Day Portfolio Project Challenge: Build and Ship a Production-Ready App
    Most student portfolios are filled with identical assignments: basic todo lists, weather apps, or generic clones. Hiring managers skip right past these because they don't demonstrate real-world engineering decisions.


    To stand out in entry-level tech applications, you need to showcase project ownership, API integration, and deployment. Here is your 7-day blueprint to ship a functional, production-ready app:


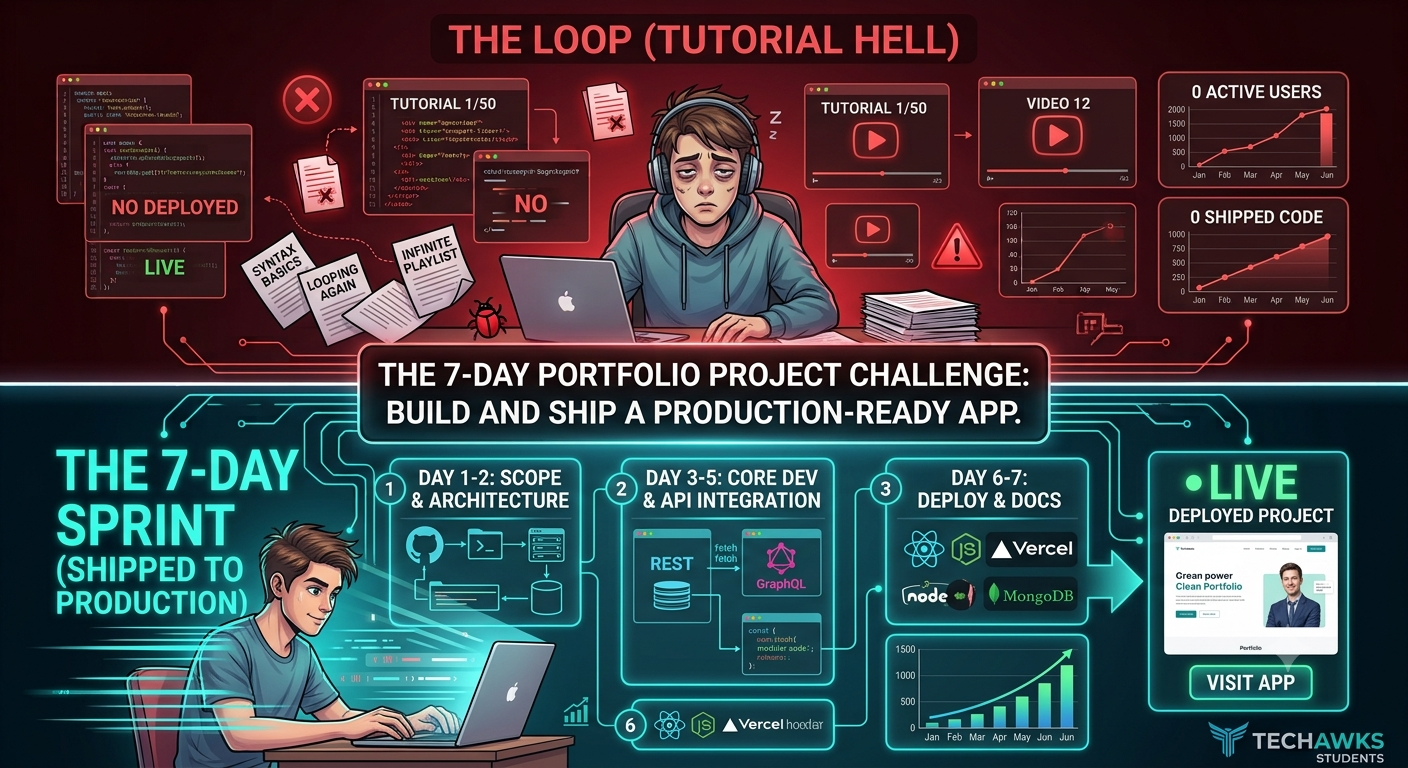
    Days 1–2: Scope & Architecture
    The Goal: Define a small problem and map your stack.
    The Action: Pick a niche utility app (e.g., a lightweight developer cheat-sheet generator, a localized study-timer with stats, or a simple markdown parser).
    The Rule: Keep the feature set minimal. Define maximum 2 core endpoints/pages. Draw your database schema and UI layout on paper before opening your IDE.


    Days 3–5: Core Development & Integration
    The Goal: Build the functional core using real data or external APIs.
    The Action: Write clean, modular code. Implement essential features first:
    Fetch dynamic data using a public REST or GraphQL API.
    Handle loading, error, and empty states gracefully in your UI.
    The Rule: Don't get stuck styling early. Make it work first, then make it look clean.


    Days 6–7: Deploy, Document & Ship
    The Goal: Put your code live on the internet with a professional repository.
    The Action: Deploy: Host your app live using free hosting platforms (e.g., Vercel, Render, Netlify, or GitHub Pages).
    Write the README: Include a clear project description, system architecture diagram, tech stack badges, local setup instructions, and key technical challenges solved.
    Share: Post a 30-second screen recording of your working app on LinkedIn or X with a live link.


    Key Takeaways
    Ship over perfect: A deployed, 80%-featured project online beats a 100%-featured project sitting on your local localhost.
    Document your engineering decisions: A well-structured README.md explaining why you chose specific tools is as important as the code itself.
    Break out of tutorial loops: Learn just enough syntax to start building, then Google and solve edge cases as you hit them in production.


    CTA (Join Students in Tech)
    Ready to build in public, get code reviews from experienced mentors, and collaborate with ambitious peers? [Join Students in Tech] to share your projects, participate in hackathons, and level up your engineering skills!
    The 7-Day Portfolio Project Challenge: Build and Ship a Production-Ready App Most student portfolios are filled with identical assignments: basic todo lists, weather apps, or generic clones. Hiring managers skip right past these because they don't demonstrate real-world engineering decisions. To stand out in entry-level tech applications, you need to showcase project ownership, API integration, and deployment. Here is your 7-day blueprint to ship a functional, production-ready app: Days 1–2: Scope & Architecture The Goal: Define a small problem and map your stack. The Action: Pick a niche utility app (e.g., a lightweight developer cheat-sheet generator, a localized study-timer with stats, or a simple markdown parser). The Rule: Keep the feature set minimal. Define maximum 2 core endpoints/pages. Draw your database schema and UI layout on paper before opening your IDE. Days 3–5: Core Development & Integration The Goal: Build the functional core using real data or external APIs. The Action: Write clean, modular code. Implement essential features first: Fetch dynamic data using a public REST or GraphQL API. Handle loading, error, and empty states gracefully in your UI. The Rule: Don't get stuck styling early. Make it work first, then make it look clean. Days 6–7: Deploy, Document & Ship The Goal: Put your code live on the internet with a professional repository. The Action: Deploy: Host your app live using free hosting platforms (e.g., Vercel, Render, Netlify, or GitHub Pages). Write the README: Include a clear project description, system architecture diagram, tech stack badges, local setup instructions, and key technical challenges solved. Share: Post a 30-second screen recording of your working app on LinkedIn or X with a live link. Key Takeaways Ship over perfect: A deployed, 80%-featured project online beats a 100%-featured project sitting on your local localhost. Document your engineering decisions: A well-structured README.md explaining why you chose specific tools is as important as the code itself. Break out of tutorial loops: Learn just enough syntax to start building, then Google and solve edge cases as you hit them in production. CTA (Join Students in Tech) Ready to build in public, get code reviews from experienced mentors, and collaborate with ambitious peers? [Join Students in Tech] to share your projects, participate in hackathons, and level up your engineering skills!
    0 Commentarii 0 Distribuiri 1K Views 0 previzualizare
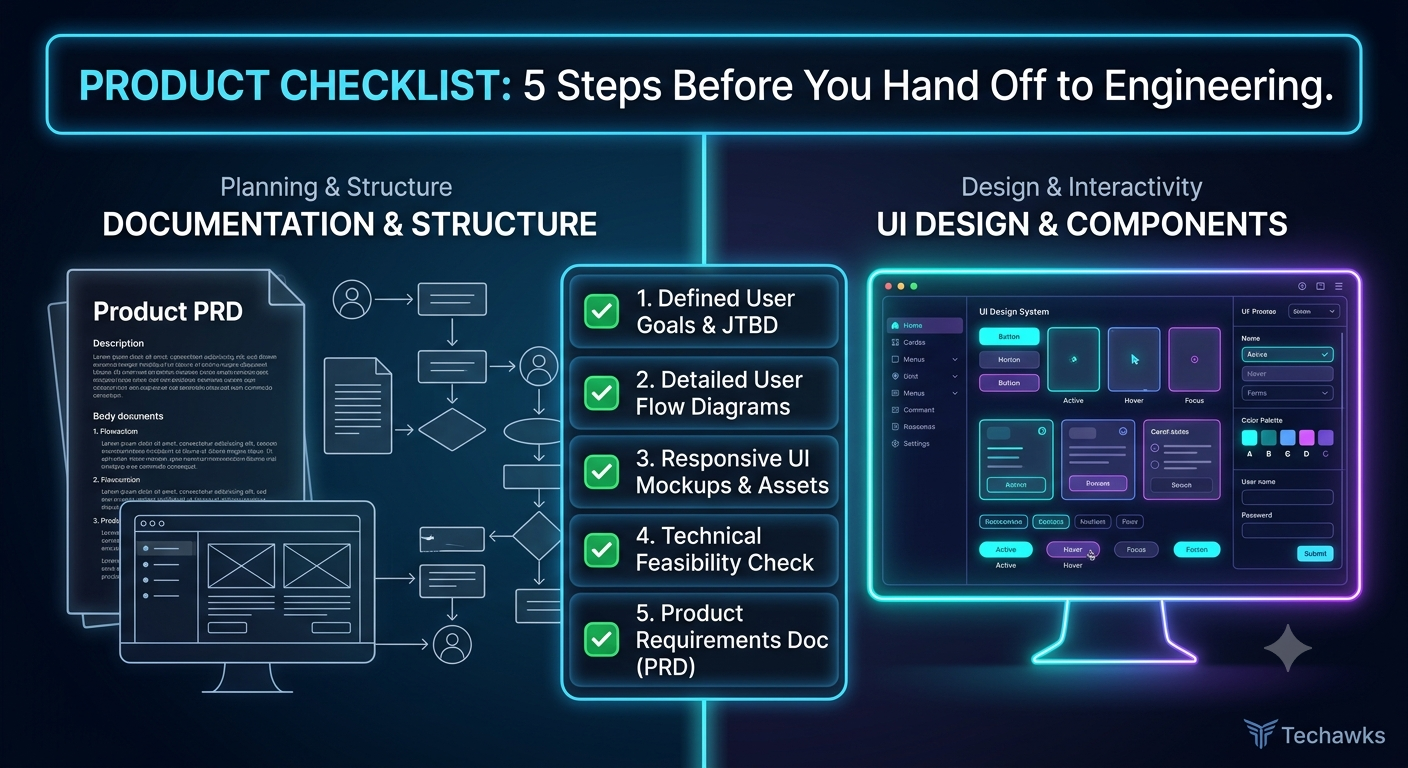
  • The Pre-Handoff Checklist: 5 Steps Every Product Manager & Designer Needs 🚀
    📋 The Ultimate UX & Product Spec Checklist
    1. User Intent & Problem Alignment
    The "So What?": Does the spec clearly articulate the target user problem and core job-to-be-done (JTBD)?
    Success Metrics Defined: Have you established clear, trackable KPIs (e.g., adoption rate, task completion time) before writing a single line of code?
    Out-of-Scope Explicitly Stated: Is it crystal clear what this iteration will not include to prevent scope creep?


    2. State Mapping & Edge Cases
    The 5 Core UI States Covered: Have you designed for Ideal, Empty, Loading/Skeleton, Partial, and Error states?
    Edge Cases Documented: What happens with max character limits, slow network connections, or expired user sessions?
    Permission & Role Scenarios: How does this UI adapt for admins vs. read-only users?


    3. System Consistency & Accessibility
    Design System Compliance: Are you using existing design system tokens, components, and typography?
    Accessibility (WCAG): Do color contrast ratios pass WCAG AA standards, and are screen reader labels/focus states mapped out?
    Responsive Behaviors: Are layout shifts specified across desktop, tablet, and mobile viewports?


    4. Technical Feasibility & Analytics
    Engineering Sanity Check: Has a tech lead reviewed the proposed UI interactions for heavy API calls or performance bottlenecks?
    Event Tracking Spec: Are analytics events (click streams, funnel conversions, modal opens) mapped with exact naming conventions?


    5. Developer Experience (DX) Handoff
    Figma Organization: Are designs cleaned up, frame dependencies detached, and autolayout applied?
    Interactive Prototypes / Flowcharts: Is the user flow linked so developers don't have to guess transitions?


    Key Takeaways
    Design for Errors First: A great user experience is defined by how gracefully it handles edge cases and empty states.
    Involve Engineering Early: Early feasibility alignment prevents costly design redos midway through sprint execution.
    Track by Design: Define analytics tracking events in the spec stage so you aren't guessing user adoption later.


    CTA
    Ready to bridge the gap between product strategy, intuitive UX design, and seamless engineering delivery?
    Join the Techawks Product, UX & Design Program today to build portfolio-worthy products, master design systems, and launch your career in tech leadership! 🎯
    The Pre-Handoff Checklist: 5 Steps Every Product Manager & Designer Needs 🚀 📋 The Ultimate UX & Product Spec Checklist 1. User Intent & Problem Alignment The "So What?": Does the spec clearly articulate the target user problem and core job-to-be-done (JTBD)? Success Metrics Defined: Have you established clear, trackable KPIs (e.g., adoption rate, task completion time) before writing a single line of code? Out-of-Scope Explicitly Stated: Is it crystal clear what this iteration will not include to prevent scope creep? 2. State Mapping & Edge Cases The 5 Core UI States Covered: Have you designed for Ideal, Empty, Loading/Skeleton, Partial, and Error states? Edge Cases Documented: What happens with max character limits, slow network connections, or expired user sessions? Permission & Role Scenarios: How does this UI adapt for admins vs. read-only users? 3. System Consistency & Accessibility Design System Compliance: Are you using existing design system tokens, components, and typography? Accessibility (WCAG): Do color contrast ratios pass WCAG AA standards, and are screen reader labels/focus states mapped out? Responsive Behaviors: Are layout shifts specified across desktop, tablet, and mobile viewports? 4. Technical Feasibility & Analytics Engineering Sanity Check: Has a tech lead reviewed the proposed UI interactions for heavy API calls or performance bottlenecks? Event Tracking Spec: Are analytics events (click streams, funnel conversions, modal opens) mapped with exact naming conventions? 5. Developer Experience (DX) Handoff Figma Organization: Are designs cleaned up, frame dependencies detached, and autolayout applied? Interactive Prototypes / Flowcharts: Is the user flow linked so developers don't have to guess transitions? Key Takeaways Design for Errors First: A great user experience is defined by how gracefully it handles edge cases and empty states. Involve Engineering Early: Early feasibility alignment prevents costly design redos midway through sprint execution. Track by Design: Define analytics tracking events in the spec stage so you aren't guessing user adoption later. CTA Ready to bridge the gap between product strategy, intuitive UX design, and seamless engineering delivery? Join the Techawks Product, UX & Design Program today to build portfolio-worthy products, master design systems, and launch your career in tech leadership! 🎯
    0 Commentarii 0 Distribuiri 2K Views 0 previzualizare
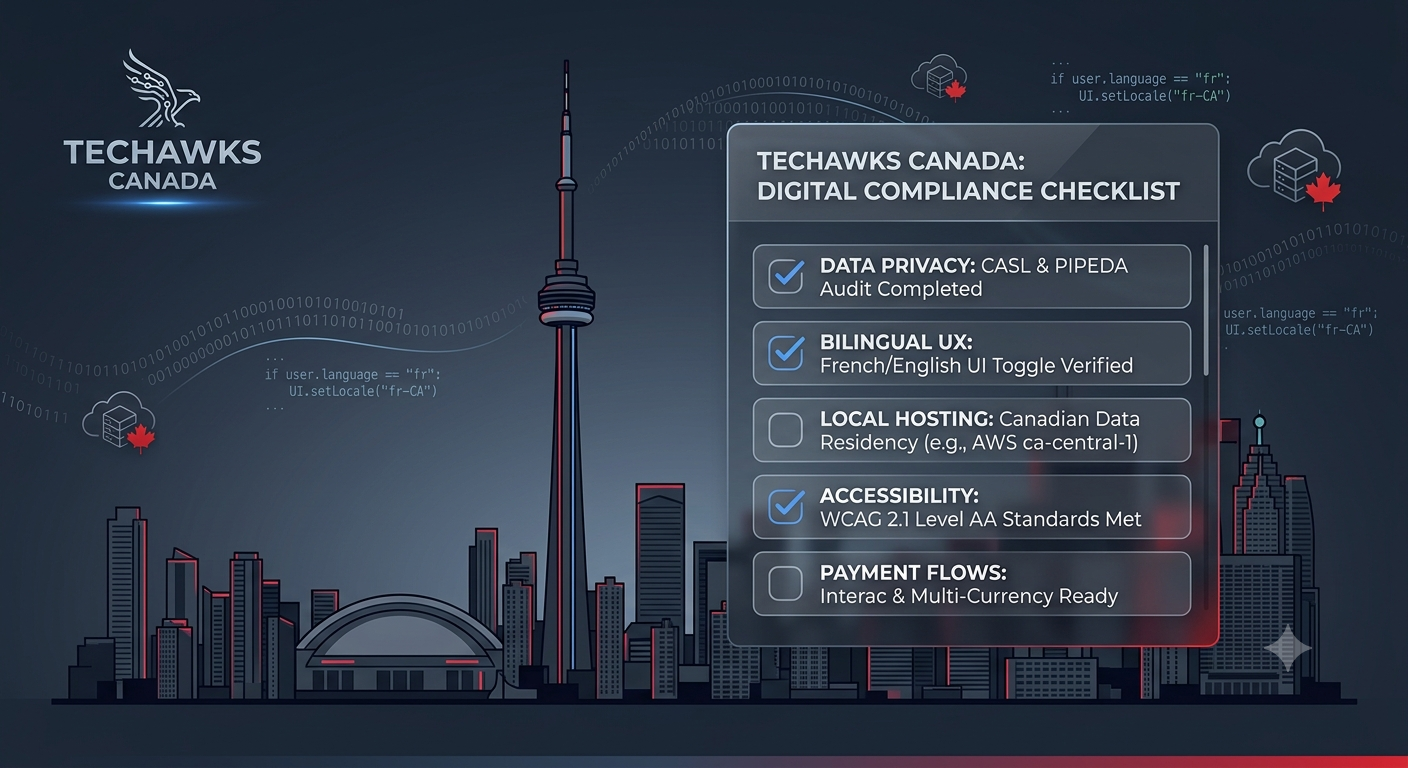
  • The Essential Canadian Tech Team Onboarding & Compliance Checklist
    Setting your systems up for long-term success in Canada requires balancing technical performance with PIPEDA compliance, provincial regulations, and local infrastructure setup. Run through this checklist to keep your stack audit-ready:


    1. Privacy & Data Governance (PIPEDA & Provincial Laws)
    Map Personal Data Workflows: Identify all user data collected and ensure compliance with PIPEDA (Personal Information Protection and Electronic Documents Act) principles.
    Provincial Compliance Check: If operating in or serving residents of Quebec, verify alignment with Law 25 obligations (e.g., mandatory privacy impact assessments and strict consent rules).
    In-Region Data Residency: Determine if client contracts or local sector regulations require hosting user data within Canadian borders (e.g., AWS ca-central-1 in Montreal or ca-west-1 in Calgary).


    2. Digital Marketing & Communication Compliance
    CASL Opt-In Audits: Review your user onboarding and email subscription flows to ensure explicit, double opt-in consent mechanisms compliant with CASL (Canada’s Anti-Spam Legislation).
    Unsubscribe Mechanisms: Test that all transactional and marketing messaging pipelines include functional, one-click unsubscribe links.


    3. Bilingual UX & Accessibility Standards
    Bilingual Support (English/French): Ensure your user interface supports seamless language toggling and dynamic text rendering for French UI components.
    Accessibility (AODA/ACA): Audit web and mobile applications against WCAG 2.1 Level AA standards to meet federal and provincial accessibility mandates.


    4. Localized Payment & Financial Operations
    Interac & Regional Payment Integration: Incorporate Interac e-Transfer or debit payment options alongside standard credit channels to reduce cart abandonment.
    Multi-Currency & Tax Handling: Configure backend billing systems to correctly calculate provincial tax rates (GST, PST, HST, QST) based on customer location.


    Key Takeaways
    Bilingual & Accessible First: Building English/French localization and WCAG accessibility into your UI early prevents costly retrofits.
    Consent Over Assumption: CASL and PIPEDA mandate clear consent mechanisms across all user collection touchpoints.
    Regional Hosting Awareness: Leverage Canadian cloud regions to satisfy local data residency requirements and optimize latency.


    CTA
    Building or scaling tech in Canada? Join Techawks Canada today to connect with local developers, engineering leaders, and tech innovators driving the nation's digital growth!
    The Essential Canadian Tech Team Onboarding & Compliance Checklist Setting your systems up for long-term success in Canada requires balancing technical performance with PIPEDA compliance, provincial regulations, and local infrastructure setup. Run through this checklist to keep your stack audit-ready: 1. Privacy & Data Governance (PIPEDA & Provincial Laws) Map Personal Data Workflows: Identify all user data collected and ensure compliance with PIPEDA (Personal Information Protection and Electronic Documents Act) principles. Provincial Compliance Check: If operating in or serving residents of Quebec, verify alignment with Law 25 obligations (e.g., mandatory privacy impact assessments and strict consent rules). In-Region Data Residency: Determine if client contracts or local sector regulations require hosting user data within Canadian borders (e.g., AWS ca-central-1 in Montreal or ca-west-1 in Calgary). 2. Digital Marketing & Communication Compliance CASL Opt-In Audits: Review your user onboarding and email subscription flows to ensure explicit, double opt-in consent mechanisms compliant with CASL (Canada’s Anti-Spam Legislation). Unsubscribe Mechanisms: Test that all transactional and marketing messaging pipelines include functional, one-click unsubscribe links. 3. Bilingual UX & Accessibility Standards Bilingual Support (English/French): Ensure your user interface supports seamless language toggling and dynamic text rendering for French UI components. Accessibility (AODA/ACA): Audit web and mobile applications against WCAG 2.1 Level AA standards to meet federal and provincial accessibility mandates. 4. Localized Payment & Financial Operations Interac & Regional Payment Integration: Incorporate Interac e-Transfer or debit payment options alongside standard credit channels to reduce cart abandonment. Multi-Currency & Tax Handling: Configure backend billing systems to correctly calculate provincial tax rates (GST, PST, HST, QST) based on customer location. Key Takeaways Bilingual & Accessible First: Building English/French localization and WCAG accessibility into your UI early prevents costly retrofits. Consent Over Assumption: CASL and PIPEDA mandate clear consent mechanisms across all user collection touchpoints. Regional Hosting Awareness: Leverage Canadian cloud regions to satisfy local data residency requirements and optimize latency. CTA Building or scaling tech in Canada? Join Techawks Canada today to connect with local developers, engineering leaders, and tech innovators driving the nation's digital growth!
    0 Commentarii 0 Distribuiri 1K Views 0 previzualizare
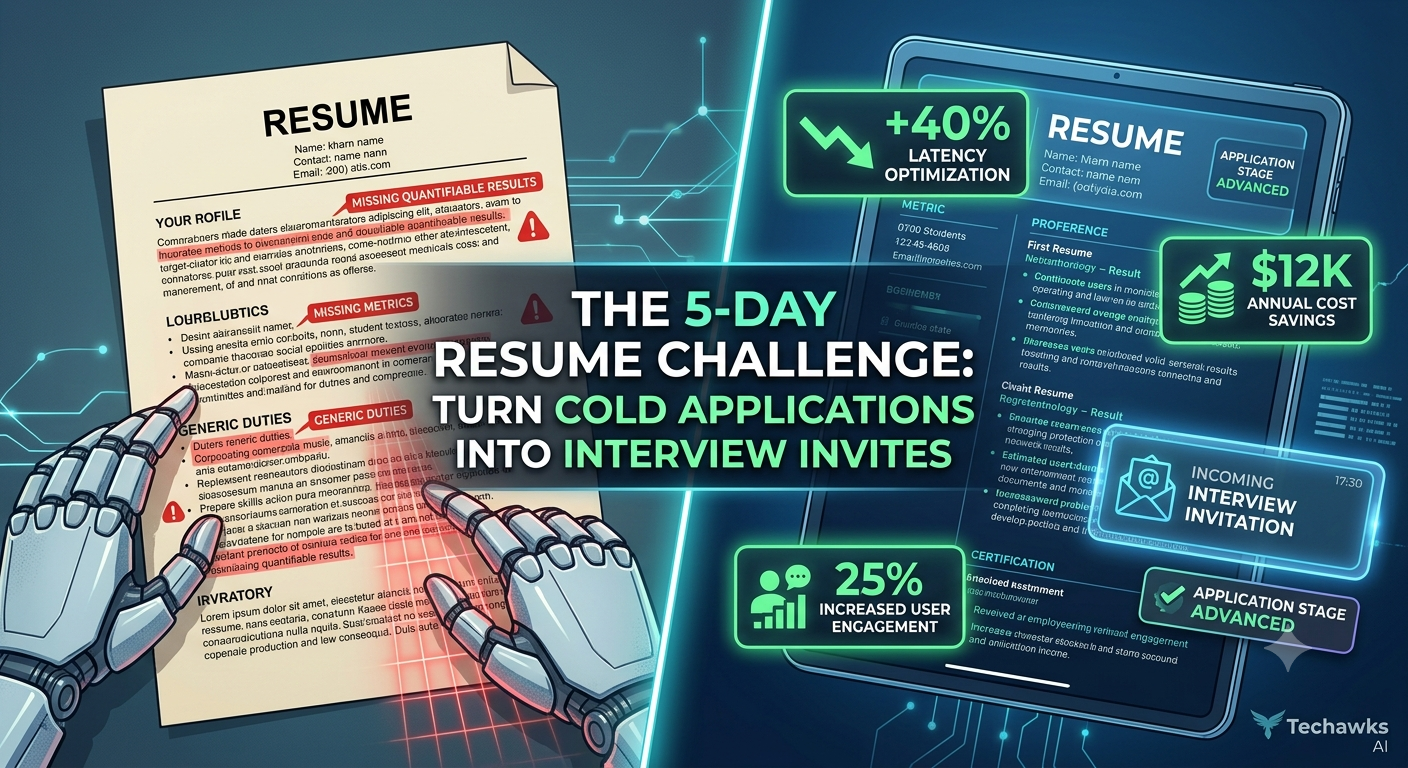
  • The 5-Day Resume & Portfolio Audit: Turn Cold Applications into Interview Calls
    In a competitive job market, hiring managers spend less than 10 seconds scanning a resume before deciding whether to advance a candidate. If your resume simply lists job duties rather than proven business outcomes, you are slipping through the cracks.
    This week, challenge yourself to execute a systematic 5-day career asset upgrade:


    Day 1: Audit Your Resume Bullet Points for Impact Metrics
    The Challenge: Rewrite every experience bullet using the X-Y-Z Formula (Accomplished [X], as measured by [Y], by doing [Z]).
    Before: "Developed API endpoints for the web application."
    After: "Optimized 12 core REST API endpoints, reducing average response latency by 40% and cutting cloud infrastructure costs by $1,200/month."


    Day 2: Optimize Your Portfolio for the 30-Second Rule
    The Challenge: Ensure every project featured on your personal site or GitHub includes a live working demo link, a clean architecture diagram, and a 3-bullet executive summary.
    The Action: Remove completed tutorial projects (e.g., basic To-Do apps) and replace them with 2–3 full-stack or domain-specific applications that solve real user pain points.


    Day 3: Align Keywords with Target Job Descriptions
    The Challenge: Run your resume against 5 job descriptions for your dream role using word-cloud or keyword-extraction tools.
    The Action: Identify missing technical frameworks, tools, and methodologies (e.g., CI/CD pipelines, Docker, microservices, unit testing) and naturally integrate them into your skills matrix and project bullet points.


    Day 4: Refresh Your LinkedIn Headline & Executive Summary
    The Challenge: Replace generic titles like "Aspiring Developer" or "Computer Science Graduate" with role-focused value propositions.
    The Action: Use a structured formula: [Current Role/Specialty] | [Core Stack/Tools] | [Value Delivered/Industry Focus]. Example: "Full-Stack Software Engineer | React, Node.js, PostgreSQL | Building Scalable FinTech Applications".


    Day 5: Execute 3 Value-First Outreach Messages
    The Challenge: Don't just click "Easy Apply." Identify 3 hiring managers or senior team leads at companies you admire.
    The Action: Send a concise, personalized message highlighting a specific insight about their product or technical stack, attaching your updated resume and live portfolio link.


    Key Takeaways
    Quantify everything: Measure your past work in terms of efficiency, latency, cost savings, or revenue impact.
    Show, don't just tell: Make portfolio projects instantly clickable and easily scannable with architecture diagrams and live demos.
    Targeted visibility: Tailor your keywords to match job descriptions and proactively reach out to decision-makers directly.


    CTA (Join Tech Jobs & Opportunities)
    Looking to accelerate your tech career, receive resume feedback, and access unlisted job opportunities across the industry? [Join Tech Jobs & Opportunities] today to connect with hiring managers, recruiters, and fellow tech professionals!
    The 5-Day Resume & Portfolio Audit: Turn Cold Applications into Interview Calls In a competitive job market, hiring managers spend less than 10 seconds scanning a resume before deciding whether to advance a candidate. If your resume simply lists job duties rather than proven business outcomes, you are slipping through the cracks. This week, challenge yourself to execute a systematic 5-day career asset upgrade: Day 1: Audit Your Resume Bullet Points for Impact Metrics The Challenge: Rewrite every experience bullet using the X-Y-Z Formula (Accomplished [X], as measured by [Y], by doing [Z]). Before: "Developed API endpoints for the web application." After: "Optimized 12 core REST API endpoints, reducing average response latency by 40% and cutting cloud infrastructure costs by $1,200/month." Day 2: Optimize Your Portfolio for the 30-Second Rule The Challenge: Ensure every project featured on your personal site or GitHub includes a live working demo link, a clean architecture diagram, and a 3-bullet executive summary. The Action: Remove completed tutorial projects (e.g., basic To-Do apps) and replace them with 2–3 full-stack or domain-specific applications that solve real user pain points. Day 3: Align Keywords with Target Job Descriptions The Challenge: Run your resume against 5 job descriptions for your dream role using word-cloud or keyword-extraction tools. The Action: Identify missing technical frameworks, tools, and methodologies (e.g., CI/CD pipelines, Docker, microservices, unit testing) and naturally integrate them into your skills matrix and project bullet points. Day 4: Refresh Your LinkedIn Headline & Executive Summary The Challenge: Replace generic titles like "Aspiring Developer" or "Computer Science Graduate" with role-focused value propositions. The Action: Use a structured formula: [Current Role/Specialty] | [Core Stack/Tools] | [Value Delivered/Industry Focus]. Example: "Full-Stack Software Engineer | React, Node.js, PostgreSQL | Building Scalable FinTech Applications". Day 5: Execute 3 Value-First Outreach Messages The Challenge: Don't just click "Easy Apply." Identify 3 hiring managers or senior team leads at companies you admire. The Action: Send a concise, personalized message highlighting a specific insight about their product or technical stack, attaching your updated resume and live portfolio link. Key Takeaways Quantify everything: Measure your past work in terms of efficiency, latency, cost savings, or revenue impact. Show, don't just tell: Make portfolio projects instantly clickable and easily scannable with architecture diagrams and live demos. Targeted visibility: Tailor your keywords to match job descriptions and proactively reach out to decision-makers directly. CTA (Join Tech Jobs & Opportunities) Looking to accelerate your tech career, receive resume feedback, and access unlisted job opportunities across the industry? [Join Tech Jobs & Opportunities] today to connect with hiring managers, recruiters, and fellow tech professionals!
    0 Commentarii 0 Distribuiri 1K Views 0 previzualizare
Sponsorizeaza Paginile