

• Step-by-Step Tutorial: Implementing GDPR-Compliant Tokenization and Data Masking in Node.js & PostgreSQL
    1. The Core Architecture Workflow
    Plaintext
    [ Client Request (Raw PII) ]
    │
    ▼
    ┌──────────────┐ Tokenize & Vault PII ┌──────────────────────┐
    │ API Gateway │ ───────────────────────────> │ Secure Token Vault │
    └──────┬───────┘ └──────────────────────┘
    │ Returns Pseudonymized Token
    ▼
    ┌──────────────┐ Write Safe Event ┌──────────────────────┐
    │ Microservice │ ───────────────────────────> │ PostgreSQL Database │
    └──────────────┘ │ (Tokenized / Masked) │
    └──────────────────────┘
    2. Step-by-Step Implementation Guide
    Step 1: Build an Ingestion Tokenization Middleware
    Intercept incoming requests at the API Gateway or Express entry point to isolate raw PII (like email addresses or phone numbers) and exchange them for cryptographic tokens via an isolated key management vault.


    JavaScript
    // Express.js PII Interception Middleware
    async function piiTokenizationMiddleware(req, res, next) {
    if (req.body && req.body.email) {
    const rawEmail = req.body.email;
    // Exchange raw PII for a secure pseudonymized token
    const piiToken = await tokenVaultService.tokenize({
    field: 'email',
    value: rawEmail,
    tenant_id: req.headers['x-tenant-id']
    });


    // Store token in payload, strip raw PII from downstream travel
    req.body.email_token = piiToken;
    delete req.body.email;
    }
    next();
    }
    Step 2: Store Tokenized and Masked Data in PostgreSQL
    Design your PostgreSQL schema to enforce strict column-level separation, keeping operational records linked strictly to non-reversible tokens rather than cleartext PII.


    SQL
    -- PostgreSQL Secure Table Schema
    CREATE TABLE user_profiles (
    profile_id UUID PRIMARY KEY DEFAULT gen_random_uuid(),
    tenant_id UUID NOT NULL,
    email_token VARCHAR(255) UNIQUE NOT NULL,
    masked_display_name VARCHAR(100),
    created_at TIMESTAMP WITH TIME ZONE DEFAULT CURRENT_TIMESTAMP
    );


    CREATE INDEX idx_tenant_email_token ON user_profiles(tenant_id, email_token);
    Step 3: Implement Automated Right-to-Be-Forgotten (RTBF) Purging
    Configure a scheduled background worker to listen for data deletion requests. Because your primary database only holds tokens, deleting the corresponding mapping in your secure token vault instantly renders downstream records anonymous and compliant.


    Key Takeaways
    Isolate at Ingestion: Never let raw PII traverse your internal microservice network or land in unencrypted application logs.


    Tokens Over Cleartext: Storing tokens in PostgreSQL databases minimizes regulatory exposure and mitigates the impact of a data breach.


    Architectural Compliance: GDPR adherence is achieved by design through automated token vaults and swift RTBF execution paths.


    CTA (Join Techawks UK)
    Want to collaborate with senior cloud architects and security leaders building compliant, resilient systems across the UK? Join Techawks UK today to share engineering playbooks, code reviews, and scale your career.
    Step-by-Step Tutorial: Implementing GDPR-Compliant Tokenization and Data Masking in Node.js & PostgreSQL 1. The Core Architecture Workflow Plaintext [ Client Request (Raw PII) ] │ ▼ ┌──────────────┐ Tokenize & Vault PII ┌──────────────────────┐ │ API Gateway │ ───────────────────────────> │ Secure Token Vault │ └──────┬───────┘ └──────────────────────┘ │ Returns Pseudonymized Token ▼ ┌──────────────┐ Write Safe Event ┌──────────────────────┐ │ Microservice │ ───────────────────────────> │ PostgreSQL Database │ └──────────────┘ │ (Tokenized / Masked) │ └──────────────────────┘ 2. Step-by-Step Implementation Guide Step 1: Build an Ingestion Tokenization Middleware Intercept incoming requests at the API Gateway or Express entry point to isolate raw PII (like email addresses or phone numbers) and exchange them for cryptographic tokens via an isolated key management vault. JavaScript // Express.js PII Interception Middleware async function piiTokenizationMiddleware(req, res, next) { if (req.body && req.body.email) { const rawEmail = req.body.email; // Exchange raw PII for a secure pseudonymized token const piiToken = await tokenVaultService.tokenize({ field: 'email', value: rawEmail, tenant_id: req.headers['x-tenant-id'] }); // Store token in payload, strip raw PII from downstream travel req.body.email_token = piiToken; delete req.body.email; } next(); } Step 2: Store Tokenized and Masked Data in PostgreSQL Design your PostgreSQL schema to enforce strict column-level separation, keeping operational records linked strictly to non-reversible tokens rather than cleartext PII. SQL -- PostgreSQL Secure Table Schema CREATE TABLE user_profiles ( profile_id UUID PRIMARY KEY DEFAULT gen_random_uuid(), tenant_id UUID NOT NULL, email_token VARCHAR(255) UNIQUE NOT NULL, masked_display_name VARCHAR(100), created_at TIMESTAMP WITH TIME ZONE DEFAULT CURRENT_TIMESTAMP ); CREATE INDEX idx_tenant_email_token ON user_profiles(tenant_id, email_token); Step 3: Implement Automated Right-to-Be-Forgotten (RTBF) Purging Configure a scheduled background worker to listen for data deletion requests. Because your primary database only holds tokens, deleting the corresponding mapping in your secure token vault instantly renders downstream records anonymous and compliant. Key Takeaways Isolate at Ingestion: Never let raw PII traverse your internal microservice network or land in unencrypted application logs. Tokens Over Cleartext: Storing tokens in PostgreSQL databases minimizes regulatory exposure and mitigates the impact of a data breach. Architectural Compliance: GDPR adherence is achieved by design through automated token vaults and swift RTBF execution paths. CTA (Join Techawks UK) Want to collaborate with senior cloud architects and security leaders building compliant, resilient systems across the UK? Join Techawks UK today to share engineering playbooks, code reviews, and scale your career.
    0 Comments 0 Shares 66 Views 0 Reviews
  • Step-by-Step Tutorial: Implementing Zero-Trust Secret Management and IAM Least-Privilege in AWS
    1. The Core Architecture Workflow
    Plaintext
    [ Developer / CI Service ]
    │
    ▼ (Assume OIDC Role / Temporary Token)
    ┌──────────────┐ Fetch Secret (mTLS / IAM Auth) ┌──────────────────────┐
    │ AWS STS │ ─────────────────────────────────> │ AWS Secrets Manager │
    └──────────────┘ └──────────┬───────────┘
    │ Rotated Automatically (Lambda)
    ▼
    ┌──────────────────────┐
    │ Encrypted Database │
    └──────────────────────┘
    2. Step-by-Step Implementation Guide
    Step 1: Replace Long-Lived IAM Keys with OIDC & AssumeRole
    Eliminate static access keys in your CI/CD pipelines by configuring OpenID Connect (OIDC) federation, granting short-lived session tokens mapped to strict resource ARNs.


    JSON
    {
    "Version": "2012-10-17",
    "Statement": [
    {
    "Effect": "Allow",
    "Principal": {
    "Federated": "arn:aws:iam::123456789012:oidc-provider/token.actions.githubusercontent.com"
    },
    "Action": "sts:AssumeRoleWithWebIdentity",
    "Condition": {
    "StringEquals": {
    "token.actions.githubusercontent.com:aud": "sts.amazonaws.com"
    },
    "StringLike": {
    "token.actions.githubusercontent.com:sub": "repo:my-org/my-repo:*"
    }
    }
    }
    ]
    }
    Step 2: Store and Automatically Rotate Secrets
    Migrate all database credentials and API tokens into AWS Secrets Manager. Configure automated rotation via a secure AWS Lambda function to cycle credentials every 30 days without downtime.


    Bash
    # Rotate a secret programmatically via AWS CLI
    aws secretsmanager rotate-secret --secret-id prod/database/credentials
    Step 3: Enforce Least-Privilege SCPs and IAM Policies
    Lock down organizational units (OUs) using Service Control Policies (SCPs) that explicitly deny dangerous actions (e.g., creating public S3 buckets or modifying IAM trust policies without MFA).


    Key Takeaways
    No Static Credentials: OIDC federation and short-lived STS tokens completely eliminate the risk of leaked permanent access keys.


    Automate Rotation: Automated secret rotation via Secrets Manager ensures compromised credentials expire rapidly.


    Scope Down Permissions: Least-privilege IAM policies and SCPs restrict the blast radius if an individual service is compromised.


    CTA (Join Techawks USA)
    Want to collaborate with senior cloud security engineers and infrastructure architects across the United States? Join Techawks USA today to share production playbooks, review system architectures, and elevate your engineering career.
    Step-by-Step Tutorial: Implementing Zero-Trust Secret Management and IAM Least-Privilege in AWS 1. The Core Architecture Workflow Plaintext [ Developer / CI Service ] │ ▼ (Assume OIDC Role / Temporary Token) ┌──────────────┐ Fetch Secret (mTLS / IAM Auth) ┌──────────────────────┐ │ AWS STS │ ─────────────────────────────────> │ AWS Secrets Manager │ └──────────────┘ └──────────┬───────────┘ │ Rotated Automatically (Lambda) ▼ ┌──────────────────────┐ │ Encrypted Database │ └──────────────────────┘ 2. Step-by-Step Implementation Guide Step 1: Replace Long-Lived IAM Keys with OIDC & AssumeRole Eliminate static access keys in your CI/CD pipelines by configuring OpenID Connect (OIDC) federation, granting short-lived session tokens mapped to strict resource ARNs. JSON { "Version": "2012-10-17", "Statement": [ { "Effect": "Allow", "Principal": { "Federated": "arn:aws:iam::123456789012:oidc-provider/token.actions.githubusercontent.com" }, "Action": "sts:AssumeRoleWithWebIdentity", "Condition": { "StringEquals": { "token.actions.githubusercontent.com:aud": "sts.amazonaws.com" }, "StringLike": { "token.actions.githubusercontent.com:sub": "repo:my-org/my-repo:*" } } } ] } Step 2: Store and Automatically Rotate Secrets Migrate all database credentials and API tokens into AWS Secrets Manager. Configure automated rotation via a secure AWS Lambda function to cycle credentials every 30 days without downtime. Bash # Rotate a secret programmatically via AWS CLI aws secretsmanager rotate-secret --secret-id prod/database/credentials Step 3: Enforce Least-Privilege SCPs and IAM Policies Lock down organizational units (OUs) using Service Control Policies (SCPs) that explicitly deny dangerous actions (e.g., creating public S3 buckets or modifying IAM trust policies without MFA). Key Takeaways No Static Credentials: OIDC federation and short-lived STS tokens completely eliminate the risk of leaked permanent access keys. Automate Rotation: Automated secret rotation via Secrets Manager ensures compromised credentials expire rapidly. Scope Down Permissions: Least-privilege IAM policies and SCPs restrict the blast radius if an individual service is compromised. CTA (Join Techawks USA) Want to collaborate with senior cloud security engineers and infrastructure architects across the United States? Join Techawks USA today to share production playbooks, review system architectures, and elevate your engineering career.
    0 Comments 0 Shares 66 Views 0 Reviews
  • Mastering kubectl port-forward: A Practical Guide to Securely Accessing Kubernetes Services
    The Problem: The "Inside-Outside" Barrier
    Kubernetes networking is designed for isolation. Services inside the cluster communicate via ClusterIP, which is not reachable from your local machine. The standard, "production-ready" solutions for external access are Ingress Controllers, API Gateways, or Service Meshes.


    However, setting up a full Ingress resource just to run a quick curl against a backend pod or check an internal Grafana dashboard is overkill and introduces unnecessary security exposure if misconfigured.


    The Solution: The kubectl port-forward Tunnel
    The solution is kubectl port-forward, a powerful, built-in command that acts as a secure, temporary bridge. It uses your existing Kubernetes authentication (your kubeconfig context) to establish a connection to the Kubernetes API server, which then proxies the traffic to the specified pod.


    This method is:


    Secure: Traffic is tunneled via the API server and is only accessible from localhost.


    Fast: No Ingress rules, DNS changes, or cloud load balancer provisioning required.


    Ephemeral: The tunnel exists only as long as the kubectl command is running.


    Here is the step-by-step process to set up the tunnel.


    Step 1: Identify Your Target Pod and Port
    You need to know the Namespace, the Pod name, and the container port you want to access.


    List pods in the current namespace:


    Bash
    kubectl get pods
    List pods in a specific namespace (e.g., monitoring):


    Bash
    kubectl get pods -n monitoring
    Identify the container port: Look at your Kubernetes Service or Pod definition (kubectl describe pod <pod-name>) to find the ContainerPort. (e.g., a MySQL pod might expose port 3306, a web UI might expose port 80 or 3000).


    Step 2: Execute the kubectl port-forward Command
    The basic syntax is:


    Bash
    kubectl port-forward <resource-type>/<resource-name> [local-port]:[remote-port]
    Let's look at three common, practical scenarios.


    Scenario A: Accessing a Web UI (e.g., Prometheus)
    Goal: Access the Prometheus dashboard running on port 9090 inside the monitoring namespace from your local browser.


    Command:


    Bash
    # Forward local port 8080 to pod's port 9090 in the 'monitoring' namespace
    kubectl port-forward pod/prometheus-server-7c6d5b4c8d-xyz12 8080:9090 -n monitoring
    How to Access: Open your browser and go to http://localhost:8080.


    (Pro-Tip: You can let Kubernetes assign a random local port by omitting it: kubectl port-forward pod/prometheus... :9090 -n monitoring.)


    Command:


    Bash
    # Forward local port 5433 to pod's port 5432 in the 'database' namespace
    kubectl port-forward service/postgres-primary 5433:5432 -n database
    How to Access: Configure your SQL client to connect to localhost:5433. Use the standard database credentials.


    Scenario C: Forwarding via Service or Deployment
    You don't always need to target a specific pod name (which can change). You can target a Service or Deployment, and Kubernetes will automatically forward to a matching, healthy pod.


    Command (Targeting a Service):


    Bash
    # Forward local port 8000 to a pod managed by the deployment 'frontend-v1' on port 80
    kubectl port-forward deployment/frontend-v1 8000:80 -n default
    Step 3: Verify and Terminate
    Once the command runs, you will see output like:


    Common Issues and Caveats
    Port Conflicts: If you try to bind to a local port already in use (e.g., local port 80 is taken by another web server), the command will fail. Choose a different local port (e.g., 8080:9090).


    Key Takeaways
    Ephemeral Access: kubectl port-forward creates a temporary, secure tunnel from localhost to a pod or service inside your cluster.


    Simple Syntax: Target Pod, Service, or Deployment by name and map local and remote ports.


    Discussion Question
    What is the most creative or unusual way you’ve used kubectl port-forward to solve a difficult debugging scenario? Share your "aha!" moment in the comments below!


    CTA (Join Cloud, DevOps & Open Source)
    Ready to move beyond basic kubectl commands and master advanced Kubernetes networking, troubleshooting, and infrastructure as code? Join Cloud, DevOps & Open Source inside the Techawks community to share scripts, discuss architecture patterns, and accelerate your cloud engineering career!
    Mastering kubectl port-forward: A Practical Guide to Securely Accessing Kubernetes Services The Problem: The "Inside-Outside" Barrier Kubernetes networking is designed for isolation. Services inside the cluster communicate via ClusterIP, which is not reachable from your local machine. The standard, "production-ready" solutions for external access are Ingress Controllers, API Gateways, or Service Meshes. However, setting up a full Ingress resource just to run a quick curl against a backend pod or check an internal Grafana dashboard is overkill and introduces unnecessary security exposure if misconfigured. The Solution: The kubectl port-forward Tunnel The solution is kubectl port-forward, a powerful, built-in command that acts as a secure, temporary bridge. It uses your existing Kubernetes authentication (your kubeconfig context) to establish a connection to the Kubernetes API server, which then proxies the traffic to the specified pod. This method is: Secure: Traffic is tunneled via the API server and is only accessible from localhost. Fast: No Ingress rules, DNS changes, or cloud load balancer provisioning required. Ephemeral: The tunnel exists only as long as the kubectl command is running. Here is the step-by-step process to set up the tunnel. Step 1: Identify Your Target Pod and Port You need to know the Namespace, the Pod name, and the container port you want to access. List pods in the current namespace: Bash kubectl get pods List pods in a specific namespace (e.g., monitoring): Bash kubectl get pods -n monitoring Identify the container port: Look at your Kubernetes Service or Pod definition (kubectl describe pod <pod-name>) to find the ContainerPort. (e.g., a MySQL pod might expose port 3306, a web UI might expose port 80 or 3000). Step 2: Execute the kubectl port-forward Command The basic syntax is: Bash kubectl port-forward <resource-type>/<resource-name> [local-port]:[remote-port] Let's look at three common, practical scenarios. Scenario A: Accessing a Web UI (e.g., Prometheus) Goal: Access the Prometheus dashboard running on port 9090 inside the monitoring namespace from your local browser. Command: Bash # Forward local port 8080 to pod's port 9090 in the 'monitoring' namespace kubectl port-forward pod/prometheus-server-7c6d5b4c8d-xyz12 8080:9090 -n monitoring How to Access: Open your browser and go to http://localhost:8080. (Pro-Tip: You can let Kubernetes assign a random local port by omitting it: kubectl port-forward pod/prometheus... :9090 -n monitoring.) Command: Bash # Forward local port 5433 to pod's port 5432 in the 'database' namespace kubectl port-forward service/postgres-primary 5433:5432 -n database How to Access: Configure your SQL client to connect to localhost:5433. Use the standard database credentials. Scenario C: Forwarding via Service or Deployment You don't always need to target a specific pod name (which can change). You can target a Service or Deployment, and Kubernetes will automatically forward to a matching, healthy pod. Command (Targeting a Service): Bash # Forward local port 8000 to a pod managed by the deployment 'frontend-v1' on port 80 kubectl port-forward deployment/frontend-v1 8000:80 -n default Step 3: Verify and Terminate Once the command runs, you will see output like: Common Issues and Caveats Port Conflicts: If you try to bind to a local port already in use (e.g., local port 80 is taken by another web server), the command will fail. Choose a different local port (e.g., 8080:9090). Key Takeaways Ephemeral Access: kubectl port-forward creates a temporary, secure tunnel from localhost to a pod or service inside your cluster. Simple Syntax: Target Pod, Service, or Deployment by name and map local and remote ports. Discussion Question What is the most creative or unusual way you’ve used kubectl port-forward to solve a difficult debugging scenario? Share your "aha!" moment in the comments below! CTA (Join Cloud, DevOps & Open Source) Ready to move beyond basic kubectl commands and master advanced Kubernetes networking, troubleshooting, and infrastructure as code? Join Cloud, DevOps & Open Source inside the Techawks community to share scripts, discuss architecture patterns, and accelerate your cloud engineering career!
    0 Comments 0 Shares 69 Views 0 Reviews
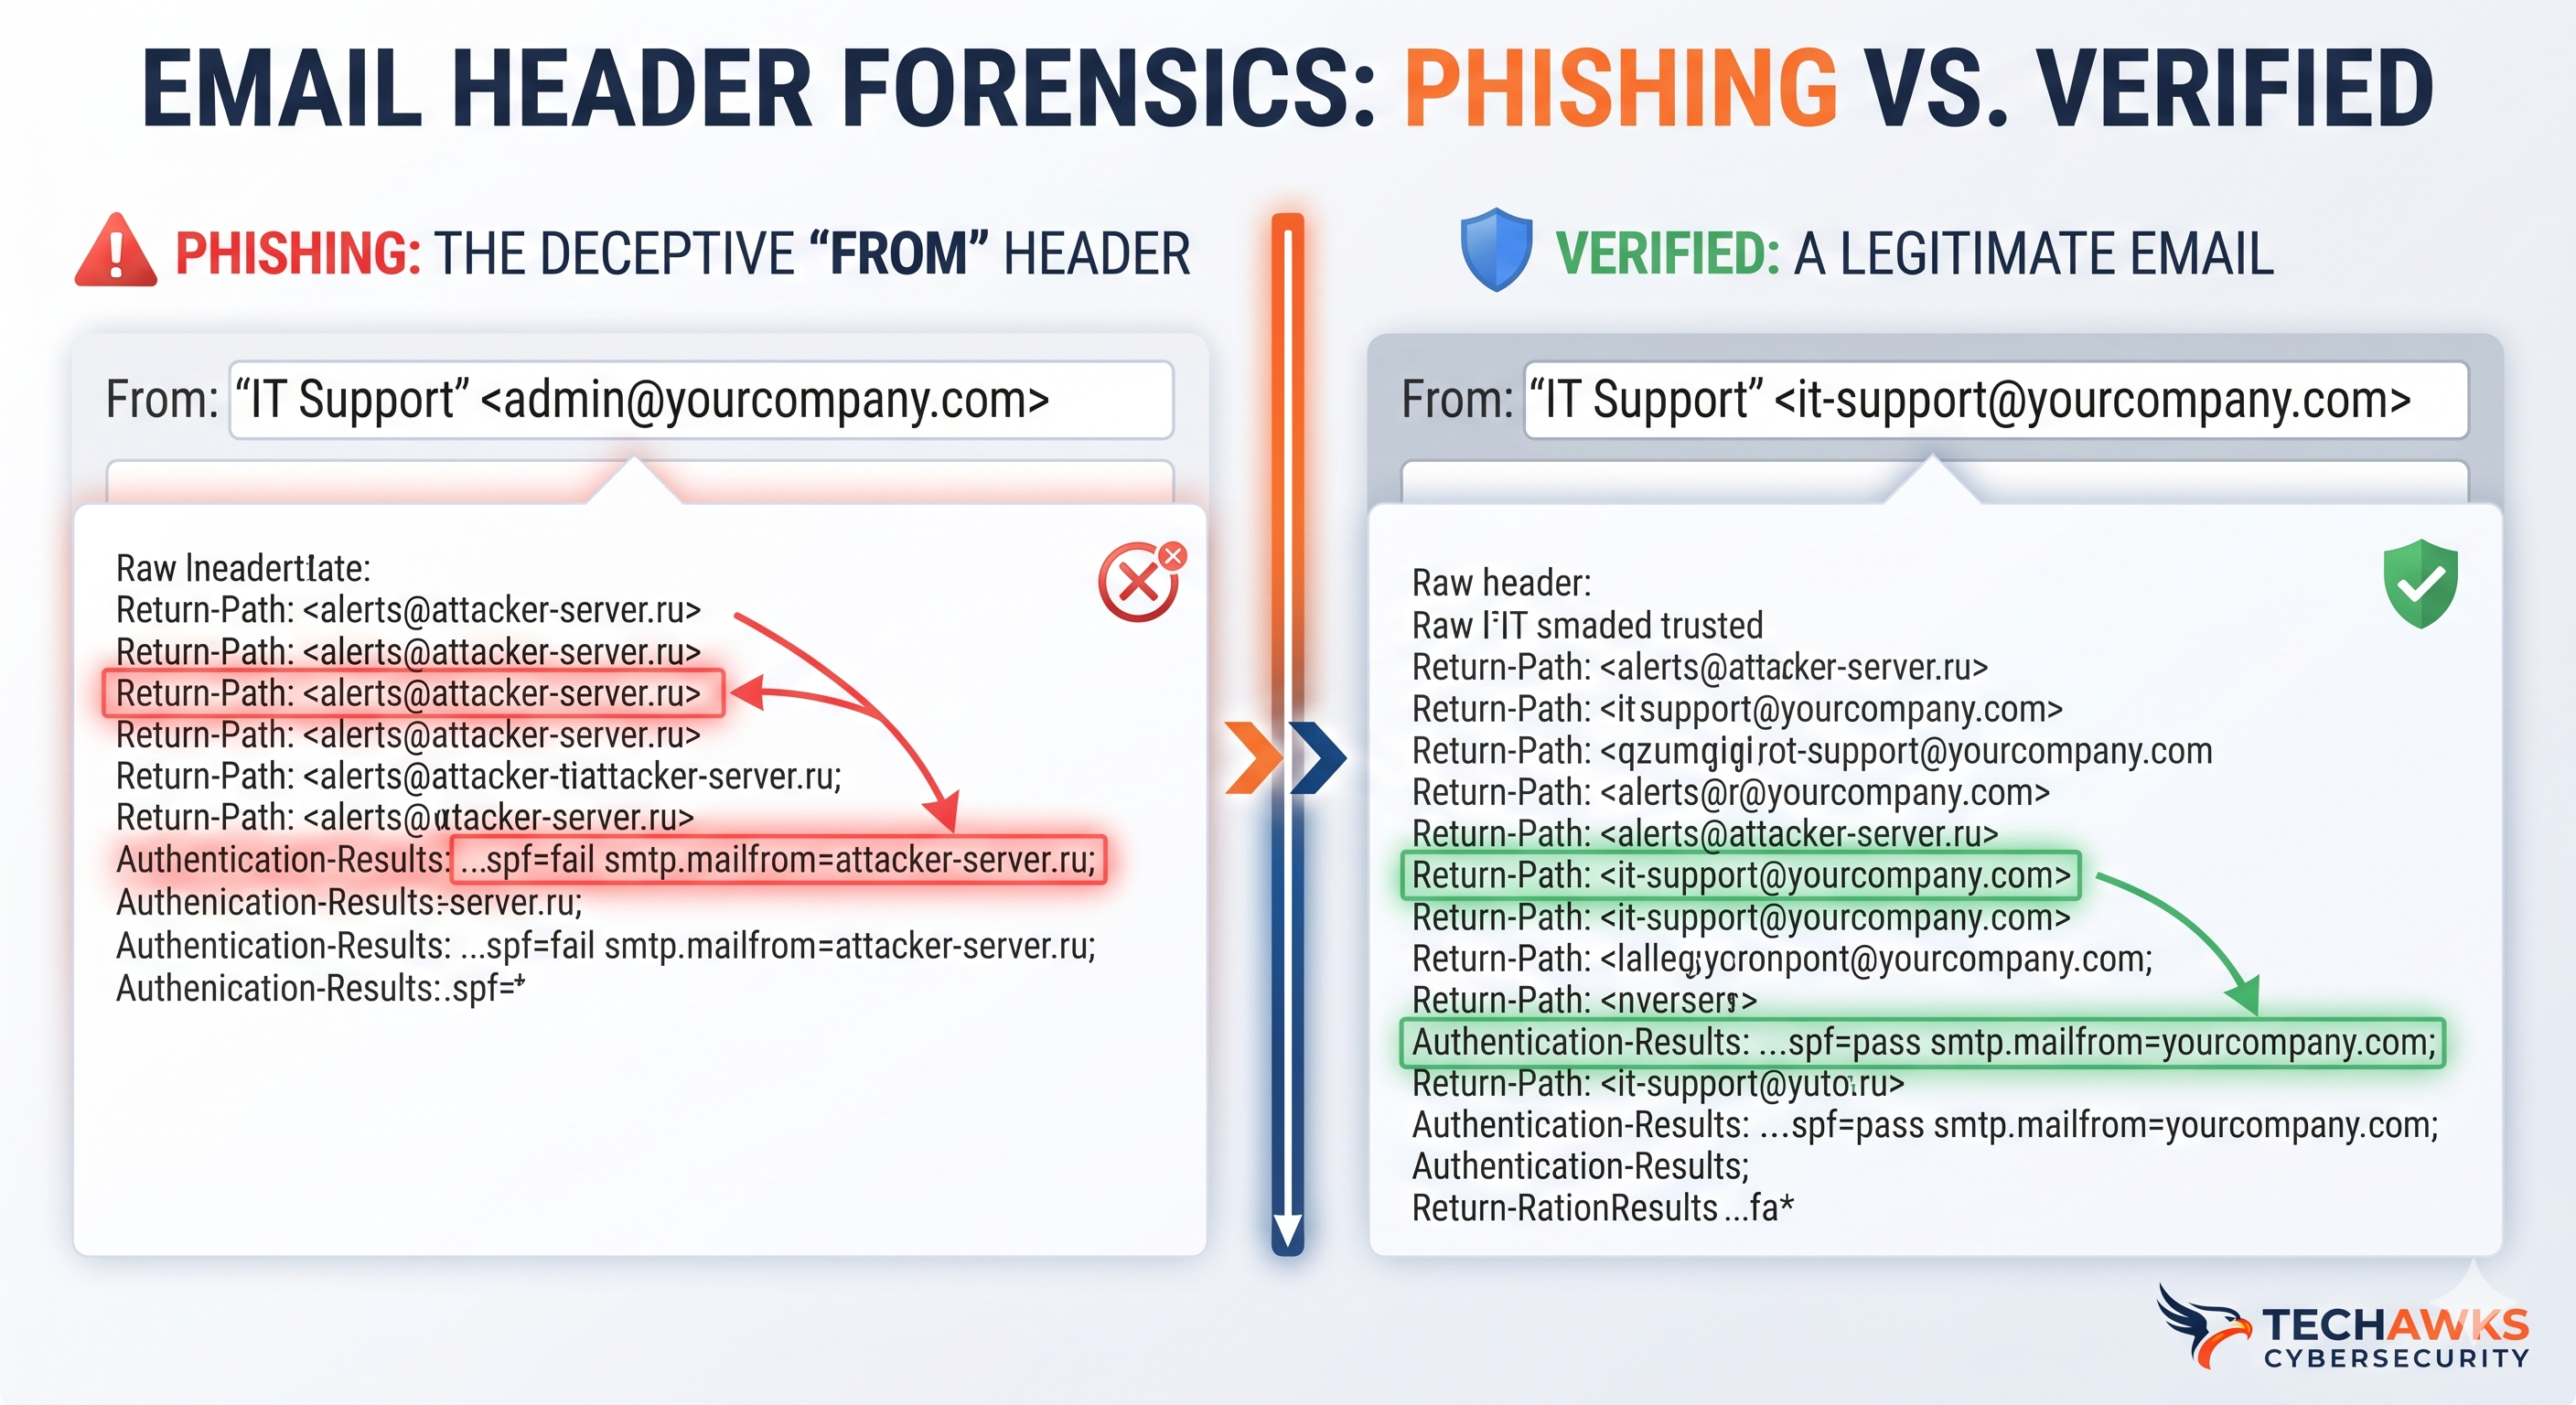
  • Stop Phishing in its Tracks: A Practical Tutorial on Analyzing Suspicious Email Headers
    The Problem: The Deceptive "From" Field
    Attackers frequently spoof the From address (e.g., making an email appear to be from ceo@yourcompany.com when it’s actually from attacker@evil-domain.org). Your email client often hides the actual sender's address behind a friendly name, making it easy to fall for the deception.


    The Solution: The Email Header Detective Work
    The solution lies in the Received headers, which are added by every mail server that handles the message. By reading these headers from the bottom up, you can trace the email’s true path and identify discrepancies.


    Here is the step-by-step process to analyze headers in most email clients (e.g., Gmail: "Show Original"; Outlook: "Message Options"):


    Step 1: Open the Full Headers
    Locate the option to view the email’s full source or headers. You will see a dense block of text. Don't be intimidated; you only need to focus on a few key lines.


    Step 2: Trace the Path (Bottom-Up)
    Read the Received: lines from the bottom to the top. The bottom-most Received header is where the email originated. Each subsequent line above it is the next server that handled the message.


    Step 3: Verify the "From" and "Return-Path"
    Look for the From: header (the one you see) and the Return-Path: header (where replies go). In a legitimate email, these usually align. In a phishing attempt, the Return-Path often shows a completely different, suspicious domain.


    Step 4: Check Authentication Results (SPF, DKIM, DMARC)
    This is the most critical step. Look for the Authentication-Results: header.


    SPF (Sender Policy Framework): Confirms the server sending the email is authorized to send on behalf of the domain. Look for spf=pass.


    DKIM (DomainKeys Identified Mail): Verifies the email's integrity and that it hasn't been altered in transit. Look for dkim=pass.


    DMARC (Domain-based Message Authentication, Reporting, and Conformance): Uses SPF and DKIM to dictate how the receiver should handle an email that fails authentication. Look for dmarc=pass.


    If any of these show fail or softfail while claiming to be from a trusted domain, it is almost certainly a phishing attempt.


    Real-World Example
    Suspicious Header:


    Plaintext
    Received: from attacker-server.ru (attacker-server.ru [192.0.2.10])
    by mail.yourcompany.com with ESMTP id abc12345
    for <employee@yourcompany.com>; Mon, 25 Oct 2023 10:00:00 -0400 (EDT)
    Authentication-Results: mail.yourcompany.com; spf=fail smtp.mailfrom=attacker-server.ru; dkim=none
    From: "IT Support" <admin@yourcompany.com>
    Return-Path: <alerts@attacker-server.ru>
    Analysis:


    The email claims to be from admin@yourcompany.com.


    However, the Return-Path shows alerts@attacker-server.ru.


    The first Received line shows the email originated from attacker-server.ru.


    Crucially, Authentication-Results shows spf=fail and dkim=none.


    Verdict: Phishing. Do not trust the From display name.


    Key Takeaways
    Never Trust the Display Name: Phishers easily fake the "From" name; always investigate the actual email address.


    Read Headers Bottom-Up: Trace the email's journey from the originating server to your inbox by reading the Received lines in reverse chronological order.


    Rely on Authentication: The Authentication-Results header with SPF, DKIM, and DMARC "pass" results is the gold standard for verifying a sender's legitimacy.


    When in Doubt, Report: If the headers show any discrepancies or authentication failures, do not interact with the email and report it to your security team immediately.


    Discussion Question
    What is the most convincing phishing email you've ever seen, and what clues finally gave it away? Share your experience to help others learn to spot red flags!


    CTA (Join Cybersecurity & Ethical Hacking)
    Ready to move from defending against attacks to understanding how attackers think? Join Cybersecurity & Ethical Hacking inside the Techawks community to access hands-on labs, learn advanced threat analysis, and start your journey toward a career in infosec.
    Stop Phishing in its Tracks: A Practical Tutorial on Analyzing Suspicious Email Headers The Problem: The Deceptive "From" Field Attackers frequently spoof the From address (e.g., making an email appear to be from ceo@yourcompany.com when it’s actually from attacker@evil-domain.org). Your email client often hides the actual sender's address behind a friendly name, making it easy to fall for the deception. The Solution: The Email Header Detective Work The solution lies in the Received headers, which are added by every mail server that handles the message. By reading these headers from the bottom up, you can trace the email’s true path and identify discrepancies. Here is the step-by-step process to analyze headers in most email clients (e.g., Gmail: "Show Original"; Outlook: "Message Options"): Step 1: Open the Full Headers Locate the option to view the email’s full source or headers. You will see a dense block of text. Don't be intimidated; you only need to focus on a few key lines. Step 2: Trace the Path (Bottom-Up) Read the Received: lines from the bottom to the top. The bottom-most Received header is where the email originated. Each subsequent line above it is the next server that handled the message. Step 3: Verify the "From" and "Return-Path" Look for the From: header (the one you see) and the Return-Path: header (where replies go). In a legitimate email, these usually align. In a phishing attempt, the Return-Path often shows a completely different, suspicious domain. Step 4: Check Authentication Results (SPF, DKIM, DMARC) This is the most critical step. Look for the Authentication-Results: header. SPF (Sender Policy Framework): Confirms the server sending the email is authorized to send on behalf of the domain. Look for spf=pass. DKIM (DomainKeys Identified Mail): Verifies the email's integrity and that it hasn't been altered in transit. Look for dkim=pass. DMARC (Domain-based Message Authentication, Reporting, and Conformance): Uses SPF and DKIM to dictate how the receiver should handle an email that fails authentication. Look for dmarc=pass. If any of these show fail or softfail while claiming to be from a trusted domain, it is almost certainly a phishing attempt. Real-World Example Suspicious Header: Plaintext Received: from attacker-server.ru (attacker-server.ru [192.0.2.10]) by mail.yourcompany.com with ESMTP id abc12345 for <employee@yourcompany.com>; Mon, 25 Oct 2023 10:00:00 -0400 (EDT) Authentication-Results: mail.yourcompany.com; spf=fail smtp.mailfrom=attacker-server.ru; dkim=none From: "IT Support" <admin@yourcompany.com> Return-Path: <alerts@attacker-server.ru> Analysis: The email claims to be from admin@yourcompany.com. However, the Return-Path shows alerts@attacker-server.ru. The first Received line shows the email originated from attacker-server.ru. Crucially, Authentication-Results shows spf=fail and dkim=none. Verdict: Phishing. Do not trust the From display name. Key Takeaways Never Trust the Display Name: Phishers easily fake the "From" name; always investigate the actual email address. Read Headers Bottom-Up: Trace the email's journey from the originating server to your inbox by reading the Received lines in reverse chronological order. Rely on Authentication: The Authentication-Results header with SPF, DKIM, and DMARC "pass" results is the gold standard for verifying a sender's legitimacy. When in Doubt, Report: If the headers show any discrepancies or authentication failures, do not interact with the email and report it to your security team immediately. Discussion Question What is the most convincing phishing email you've ever seen, and what clues finally gave it away? Share your experience to help others learn to spot red flags! CTA (Join Cybersecurity & Ethical Hacking) Ready to move from defending against attacks to understanding how attackers think? Join Cybersecurity & Ethical Hacking inside the Techawks community to access hands-on labs, learn advanced threat analysis, and start your journey toward a career in infosec.
    0 Comments 0 Shares 121 Views 0 Reviews
  • Mastering the Kubernetes Sidecar: A Practical Guide to Zero-Downtime Configuration Reloads
    The Problem: Static Configs = Brittle Deployments
    In traditional container architectures, application code and configuration are often tightly coupled. When an operations team needs to update a feature flag, database endpoint, or TLS certificate, they typically have to update the ConfigMap/Secret and then trigger a rolling deployment of the main application pod. This causes service disruption, requires coordination, and slows down delivery pipelines.


    The Solution: The Configuration Reloader Sidecar
    By implementing the Sidecar pattern, we decouple the core application logic from the lifecycle of its configuration. We run a secondary, specialized container (the "sidecar") alongside the main application container within the same pod. This sidecar is responsible for:


    Mounting the Kubernetes ConfigMap or Secret as a shared volume.


    Watching that volume for atomic file updates (using inotify or similar mechanisms).


    Triggering a reload of the main application (via API call or POSIX signal) as soon as a change is detected.


    Step-by-Step Implementation (Using Nginx as an Example)
    YAML
    apiVersion: apps/v1
    kind: Deployment
    metadata:
    name: web-app
    spec:
    template:
    spec:
    containers:
    # 1. Main Application Container
    - name: nginx
    image: nginx:1.25
    volumeMounts:
    - name: config-volume
    mountPath: /etc/nginx/conf.d/ # Config shared here
    # 2. Configuration Reloader Sidecar
    - name: config-reloader
    image: k8s-sidecar/config-reloader:v1 # e.g., Reloader or custom script
    env:
    - name: FOLDER_TO_WATCH
    value: "/etc/nginx/conf.d/"
    - name: RELOAD_URL
    value: "http://localhost:18080/reload" # Nginx specific reload endpoint
    volumeMounts:
    - name: config-volume
    mountPath: /etc/nginx/conf.d/
    volumes:
    - name: config-volume
    configMap:
    name: nginx-config
    Practical Steps for Adoption:
    Identify Compatible Applications: This pattern works best for applications that support hot-reloading (e.g., Nginx, Envoy, Prometheus) or can be signaled to reload (e.g., SIGHUP for many services).


    Choose Your Sidecar: You can build a custom script using tools like entr or inotify-wait, or leverage established open-source projects designed for this specific task.


    Define the Signal/Action: Ensure your main container can accept a reload signal or API call and apply the new configuration without dropping connections.


    Key Takeaways
    Decouple Configuration from Application Lifecycle: Separate config updates from code deployments to increase velocity and reduce risk.


    Zero Downtime is Achievable: Hot-reloading allows for instant configuration updates without restarting the main application process.


    Sidecar Pattern is Universal: This pattern applies broadly beyond configuration, including logging agents, service mesh proxies, and security scanners.


    CTA (Join Techawks General Community)
    Ready to master advanced Kubernetes patterns? Join the global Techawks community to connect with senior engineers, share deployment war stories, and level up your cloud-native architecture skills. [Join the Techawks General Community today!]
    Mastering the Kubernetes Sidecar: A Practical Guide to Zero-Downtime Configuration Reloads The Problem: Static Configs = Brittle Deployments In traditional container architectures, application code and configuration are often tightly coupled. When an operations team needs to update a feature flag, database endpoint, or TLS certificate, they typically have to update the ConfigMap/Secret and then trigger a rolling deployment of the main application pod. This causes service disruption, requires coordination, and slows down delivery pipelines. The Solution: The Configuration Reloader Sidecar By implementing the Sidecar pattern, we decouple the core application logic from the lifecycle of its configuration. We run a secondary, specialized container (the "sidecar") alongside the main application container within the same pod. This sidecar is responsible for: Mounting the Kubernetes ConfigMap or Secret as a shared volume. Watching that volume for atomic file updates (using inotify or similar mechanisms). Triggering a reload of the main application (via API call or POSIX signal) as soon as a change is detected. Step-by-Step Implementation (Using Nginx as an Example) YAML apiVersion: apps/v1 kind: Deployment metadata: name: web-app spec: template: spec: containers: # 1. Main Application Container - name: nginx image: nginx:1.25 volumeMounts: - name: config-volume mountPath: /etc/nginx/conf.d/ # Config shared here # 2. Configuration Reloader Sidecar - name: config-reloader image: k8s-sidecar/config-reloader:v1 # e.g., Reloader or custom script env: - name: FOLDER_TO_WATCH value: "/etc/nginx/conf.d/" - name: RELOAD_URL value: "http://localhost:18080/reload" # Nginx specific reload endpoint volumeMounts: - name: config-volume mountPath: /etc/nginx/conf.d/ volumes: - name: config-volume configMap: name: nginx-config Practical Steps for Adoption: Identify Compatible Applications: This pattern works best for applications that support hot-reloading (e.g., Nginx, Envoy, Prometheus) or can be signaled to reload (e.g., SIGHUP for many services). Choose Your Sidecar: You can build a custom script using tools like entr or inotify-wait, or leverage established open-source projects designed for this specific task. Define the Signal/Action: Ensure your main container can accept a reload signal or API call and apply the new configuration without dropping connections. Key Takeaways Decouple Configuration from Application Lifecycle: Separate config updates from code deployments to increase velocity and reduce risk. Zero Downtime is Achievable: Hot-reloading allows for instant configuration updates without restarting the main application process. Sidecar Pattern is Universal: This pattern applies broadly beyond configuration, including logging agents, service mesh proxies, and security scanners. CTA (Join Techawks General Community) Ready to master advanced Kubernetes patterns? Join the global Techawks community to connect with senior engineers, share deployment war stories, and level up your cloud-native architecture skills. [Join the Techawks General Community today!]
    0 Comments 0 Shares 80 Views 0 Reviews
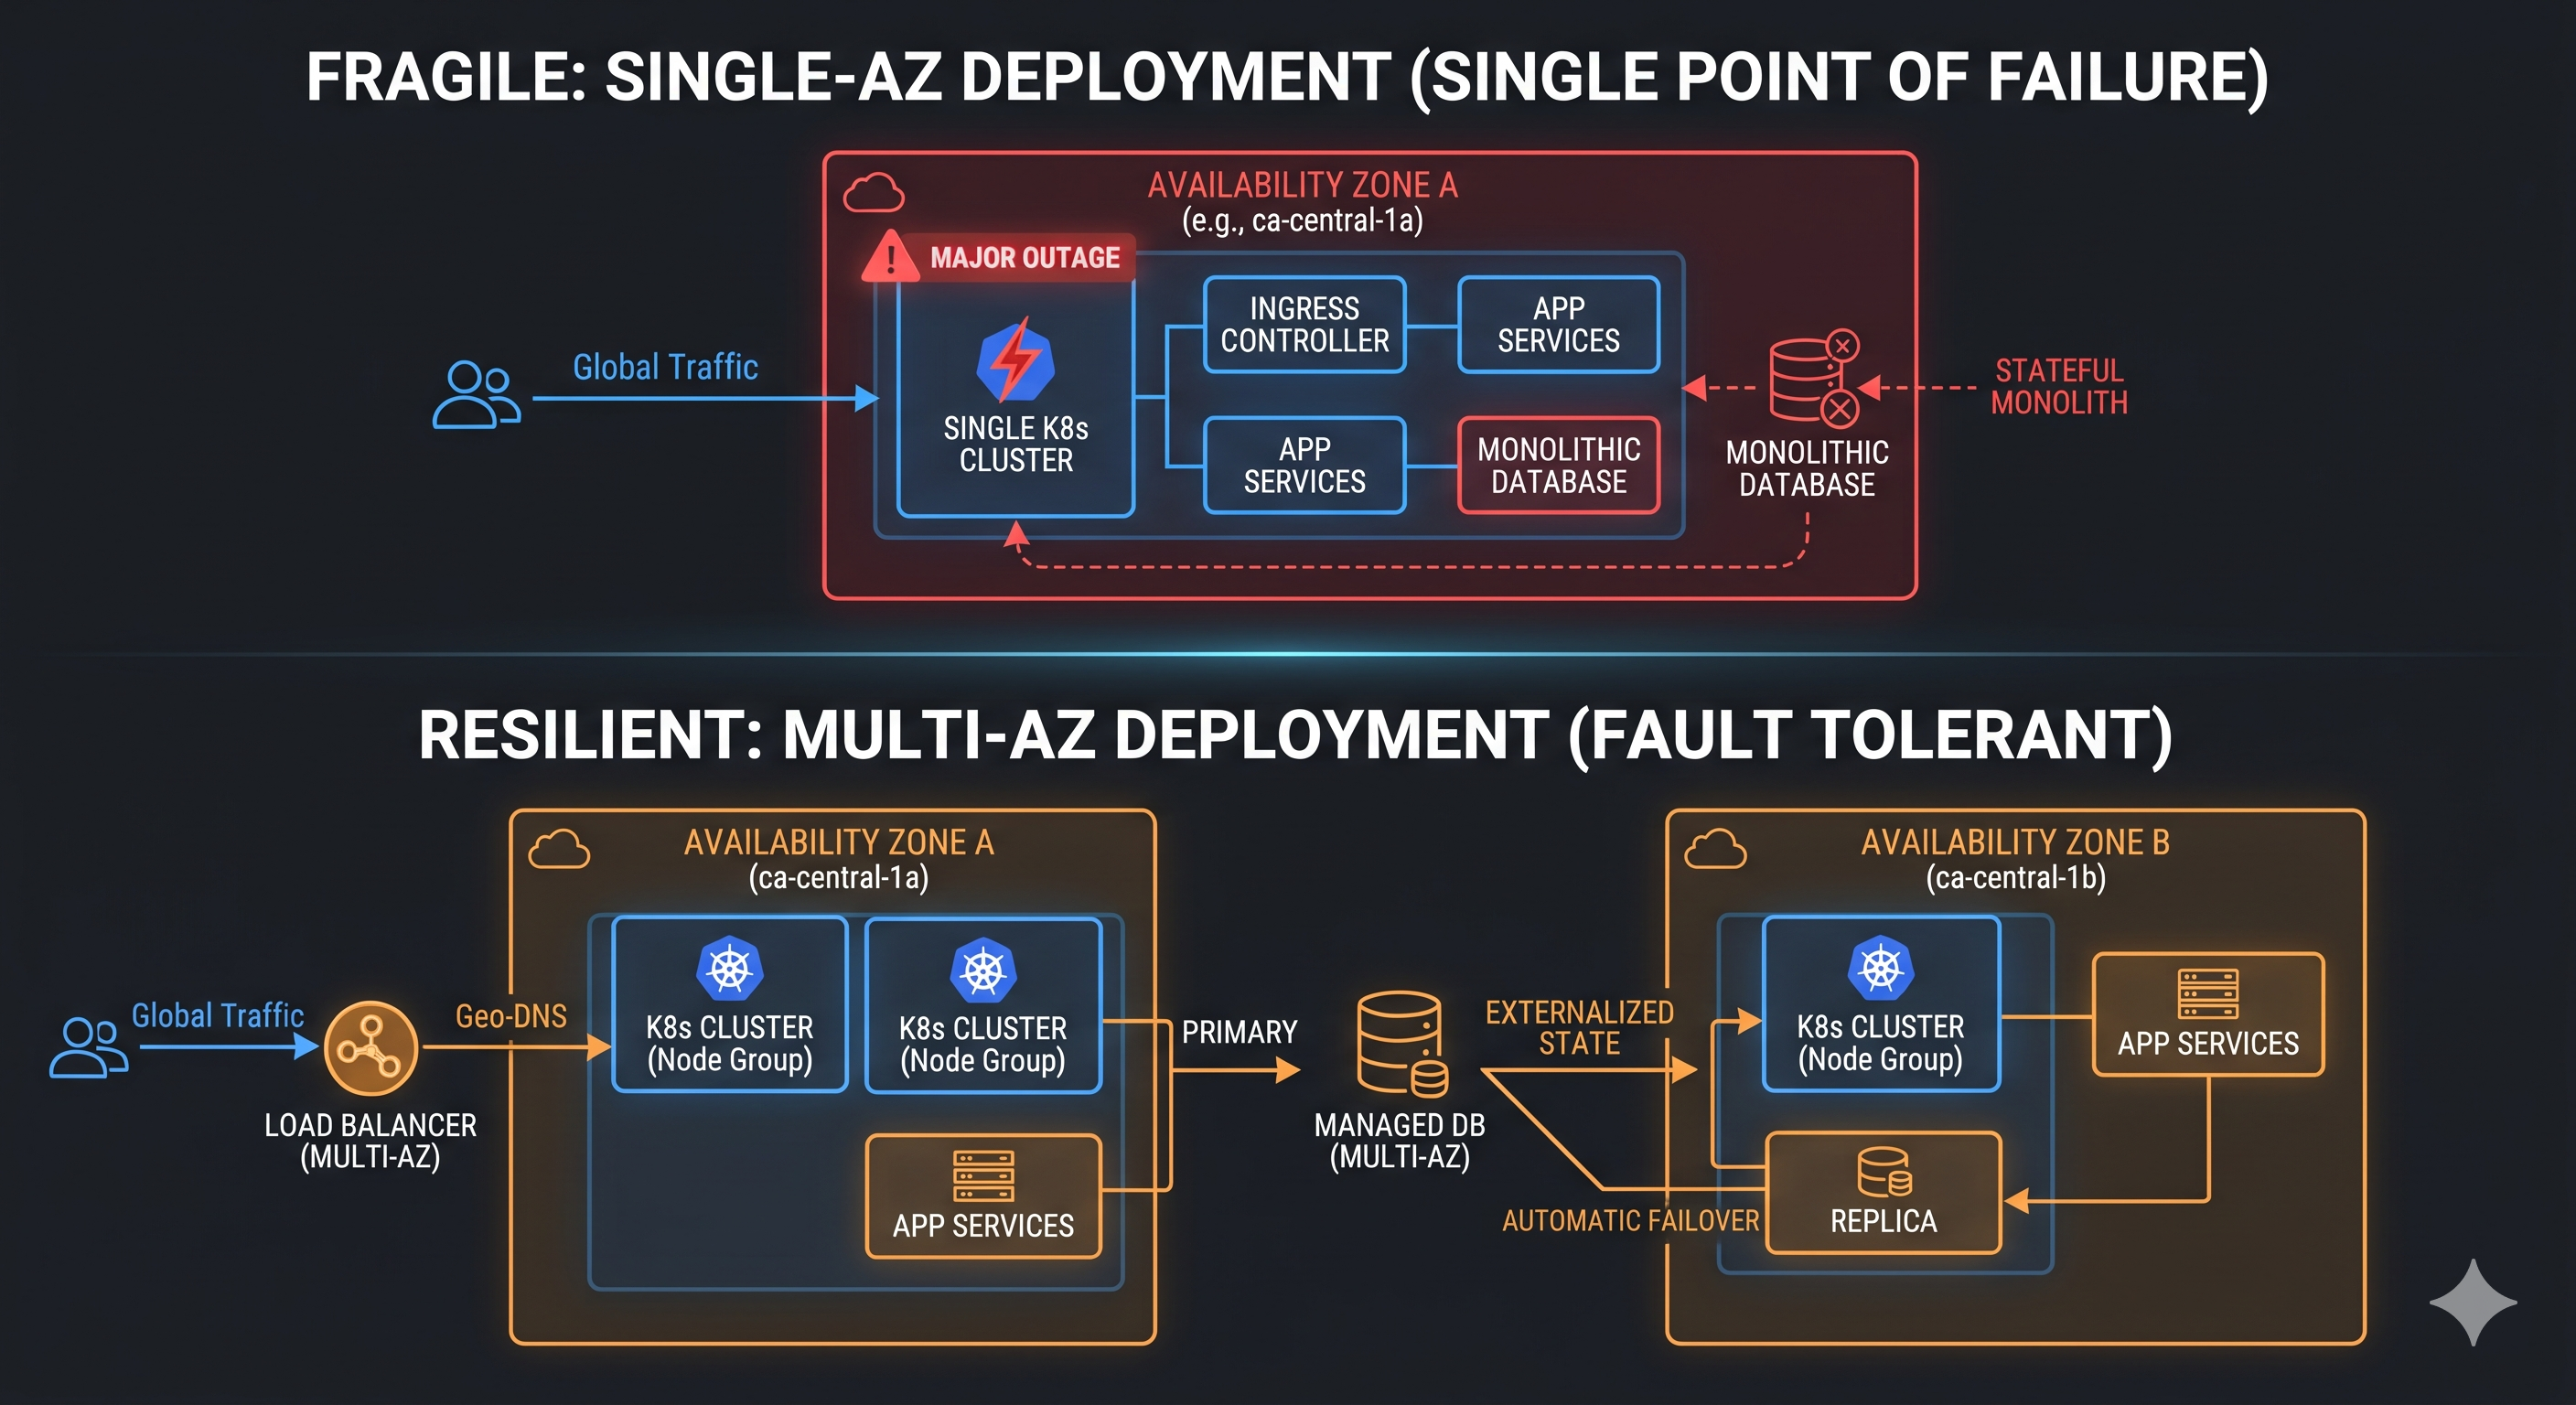
  • The Canadian Production Readiness Checklist: Building Resilient, Compliant Infrastructure
    1. Failure Modes & Anti-Patterns
    The Single-Region Trap: Relying solely on ca-central-1, leading to total platform downtime if a specific availability zone or the entire region experiences degradation.


    Unencrypted Data at Rest: Neglecting full-disk encryption (e.g., AES-256) for all databases and persistent volumes in the name of convenience, violating basic security principles.


    The Blind Operator: Deploying services with zero distributed tracing, no structured logging, and only basic CPU/RAM alerts, making root-cause analysis impossible during an incident.


    2. Architecture Blueprint (Resilient & Compliant)
    Plaintext
    [ Global/Canadian Traffic ]
    │
    ▼ (Geo-DNS Routing to Canada)
    ┌──────────────┐ Service Mesh / mTLS ┌──────────────────────┐
    │ WAF / CDN │ ───────────────────────────> │ Canadian K8s Cluster │
    └──────┬───────┘ └──────────────────────┘
    │ │ Scoped IAM Role
    ▼ ▼
    ┌──────────────┐ ┌──────────────────────┐
    │ Ingress │ │ Managed DB │
    │ Controller │ │ (Multi-AZ, Encrypted)│
    └──────────────┘ └──────────────────────┘
    3. Actionable Engineering Principles
    Multi-AZ Deployment as Default: Architect your container orchestration (K8s/EKS/AKS) to spread application nodes across at least two physically separate availability zones within the Canadian region. Implement Pod Disruption Budgets.


    Encrypt Everything at Rest: Enforce managed encryption keys (e.g., AWS KMS, Azure Key Vault) for all databases, caches (Redis), and object storage (S3/Blob Storage) to protect sensitive data.


    Implement Centralized Observability: Standardize on structured JSON logging and implement end-to-end distributed tracing (e.g., OpenTelemetry) from day one. Configure alerts based on service-level indicators (SLIs) like error rate and latency, not just infrastructure metrics.


    Automate IaC & Security Scanning: Define all infrastructure using Infrastructure-as-Code (IaC) pipelines. Integrate static analysis security testing (SAST) for IaC templates (e.g., tfsec, Checkov) into your CI/CD to block insecure deployments (e.g., open security groups).


    Key Takeaways
    Resilience is Architectural: Multi-AZ architecture isn't an option; it's a requirement for Canadian platform uptime.


    Security is Non-Negotiable: Encryption at rest and in transit must be enabled by default, not as an afterthought.


    Visibility is Operational: If you can't trace a request end-to-end, you cannot debug production incidents efficiently.


    CTA (Join Techawks Canada)
    Ready to build systems that meet the highest Canadian standards of resilience and security? Join Techawks Canada today to collaborate with senior platform engineers, share regional best practices, and elevate your engineering career.
    The Canadian Production Readiness Checklist: Building Resilient, Compliant Infrastructure 1. Failure Modes & Anti-Patterns The Single-Region Trap: Relying solely on ca-central-1, leading to total platform downtime if a specific availability zone or the entire region experiences degradation. Unencrypted Data at Rest: Neglecting full-disk encryption (e.g., AES-256) for all databases and persistent volumes in the name of convenience, violating basic security principles. The Blind Operator: Deploying services with zero distributed tracing, no structured logging, and only basic CPU/RAM alerts, making root-cause analysis impossible during an incident. 2. Architecture Blueprint (Resilient & Compliant) Plaintext [ Global/Canadian Traffic ] │ ▼ (Geo-DNS Routing to Canada) ┌──────────────┐ Service Mesh / mTLS ┌──────────────────────┐ │ WAF / CDN │ ───────────────────────────> │ Canadian K8s Cluster │ └──────┬───────┘ └──────────────────────┘ │ │ Scoped IAM Role ▼ ▼ ┌──────────────┐ ┌──────────────────────┐ │ Ingress │ │ Managed DB │ │ Controller │ │ (Multi-AZ, Encrypted)│ └──────────────┘ └──────────────────────┘ 3. Actionable Engineering Principles Multi-AZ Deployment as Default: Architect your container orchestration (K8s/EKS/AKS) to spread application nodes across at least two physically separate availability zones within the Canadian region. Implement Pod Disruption Budgets. Encrypt Everything at Rest: Enforce managed encryption keys (e.g., AWS KMS, Azure Key Vault) for all databases, caches (Redis), and object storage (S3/Blob Storage) to protect sensitive data. Implement Centralized Observability: Standardize on structured JSON logging and implement end-to-end distributed tracing (e.g., OpenTelemetry) from day one. Configure alerts based on service-level indicators (SLIs) like error rate and latency, not just infrastructure metrics. Automate IaC & Security Scanning: Define all infrastructure using Infrastructure-as-Code (IaC) pipelines. Integrate static analysis security testing (SAST) for IaC templates (e.g., tfsec, Checkov) into your CI/CD to block insecure deployments (e.g., open security groups). Key Takeaways Resilience is Architectural: Multi-AZ architecture isn't an option; it's a requirement for Canadian platform uptime. Security is Non-Negotiable: Encryption at rest and in transit must be enabled by default, not as an afterthought. Visibility is Operational: If you can't trace a request end-to-end, you cannot debug production incidents efficiently. CTA (Join Techawks Canada) Ready to build systems that meet the highest Canadian standards of resilience and security? Join Techawks Canada today to collaborate with senior platform engineers, share regional best practices, and elevate your engineering career.
    0 Comments 0 Shares 208 Views 0 Reviews
  • The UAE Production Readiness Checklist: Scaling Resilient Cloud Infrastructure
    1. Failure Modes & Anti-Patterns
    The Single Region Trap: Relying on a single availability zone within the UAE cluster, leading to a total platform outage if that specific zone experiences infrastructure degradation.


    The Stateful Monolith: Deploying applications where critical state (session data, user uploads) is stored locally on the server instance rather than in a managed, distributed service.


    2. Architecture Blueprint (Resilient UAE Deployment)
    Plaintext
    [ Global Traffic ]
    │
    ▼ (Geo-DNS Routing to UAE)
    ┌──────────────┐ Service Mesh / mTLS ┌──────────────────────┐
    │ WAF / CDN │ ───────────────────────────> │ UAE K8s Cluster (Multi-AZ) │
    └──────┬───────┘ └──────────────────────┘
    │ │ Scoped IAM Role
    ▼ ▼
    ┌──────────────┐ ┌──────────────────────┐
    │ Ingress │ │ Managed DB (Multi-AZ)│
    │ Controller │ │ (Encrypted) │
    └──────────────┘ └──────────────────────┘
    3. Actionable Engineering Principles
    Multi-AZ Deployment is Non-Negotiable: Architect your container orchestration (Kubernetes/EKS/AKS) to spread application nodes across at least two physically separate availability zones within the UAE region. Configure Pod Disruption Budgets to ensure zero-downtime deployments.


    Externalize State & Secrets: Decouple application state entirely. Use managed database services (e.g., AWS RDS Aurora, Azure SQL) configured for Multi-AZ failover and store all configuration secrets in a dedicated vault (e.g., HashiCorp Vault, AWS Secrets Manager).


    Implement Distributed Tracing & Log Aggregation: Standardize on a unified logging format (e.g., JSON) and implement end-to-end distributed tracing (e.g., using OpenTelemetry) across all microservices. Ingest logs centrally with automated alerts configured for critical error rate spikes, not just CPU/RAM saturation.


    Automate IaC & Compliance Drift Detection: Define all infrastructure using Infrastructure-as-Code (IaC) pipelines (Terraform/Pulumi) that run from a secure CI/CD environment. Implement regular compliance scanning to detect and remediate "drift" (e.g., someone manually opening port 0.0.0.0/0 in a security group).


    Key Takeaways
    Isolate Failures: Multi-AZ architecture ensures that a localized infrastructure failure in one datacenter doesn't take down your entire UAE platform.


    Don't Fear the Failover: Automate database failover testing regularly. If you haven't tested your disaster recovery plan in production, it doesn't exist.


    Visibility is Resilience: Without centralized, searchable logs and distributed traces, you are debugging in the dark during high-stakes production incidents.


    CTA (Join Techawks UAE)
    Ready to build systems that match the ambition of the UAE’s tech landscape? Join Techawks UAE today to collaborate with senior cloud architects and platform engineers, share regional best practices, and elevate your engineering standards.
    The UAE Production Readiness Checklist: Scaling Resilient Cloud Infrastructure 1. Failure Modes & Anti-Patterns The Single Region Trap: Relying on a single availability zone within the UAE cluster, leading to a total platform outage if that specific zone experiences infrastructure degradation. The Stateful Monolith: Deploying applications where critical state (session data, user uploads) is stored locally on the server instance rather than in a managed, distributed service. 2. Architecture Blueprint (Resilient UAE Deployment) Plaintext [ Global Traffic ] │ ▼ (Geo-DNS Routing to UAE) ┌──────────────┐ Service Mesh / mTLS ┌──────────────────────┐ │ WAF / CDN │ ───────────────────────────> │ UAE K8s Cluster (Multi-AZ) │ └──────┬───────┘ └──────────────────────┘ │ │ Scoped IAM Role ▼ ▼ ┌──────────────┐ ┌──────────────────────┐ │ Ingress │ │ Managed DB (Multi-AZ)│ │ Controller │ │ (Encrypted) │ └──────────────┘ └──────────────────────┘ 3. Actionable Engineering Principles Multi-AZ Deployment is Non-Negotiable: Architect your container orchestration (Kubernetes/EKS/AKS) to spread application nodes across at least two physically separate availability zones within the UAE region. Configure Pod Disruption Budgets to ensure zero-downtime deployments. Externalize State & Secrets: Decouple application state entirely. Use managed database services (e.g., AWS RDS Aurora, Azure SQL) configured for Multi-AZ failover and store all configuration secrets in a dedicated vault (e.g., HashiCorp Vault, AWS Secrets Manager). Implement Distributed Tracing & Log Aggregation: Standardize on a unified logging format (e.g., JSON) and implement end-to-end distributed tracing (e.g., using OpenTelemetry) across all microservices. Ingest logs centrally with automated alerts configured for critical error rate spikes, not just CPU/RAM saturation. Automate IaC & Compliance Drift Detection: Define all infrastructure using Infrastructure-as-Code (IaC) pipelines (Terraform/Pulumi) that run from a secure CI/CD environment. Implement regular compliance scanning to detect and remediate "drift" (e.g., someone manually opening port 0.0.0.0/0 in a security group). Key Takeaways Isolate Failures: Multi-AZ architecture ensures that a localized infrastructure failure in one datacenter doesn't take down your entire UAE platform. Don't Fear the Failover: Automate database failover testing regularly. If you haven't tested your disaster recovery plan in production, it doesn't exist. Visibility is Resilience: Without centralized, searchable logs and distributed traces, you are debugging in the dark during high-stakes production incidents. CTA (Join Techawks UAE) Ready to build systems that match the ambition of the UAE’s tech landscape? Join Techawks UAE today to collaborate with senior cloud architects and platform engineers, share regional best practices, and elevate your engineering standards.
    0 Comments 0 Shares 209 Views 0 Reviews
  • The SOC 2 & Zero-Trust Production Readiness Checklist: Securing Cloud Native Infrastructure
    1. Common Security Anti-Patterns
    The Perimeter Fallacy: Relying entirely on traditional VPN boundaries while leaving internal microservice-to-microservice traffic completely unencrypted and unauthenticated.


    Over-Privileged IAM Roles: Attaching broad wildcard permissions (*) to cloud roles and service accounts because it's faster during prototype development.


    2. Architecture Blueprint
    Plaintext
    [ Client Traffic ]
    │
    ▼ (mTLS & JWT Validation)
    ┌──────────────┐ Zero-Trust Policy Check ┌──────────────────────┐
    │ API Gateway │ ───────────────────────────> │ Internal Microservice│
    └──────────────┘ └──────────┬───────────┘
    │ Scoped IAM Role
    ▼
    ┌──────────────────────┐
    │ Encrypted Database │
    └──────────────────────┘
    3. Actionable Production Principles
    Enforce Mutual TLS (mTLS) Service-to-Service: Eliminate implicit trust inside your cluster by mandating cryptographic identity verification and encryption for all internal traffic flows.


    Apply Least-Privilege IAM & Temporary Credentials: Restrict service accounts to exact resource ARNs and short-lived tokens (via OIDC or cloud vaulting systems) to minimize blast radius upon compromise.


    Automate Infrastructure-as-Code (IaC) Scanning: Integrate security policies (using tools like Checkov, OPA/Rego, or tfsec) directly into pull request checks to block insecure S3 buckets or open security groups before deployment.


    Centralize Immutable Audit Logging: Ship all cloud control plane logs, API access tokens, and administrative actions to a centralized, write-once-read-many (WORM) storage bucket with automated anomaly alerts.


    Key Takeaways
    Assume Breach: Zero-trust architecture demands that every service request—regardless of network origin—is authenticated, authorized, and encrypted.


    Shift Left on Compliance: Catching IAM misconfigurations and unencrypted data stores in your CI/CD pipeline costs a fraction of fixing them during a live SOC 2 audit.


    Audit Logs are Lifelines: Immutable, centralized logging ensures rapid forensic investigations when security incidents occur.


    CTA (Join Techawks USA)
    Want to collaborate with senior cloud architects and security engineers scaling resilient infrastructure across the United States? Join Techawks USA today to share production playbooks, review system architectures, and accelerate your career.
    The SOC 2 & Zero-Trust Production Readiness Checklist: Securing Cloud Native Infrastructure 1. Common Security Anti-Patterns The Perimeter Fallacy: Relying entirely on traditional VPN boundaries while leaving internal microservice-to-microservice traffic completely unencrypted and unauthenticated. Over-Privileged IAM Roles: Attaching broad wildcard permissions (*) to cloud roles and service accounts because it's faster during prototype development. 2. Architecture Blueprint Plaintext [ Client Traffic ] │ ▼ (mTLS & JWT Validation) ┌──────────────┐ Zero-Trust Policy Check ┌──────────────────────┐ │ API Gateway │ ───────────────────────────> │ Internal Microservice│ └──────────────┘ └──────────┬───────────┘ │ Scoped IAM Role ▼ ┌──────────────────────┐ │ Encrypted Database │ └──────────────────────┘ 3. Actionable Production Principles Enforce Mutual TLS (mTLS) Service-to-Service: Eliminate implicit trust inside your cluster by mandating cryptographic identity verification and encryption for all internal traffic flows. Apply Least-Privilege IAM & Temporary Credentials: Restrict service accounts to exact resource ARNs and short-lived tokens (via OIDC or cloud vaulting systems) to minimize blast radius upon compromise. Automate Infrastructure-as-Code (IaC) Scanning: Integrate security policies (using tools like Checkov, OPA/Rego, or tfsec) directly into pull request checks to block insecure S3 buckets or open security groups before deployment. Centralize Immutable Audit Logging: Ship all cloud control plane logs, API access tokens, and administrative actions to a centralized, write-once-read-many (WORM) storage bucket with automated anomaly alerts. Key Takeaways Assume Breach: Zero-trust architecture demands that every service request—regardless of network origin—is authenticated, authorized, and encrypted. Shift Left on Compliance: Catching IAM misconfigurations and unencrypted data stores in your CI/CD pipeline costs a fraction of fixing them during a live SOC 2 audit. Audit Logs are Lifelines: Immutable, centralized logging ensures rapid forensic investigations when security incidents occur. CTA (Join Techawks USA) Want to collaborate with senior cloud architects and security engineers scaling resilient infrastructure across the United States? Join Techawks USA today to share production playbooks, review system architectures, and accelerate your career.
    0 Comments 0 Shares 207 Views 0 Reviews
  • The Production-Ready Kubernetes Checklist: 7 Essential Steps Before Launching Your Cluster
    The Problem: The "It Works on Minikube" Trap
    Engineering teams often spin up managed Kubernetes services (EKS, GKE, AKS) and treat default configurations as production-ready. This leaves massive gaps in security isolation, resource management, and observability. Without guardrails, a single misconfigured container can starve cluster resources or expose sensitive internal APIs.


    The Solution: The Production Hardening Checklist
    Don't route production traffic until your cluster passes every check in this framework.


    🛠️ Step 1: Resource Quotas and Requests/Limits
    [ ] Are CPU and Memory requests set for every container? (Crucial for proper scheduler scheduling and node bin-packing).


    [ ] Are hard memory limits enforced? (Prevents a single memory leak from triggering an OOM Killer across the entire node).


    [ ] Are Namespace-level Resource Quotas configured? (Stops a runaway deployment or bad helm chart from consuming all cluster capacity).


    🔒 Step 2: Pod Security & Least Privilege
    [ ] Are containers running as non-root? (securityContext.runAsNonRoot: true must be enforced).


    [ ] Is privileged: false set globally? (Never give containers root access to the host kernel unless strictly required).


    [ ] Are read-only root filesystems enabled? (readOnlyRootFilesystem: true to mitigate container breakout persistence).


    🌐 Step 3: Network Policies & Segmentation
    [ ] Is a default-deny NetworkPolicy applied to all namespaces? (By default, all pods in Kubernetes can talk to all other pods; lock this down immediately).


    [ ] Are ingress and egress rules explicitly defined? (Only allow required traffic between microservices, e.g., Frontend -> API -> Database).


    🔭 Step 4: Observability, Metrics & Logging
    [ ] Are node-level and cluster-level metrics scraping active? (Deploy Prometheus or Cloud-native metrics agents).


    [ ] Is centralized log aggregation configured? (Do not rely on ephemeral container logs; pipe stdout/stderr to a persistent sink like Grafana Loki, Elasticsearch, or Cloudwatch).


    [ ] Are critical alerting rules set up? (Alert on CrashLoopBackOff spikes, high CPU/memory throttling, and node disk pressure).


    🩺 Step 5: Health Probes (Liveness & Readiness)
    [ ] Are Readiness Probes configured correctly? (Ensures traffic is only sent to pods that are fully initialized and ready to serve).


    [ ] Are Liveness Probes configured with appropriate delays? (Prevents Kubernetes from prematurely killing slow-starting containers during heavy load).


    [ ] Are Startup Probes enabled for legacy apps? (Protects slow-booting applications from failing liveness checks).


    📦 Step 6: Secret Management & Configuration
    [ ] Are Kubernetes Secrets encrypted at rest? (Ensure etcd encryption is enabled in your cloud provider config).


    [ ] Are plain-text secrets kept out of Git? (Use external secret stores like HashiCorp Vault, AWS Secrets Manager, or Sealed Secrets).


    🔄 Step 7: Backup, Disaster Recovery & High Availability
    [ ] Are etcd backups scheduled and tested? (If your control plane fails, can you restore state?).


    [ ] Are multi-AZ (Availability Zone) node pools deployed? (Ensure your workloads tolerate a single data center outage).


    Key Takeaways
    Never Use Defaults: Out-of-the-box Kubernetes configurations are designed for ease of use, not production security or stability.


    Enforce Requests and Limits: Resource starvation is the #1 cause of cascading cluster failures.


    Zero-Trust Networking: Implement default-deny NetworkPolicies to isolate microservices and limit blast radius.


    Test Your Probes: Proper liveness and readiness configuration prevents downtime during rolling updates.


    CTA (Join Cloud, DevOps & Open Source)
    Ready to master cloud architecture, Kubernetes hardening, and resilient infrastructure patterns? Join Cloud, DevOps & Open Source inside the Techawks community to share production runbooks, discuss architecture trade-offs, and accelerate your engineering career!
    The Production-Ready Kubernetes Checklist: 7 Essential Steps Before Launching Your Cluster The Problem: The "It Works on Minikube" Trap Engineering teams often spin up managed Kubernetes services (EKS, GKE, AKS) and treat default configurations as production-ready. This leaves massive gaps in security isolation, resource management, and observability. Without guardrails, a single misconfigured container can starve cluster resources or expose sensitive internal APIs. The Solution: The Production Hardening Checklist Don't route production traffic until your cluster passes every check in this framework. 🛠️ Step 1: Resource Quotas and Requests/Limits [ ] Are CPU and Memory requests set for every container? (Crucial for proper scheduler scheduling and node bin-packing). [ ] Are hard memory limits enforced? (Prevents a single memory leak from triggering an OOM Killer across the entire node). [ ] Are Namespace-level Resource Quotas configured? (Stops a runaway deployment or bad helm chart from consuming all cluster capacity). 🔒 Step 2: Pod Security & Least Privilege [ ] Are containers running as non-root? (securityContext.runAsNonRoot: true must be enforced). [ ] Is privileged: false set globally? (Never give containers root access to the host kernel unless strictly required). [ ] Are read-only root filesystems enabled? (readOnlyRootFilesystem: true to mitigate container breakout persistence). 🌐 Step 3: Network Policies & Segmentation [ ] Is a default-deny NetworkPolicy applied to all namespaces? (By default, all pods in Kubernetes can talk to all other pods; lock this down immediately). [ ] Are ingress and egress rules explicitly defined? (Only allow required traffic between microservices, e.g., Frontend -> API -> Database). 🔭 Step 4: Observability, Metrics & Logging [ ] Are node-level and cluster-level metrics scraping active? (Deploy Prometheus or Cloud-native metrics agents). [ ] Is centralized log aggregation configured? (Do not rely on ephemeral container logs; pipe stdout/stderr to a persistent sink like Grafana Loki, Elasticsearch, or Cloudwatch). [ ] Are critical alerting rules set up? (Alert on CrashLoopBackOff spikes, high CPU/memory throttling, and node disk pressure). 🩺 Step 5: Health Probes (Liveness & Readiness) [ ] Are Readiness Probes configured correctly? (Ensures traffic is only sent to pods that are fully initialized and ready to serve). [ ] Are Liveness Probes configured with appropriate delays? (Prevents Kubernetes from prematurely killing slow-starting containers during heavy load). [ ] Are Startup Probes enabled for legacy apps? (Protects slow-booting applications from failing liveness checks). 📦 Step 6: Secret Management & Configuration [ ] Are Kubernetes Secrets encrypted at rest? (Ensure etcd encryption is enabled in your cloud provider config). [ ] Are plain-text secrets kept out of Git? (Use external secret stores like HashiCorp Vault, AWS Secrets Manager, or Sealed Secrets). 🔄 Step 7: Backup, Disaster Recovery & High Availability [ ] Are etcd backups scheduled and tested? (If your control plane fails, can you restore state?). [ ] Are multi-AZ (Availability Zone) node pools deployed? (Ensure your workloads tolerate a single data center outage). Key Takeaways Never Use Defaults: Out-of-the-box Kubernetes configurations are designed for ease of use, not production security or stability. Enforce Requests and Limits: Resource starvation is the #1 cause of cascading cluster failures. Zero-Trust Networking: Implement default-deny NetworkPolicies to isolate microservices and limit blast radius. Test Your Probes: Proper liveness and readiness configuration prevents downtime during rolling updates. CTA (Join Cloud, DevOps & Open Source) Ready to master cloud architecture, Kubernetes hardening, and resilient infrastructure patterns? Join Cloud, DevOps & Open Source inside the Techawks community to share production runbooks, discuss architecture trade-offs, and accelerate your engineering career!
    0 Comments 0 Shares 171 Views 0 Reviews
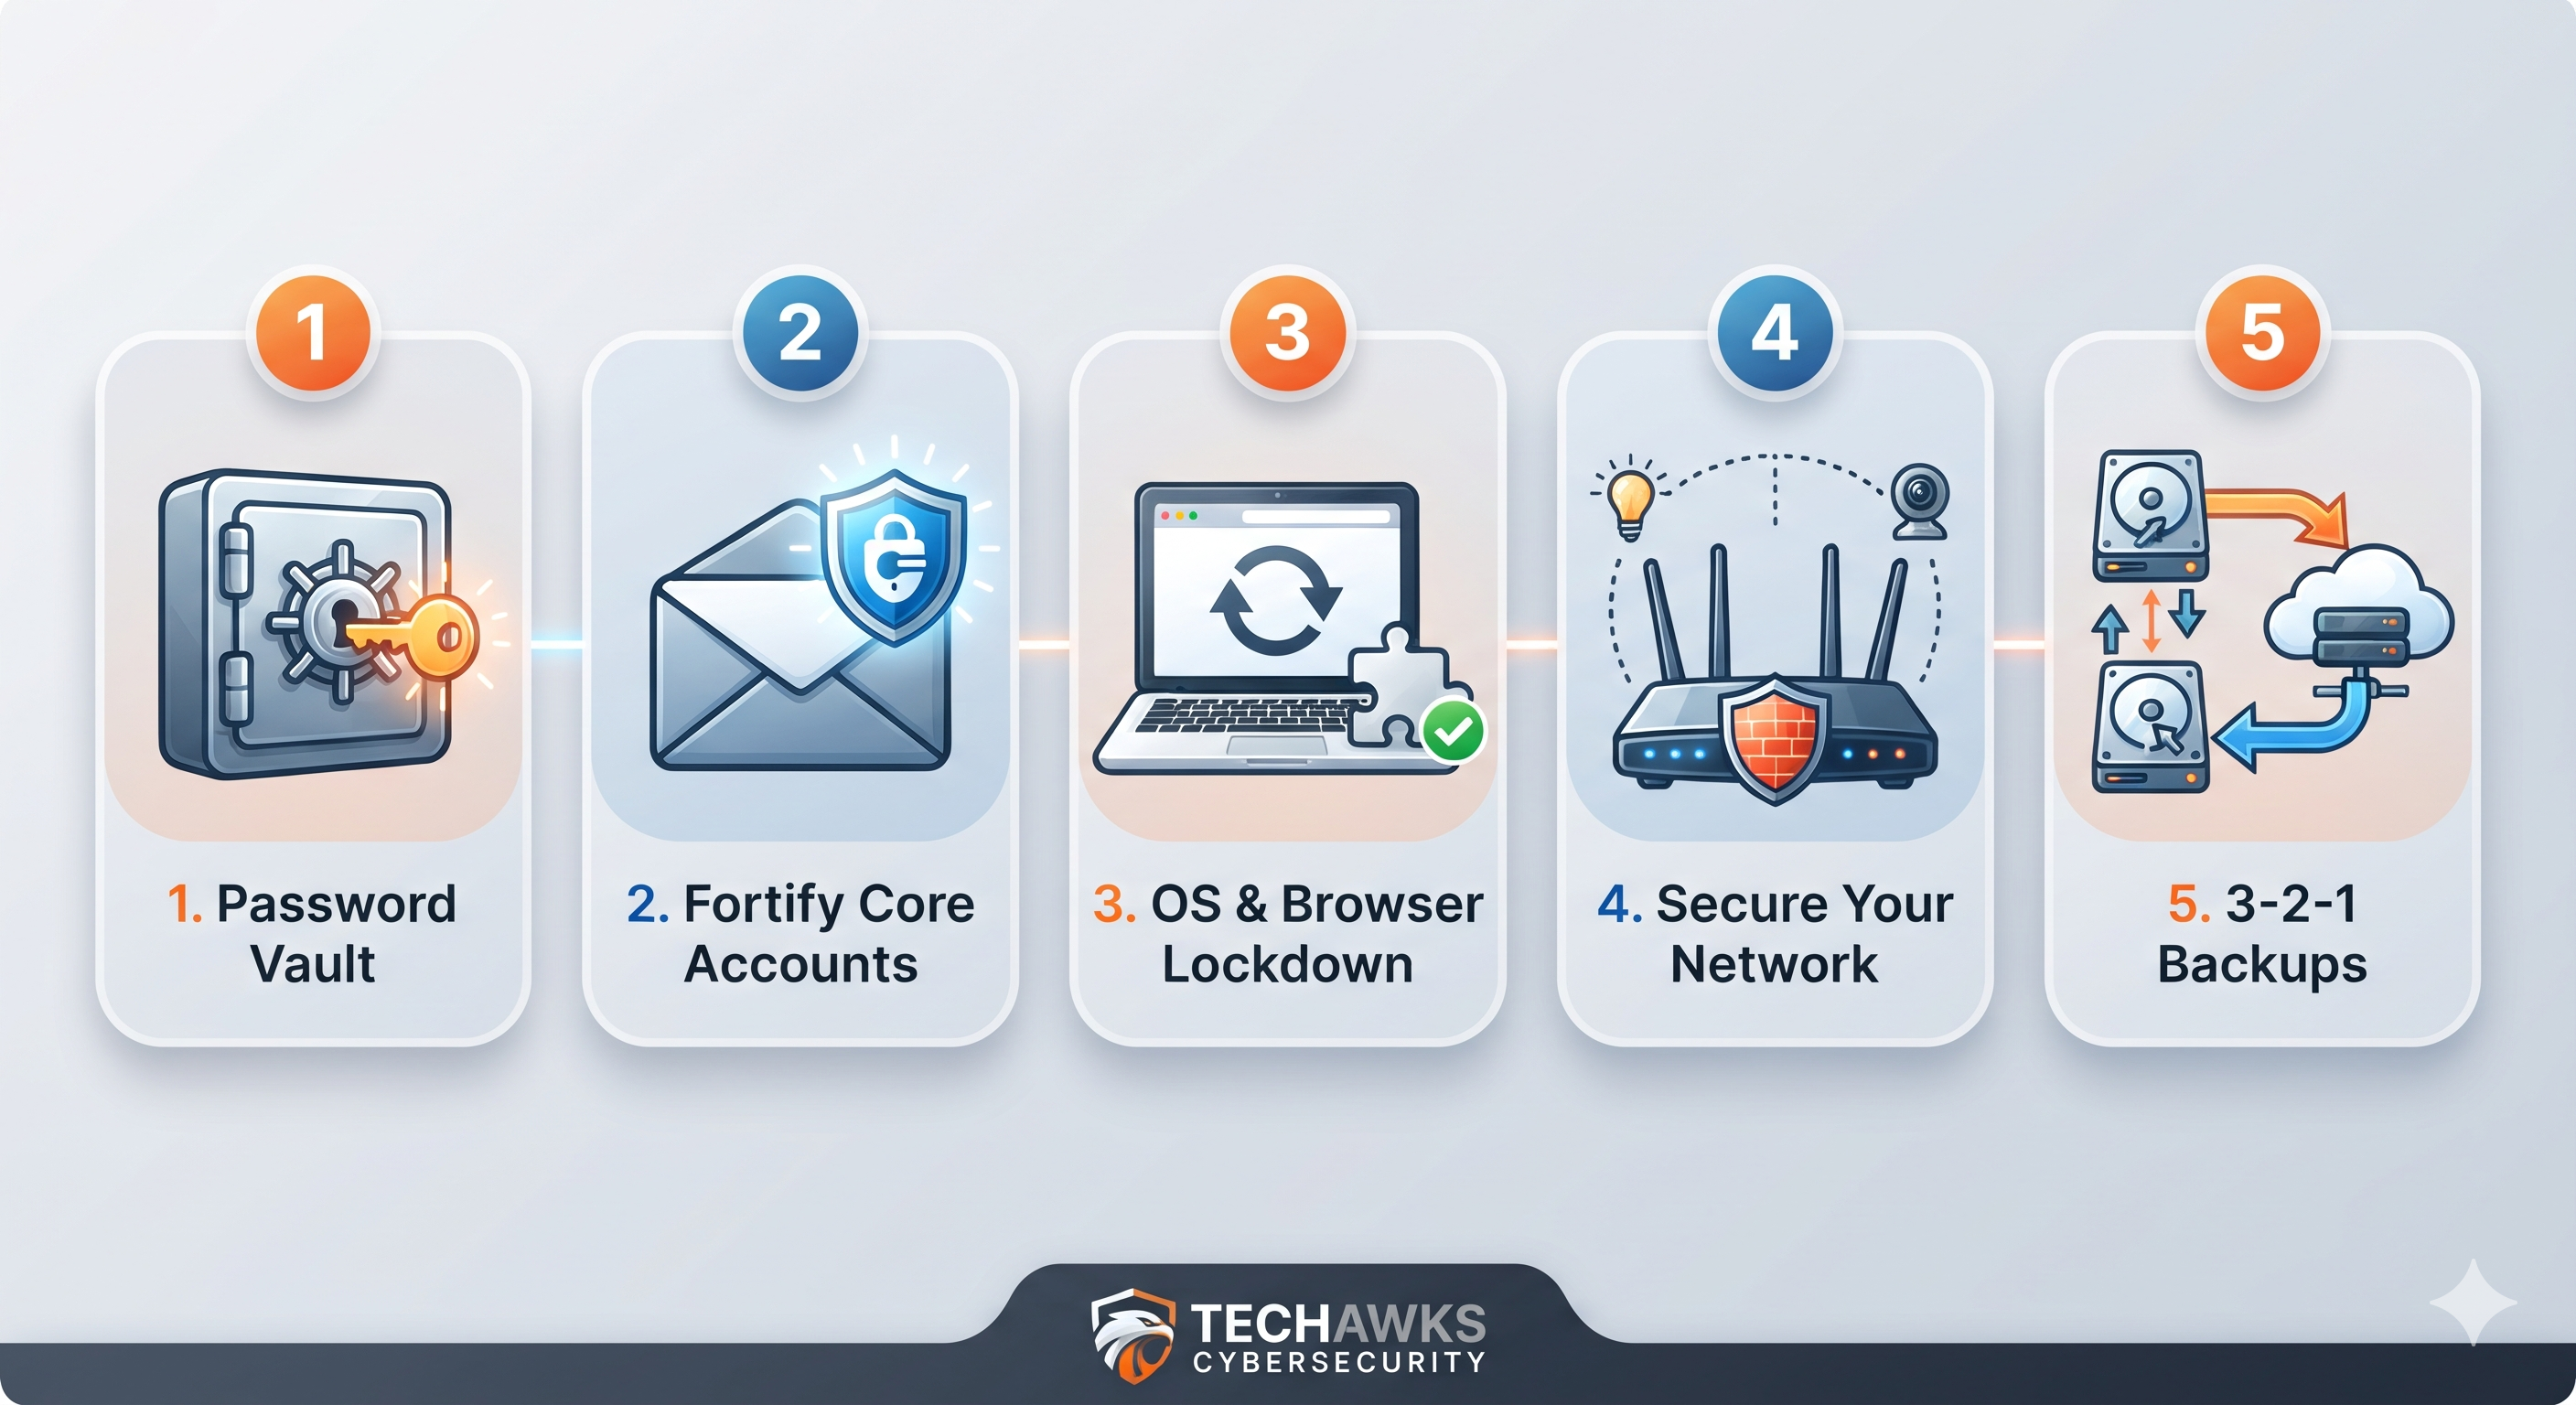
  • The Ultimate Security Hygiene Checklist: 5 Steps to Harden Your Digital Footprint
    The Problem: The "Weakest Link" Fallacy
    Many beginners focus exclusively on advanced topics like penetration testing or cryptography, while attackers simply exploit easily preventable vulnerabilities in their personal security setup. If your email is compromised, it doesn't matter how strong your network security knowledge is—your entire identity is at risk.


    The Solution: The Active Defense Checklist
    This checklist is designed to be actionable. Don't just read it; implement it today.


    1. The Password Vault Migration
    The Habit: Using the same password across multiple sites and relying on your memory.The Fix:
    [ ] Choose a reputable password manager (e.g., Bitwarden, 1Password).
    [ ] Generate unique, complex passwords (20+ characters, random mix) for every single account.
    [ ] Change your master password to something incredibly strong and memorize it.
    [ ] Pro-Tip: Enable 2FA on the password vault itself immediately.


    2. Fortify the Core (Email & Financials)
    The Habit: Using SMS-based 2FA for banking and primary email.The Fix:
    [ ] Identify your top 5 most critical accounts (Email, Banking, Primary Cloud Storage, Tax Portal).
    [ ] Upgrade 2FA from SMS to an Authenticator App (e.g., Authy, Google Authenticator) or, ideally, a Hardware Security Key (e.g., YubiKey).
    [ ] Review and revoke all "App Passwords" and connected third-party apps you no longer use from these core accounts.


    3. OS and Browser Lockdown
    The Habit: Deferring OS updates and installing browser extensions without auditing them.The Fix:
    [ ] Enable automatic OS updates for all devices (Mobile, Laptop, Desktop).
    [ ] Audit your browser extensions. Remove any that are not strictly necessary or have excessive permissions.
    [ ] Install a reputable ad-blocker/script-blocker (e.g., uBlock Origin) to reduce malvertising exposure.


    4. The Network Perimeter
    The Habit: Using the default ISP router password and leaving UPnP enabled.The Fix:
    [ ] Log into your home router and change the administrator password immediately.
    [ ] Change the default Wi-Fi SSID (network name) and password.
    [ ] Disable UPnP (Universal Plug and Play) on your router to prevent malware from opening unauthorized ports.
    [ ] Isolate your IoT devices (smart lights, cameras) on a separate guest network if possible.


    5. Data Backup and Recovery
    The Habit: Storing all critical files on a single laptop without backup.The Fix:
    [ ] Implement the 3-2-1 Backup Rule: Keep 3 copies of any important data, on 2 different media types, with 1 copy offsite (e.g., encrypted cloud backup like Backblaze or Arq).
    [ ] Verify your backups actually work by attempting a test file restoration.


    Key Takeaways
    Password Managers are Mandatory: Stop reusing passwords; use a vault for unique, complex credentials everywhere.


    Upgrade Your 2FA: Move away from SMS-based 2FA to authenticator apps or hardware keys for critical accounts.


    Update Everything: Enable automatic updates for your OS, browser, and router firmware.


    Backup or Bust: Implement the 3-2-1 backup rule to protect against ransomware and hardware failure.


    Discussion Question
    What is the single most common security mistake you see otherwise knowledgeable people make in their personal lives? Share your observations and help educate the community!


    CTA (Join Cybersecurity & Ethical Hacking)
    Ready to move from securing your personal devices to defending global infrastructure? Join Cybersecurity & Ethical Hacking inside the Techawks community to access advanced labs, share threat intelligence, and accelerate your career in infosec.
    The Ultimate Security Hygiene Checklist: 5 Steps to Harden Your Digital Footprint The Problem: The "Weakest Link" Fallacy Many beginners focus exclusively on advanced topics like penetration testing or cryptography, while attackers simply exploit easily preventable vulnerabilities in their personal security setup. If your email is compromised, it doesn't matter how strong your network security knowledge is—your entire identity is at risk. The Solution: The Active Defense Checklist This checklist is designed to be actionable. Don't just read it; implement it today. 1. The Password Vault Migration The Habit: Using the same password across multiple sites and relying on your memory.The Fix: [ ] Choose a reputable password manager (e.g., Bitwarden, 1Password). [ ] Generate unique, complex passwords (20+ characters, random mix) for every single account. [ ] Change your master password to something incredibly strong and memorize it. [ ] Pro-Tip: Enable 2FA on the password vault itself immediately. 2. Fortify the Core (Email & Financials) The Habit: Using SMS-based 2FA for banking and primary email.The Fix: [ ] Identify your top 5 most critical accounts (Email, Banking, Primary Cloud Storage, Tax Portal). [ ] Upgrade 2FA from SMS to an Authenticator App (e.g., Authy, Google Authenticator) or, ideally, a Hardware Security Key (e.g., YubiKey). [ ] Review and revoke all "App Passwords" and connected third-party apps you no longer use from these core accounts. 3. OS and Browser Lockdown The Habit: Deferring OS updates and installing browser extensions without auditing them.The Fix: [ ] Enable automatic OS updates for all devices (Mobile, Laptop, Desktop). [ ] Audit your browser extensions. Remove any that are not strictly necessary or have excessive permissions. [ ] Install a reputable ad-blocker/script-blocker (e.g., uBlock Origin) to reduce malvertising exposure. 4. The Network Perimeter The Habit: Using the default ISP router password and leaving UPnP enabled.The Fix: [ ] Log into your home router and change the administrator password immediately. [ ] Change the default Wi-Fi SSID (network name) and password. [ ] Disable UPnP (Universal Plug and Play) on your router to prevent malware from opening unauthorized ports. [ ] Isolate your IoT devices (smart lights, cameras) on a separate guest network if possible. 5. Data Backup and Recovery The Habit: Storing all critical files on a single laptop without backup.The Fix: [ ] Implement the 3-2-1 Backup Rule: Keep 3 copies of any important data, on 2 different media types, with 1 copy offsite (e.g., encrypted cloud backup like Backblaze or Arq). [ ] Verify your backups actually work by attempting a test file restoration. Key Takeaways Password Managers are Mandatory: Stop reusing passwords; use a vault for unique, complex credentials everywhere. Upgrade Your 2FA: Move away from SMS-based 2FA to authenticator apps or hardware keys for critical accounts. Update Everything: Enable automatic updates for your OS, browser, and router firmware. Backup or Bust: Implement the 3-2-1 backup rule to protect against ransomware and hardware failure. Discussion Question What is the single most common security mistake you see otherwise knowledgeable people make in their personal lives? Share your observations and help educate the community! CTA (Join Cybersecurity & Ethical Hacking) Ready to move from securing your personal devices to defending global infrastructure? Join Cybersecurity & Ethical Hacking inside the Techawks community to access advanced labs, share threat intelligence, and accelerate your career in infosec.
    0 Comments 0 Shares 153 Views 0 Reviews
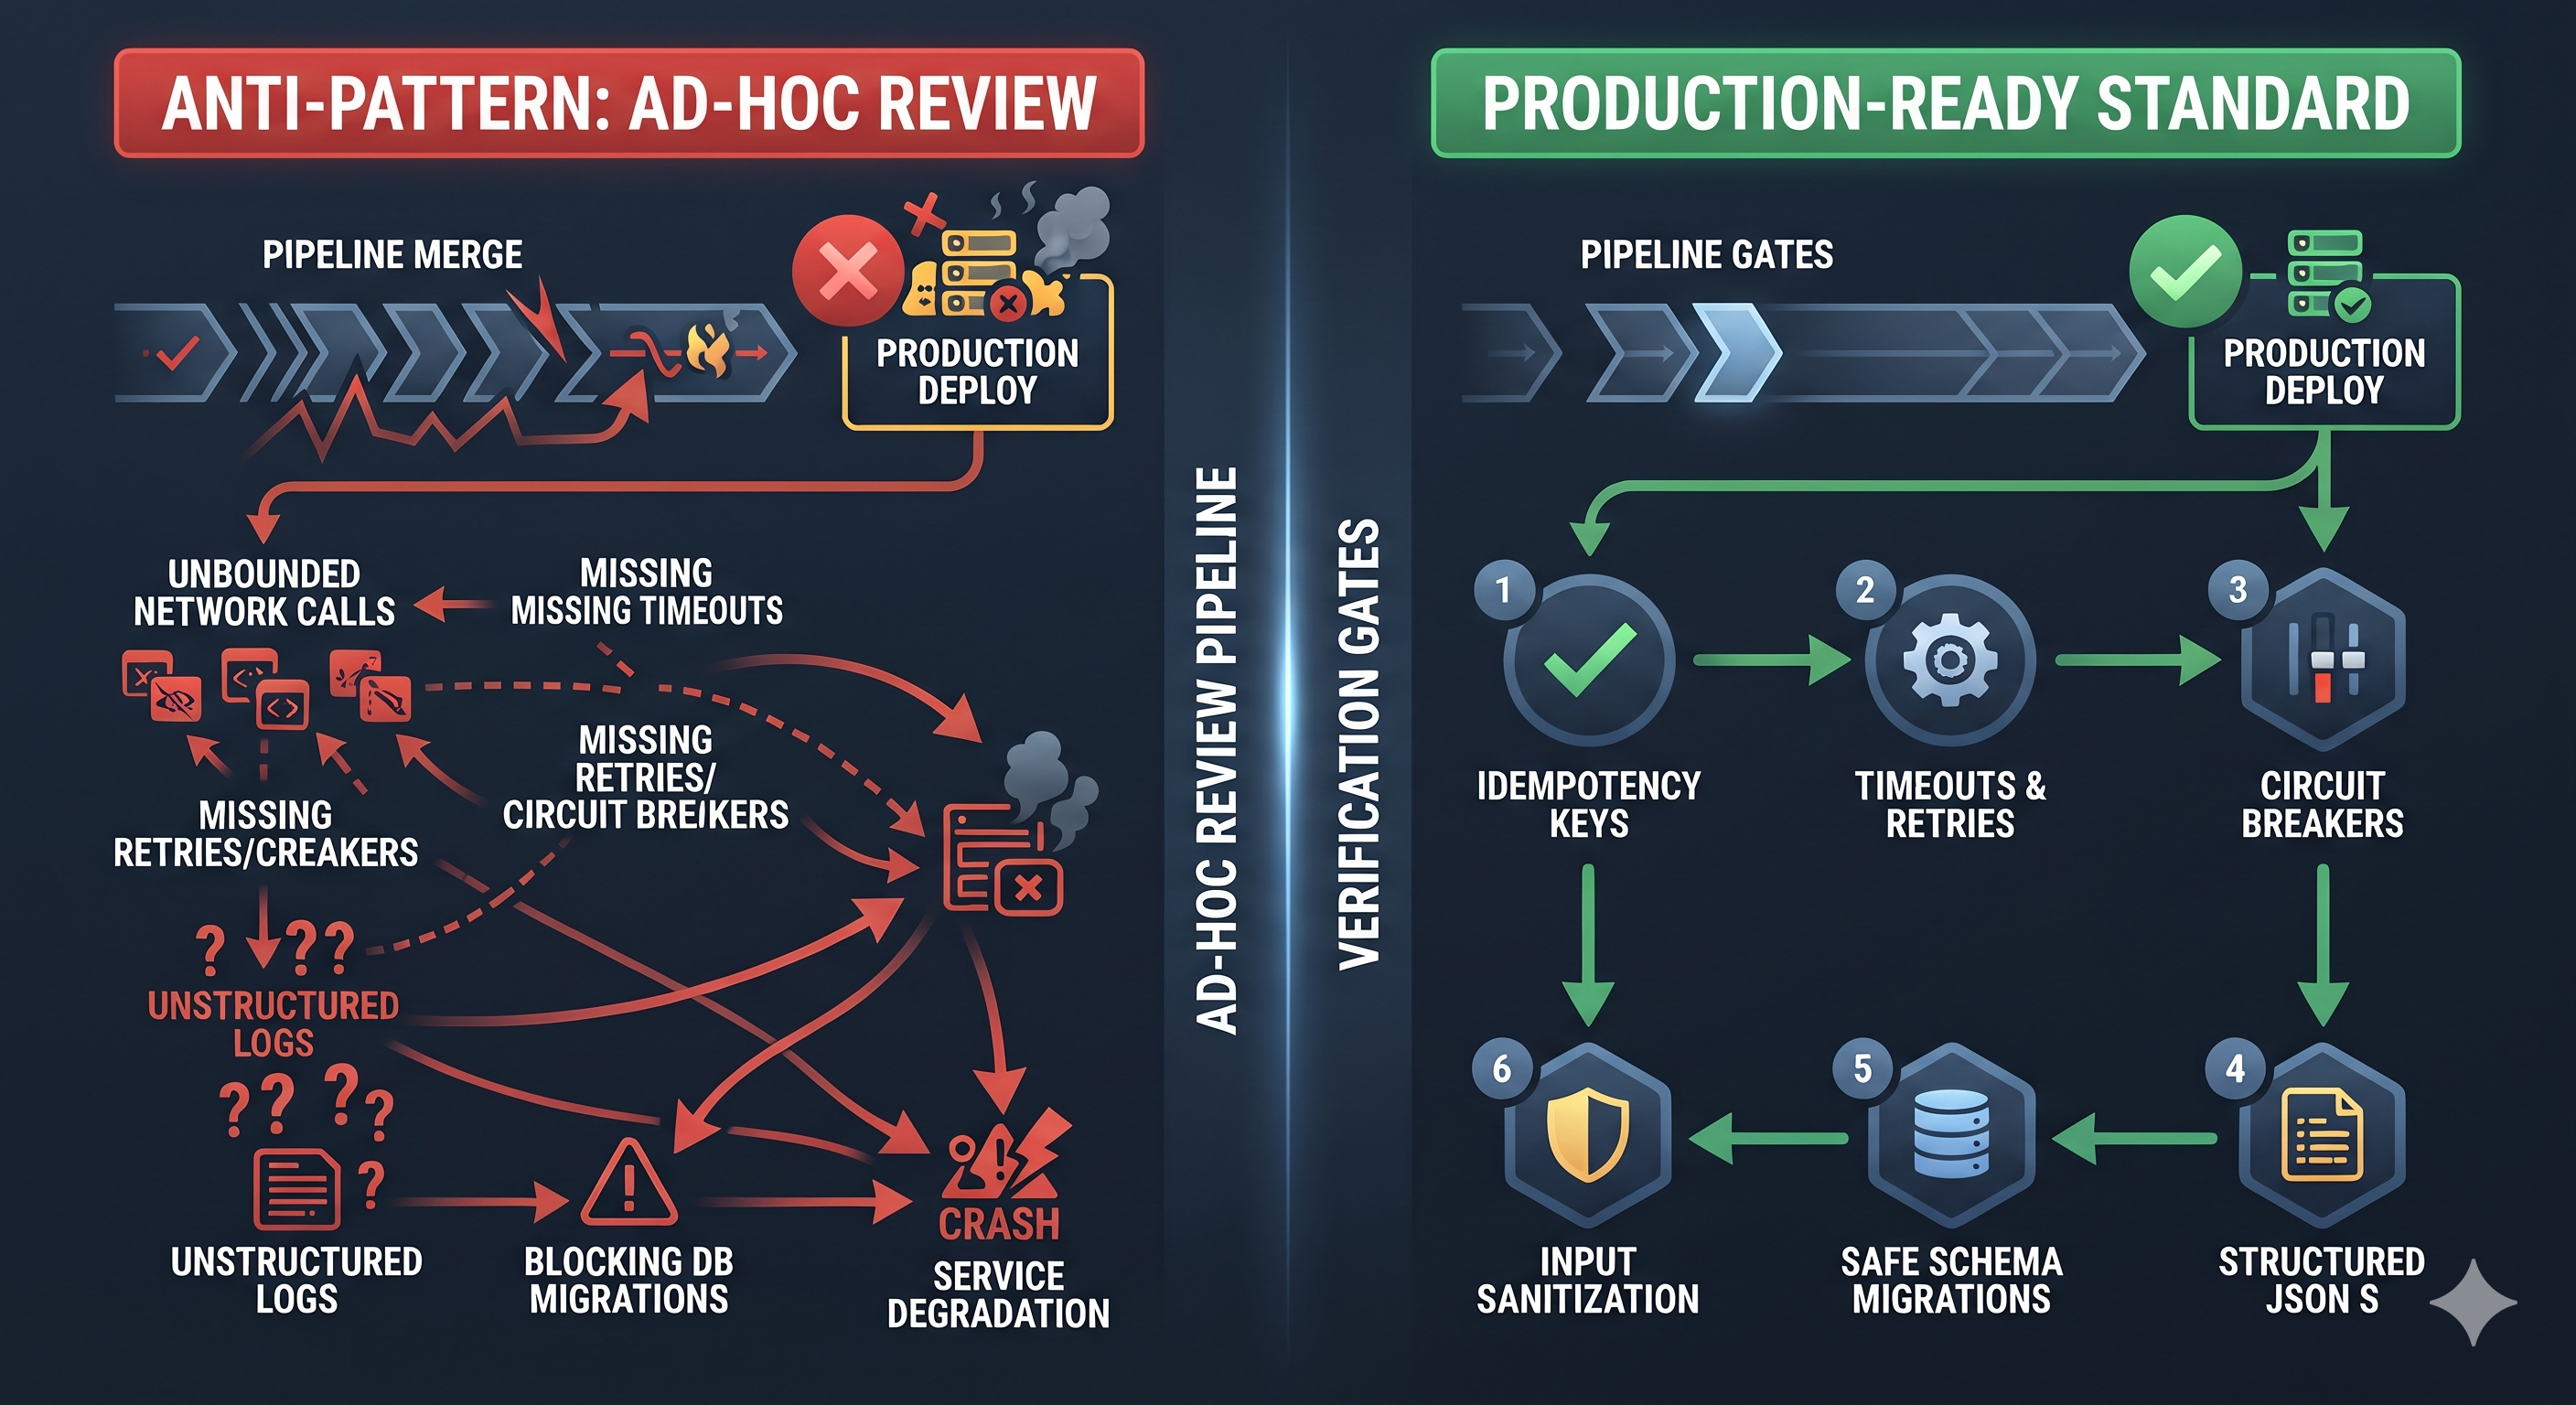
  • The Production-Ready Code Review Checklist: 6 Steps to Ship Resilient Software Without the Tech Debt
    The Problem: Ad-Hoc Merges and Hidden Failures
    Teams often rely on memory or superficial linting checks before merging pull requests. Without a rigorous, standardized verification checklist, subtle security flaws, unhandled edge cases, and memory leaks slip past review—compounding technical debt over time.


    Architectural Workflow: Verification Pipeline
    [ Feature Implementation ]
    │
    ▼
    ┌──────────────────────────────────────────────┐
    │ THE PRODUCTION CHECKLIST │
    │ 1. Idempotency & State Safety │
    │ 2. Explicit Error Boundaries & Timeouts │
    │ 3. Observable Logging & Metrics │
    │ 4. Zero-Downtime Migration Safety │
    │ 5. Resource Leak & Garbage Collection Check │
    │ 6. Security & Input Sanitization │
    └──────────────────────────────────────────────┘
    │
    ▼
    [ Resilient Production Release ]
    Actionable Engineering Principles
    Enforce Idempotency on All State-Mutating Operations


    Practice: Ensure every API request or background worker job can be safely retried without duplicating side effects or corrupting database state (e.g., using idempotency keys or unique constraint upserts).


    Define Strict Timeouts, Retries, and Circuit Breakers


    Practice: Never make unbounded network calls or database queries. Explicitly configure connection timeouts, exponential backoff with jitter, and circuit breakers for all external service dependencies.


    Emit Structured Logs with Contextual Trace IDs


    Practice: Avoid unstructured print statements. Log in JSON format containing unique request correlation IDs, severity levels, and sanitized metadata to simplify distributed tracing.


    Verify Backward-Compatible Schema Migrations


    Practice: Follow the expand-and-contract pattern for database changes. Never rename or drop columns in a single deploy; separate schema updates from application logic updates to prevent downtime.


    Key Takeaways
    Systematic Rigor: Standardize pull request reviews using an immutable checklist rather than relying on individual intuition.


    Failure Resilience: Design for downstream network failures, latency spikes, and partial system outages by default.


    Maintainability: Prioritize zero-downtime deployment patterns and structured observability to drastically reduce debugging time.


    CTA (Join Developers & Coding)
    Ready to build cleaner, more robust systems alongside thousands of software engineers? Join the Techawks Developers community to access open-source architectural patterns, advanced engineering checklists, and collaborative code reviews.
    The Production-Ready Code Review Checklist: 6 Steps to Ship Resilient Software Without the Tech Debt The Problem: Ad-Hoc Merges and Hidden Failures Teams often rely on memory or superficial linting checks before merging pull requests. Without a rigorous, standardized verification checklist, subtle security flaws, unhandled edge cases, and memory leaks slip past review—compounding technical debt over time. Architectural Workflow: Verification Pipeline [ Feature Implementation ] │ ▼ ┌──────────────────────────────────────────────┐ │ THE PRODUCTION CHECKLIST │ │ 1. Idempotency & State Safety │ │ 2. Explicit Error Boundaries & Timeouts │ │ 3. Observable Logging & Metrics │ │ 4. Zero-Downtime Migration Safety │ │ 5. Resource Leak & Garbage Collection Check │ │ 6. Security & Input Sanitization │ └──────────────────────────────────────────────┘ │ ▼ [ Resilient Production Release ] Actionable Engineering Principles Enforce Idempotency on All State-Mutating Operations Practice: Ensure every API request or background worker job can be safely retried without duplicating side effects or corrupting database state (e.g., using idempotency keys or unique constraint upserts). Define Strict Timeouts, Retries, and Circuit Breakers Practice: Never make unbounded network calls or database queries. Explicitly configure connection timeouts, exponential backoff with jitter, and circuit breakers for all external service dependencies. Emit Structured Logs with Contextual Trace IDs Practice: Avoid unstructured print statements. Log in JSON format containing unique request correlation IDs, severity levels, and sanitized metadata to simplify distributed tracing. Verify Backward-Compatible Schema Migrations Practice: Follow the expand-and-contract pattern for database changes. Never rename or drop columns in a single deploy; separate schema updates from application logic updates to prevent downtime. Key Takeaways Systematic Rigor: Standardize pull request reviews using an immutable checklist rather than relying on individual intuition. Failure Resilience: Design for downstream network failures, latency spikes, and partial system outages by default. Maintainability: Prioritize zero-downtime deployment patterns and structured observability to drastically reduce debugging time. CTA (Join Developers & Coding) Ready to build cleaner, more robust systems alongside thousands of software engineers? Join the Techawks Developers community to access open-source architectural patterns, advanced engineering checklists, and collaborative code reviews.
    0 Comments 0 Shares 38 Views 0 Reviews
  • The Production-Grade RAG Architecture Checklist: 7 Essential Pillars for Reliable Enterprise Retrieval
    Why Prototype RAG Fails in ProductionMost tutorial-grade RAG systems rely on naive text splitting, basic vector similarity search, and direct LLM prompting. Once exposed to messy enterprise data, these setups suffer from context fragmentation, irrelevant chunk retrieval, and silent data leakage, leading to costly hallucinations and frustrated users.[ Naive Prototype ] Raw Document ──> Fixed Split ──> Cosine Similarity ──> Direct LLM
    [ Resilient RAG ] Clean Parser ──> Semantic Chunking ──> Hybrid Search + Reranker ──> Guardrailed LLM
    The Production RAG Engineering ChecklistWork through these 7 foundational steps to transition your AI application from a brittle demo to a reliable enterprise system:
    Intelligent Document Parsing & PreprocessingStrip out non-semantic noise (headers, footers, watermarks, and raw HTML tags) before ingestion.
    Preserve structural hierarchies (markdown headers, tables, and lists) so chunk context isn't lost.
    Semantic & Overlapping Chunking StrategiesMove away from arbitrary fixed-character splitting; use semantic chunking based on natural paragraph and section breaks.
    Maintain a token overlap (e.g., 10–15%) between consecutive chunks to preserve boundary context.
    Hybrid Search (Dense + Sparse Retrieval)Combine dense vector embeddings (capturing semantic meaning) with sparse keyword search (BM25 for exact terminology and IDs).Fuse results using Reciprocal Rank Fusion (RRF) to ensure both conceptual and exact-match queries succeed.
    Cross-Encoder RerankingNever feed raw top-$k$ vector results directly to your LLM. Pass retrieved chunks through a specialized cross-encoder reranker (e.g., Cohere Rerank or BGE-Reranker) to score true relevance.
    Filter out low-scoring chunks to keep the context window clean and focused.
    Metadata Filtering & Access ControlAttach fine-grained metadata (tenant IDs, security clearances, dates, and document categories) to every vector chunk.
    Enforce security-aware pre-filtering so users only retrieve data they are authorized to view.Context Window Optimization & CompressionStrip redundant text and implement prompt caching where supported by your LLM provider to reduce latency and cost.
    Summarize or compress lengthy retrieved passages if they approach token limits without adding new information.
    Rigorous Evaluation & Continuous MonitoringImplement automated evaluation frameworks (such as RAGAS or TruLens) to continuously measure faithfulness, answer relevance, and context precision.
    Log user feedback alongside retrieved chunks to systematically identify knowledge gaps in your vector database.
    Key Takeaways
    Garbage In, Garbage Out: Vector search is only as good as your initial document preprocessing and chunking strategy.
    Reranking is Non-Negotiable: Adding a cross-encoder reranker is the single highest-impact upgrade you can make to retrieval precision.
    Security First: Access control must be integrated at the retrieval layer, not patched onto the LLM response layer.
    CTA (Join AI Builders & Enthusiasts)
    Ready to build production-grade AI systems? Join the global Techawks AI Builders & Enthusiasts community to connect with fellow engineers, share architecture patterns, and scale your machine learning workflows. [Join AI Builders & Enthusiasts today!]
    The Production-Grade RAG Architecture Checklist: 7 Essential Pillars for Reliable Enterprise Retrieval Why Prototype RAG Fails in ProductionMost tutorial-grade RAG systems rely on naive text splitting, basic vector similarity search, and direct LLM prompting. Once exposed to messy enterprise data, these setups suffer from context fragmentation, irrelevant chunk retrieval, and silent data leakage, leading to costly hallucinations and frustrated users.[ Naive Prototype ] Raw Document ──> Fixed Split ──> Cosine Similarity ──> Direct LLM [ Resilient RAG ] Clean Parser ──> Semantic Chunking ──> Hybrid Search + Reranker ──> Guardrailed LLM The Production RAG Engineering ChecklistWork through these 7 foundational steps to transition your AI application from a brittle demo to a reliable enterprise system: Intelligent Document Parsing & PreprocessingStrip out non-semantic noise (headers, footers, watermarks, and raw HTML tags) before ingestion. Preserve structural hierarchies (markdown headers, tables, and lists) so chunk context isn't lost. Semantic & Overlapping Chunking StrategiesMove away from arbitrary fixed-character splitting; use semantic chunking based on natural paragraph and section breaks. Maintain a token overlap (e.g., 10–15%) between consecutive chunks to preserve boundary context. Hybrid Search (Dense + Sparse Retrieval)Combine dense vector embeddings (capturing semantic meaning) with sparse keyword search (BM25 for exact terminology and IDs).Fuse results using Reciprocal Rank Fusion (RRF) to ensure both conceptual and exact-match queries succeed. Cross-Encoder RerankingNever feed raw top-$k$ vector results directly to your LLM. Pass retrieved chunks through a specialized cross-encoder reranker (e.g., Cohere Rerank or BGE-Reranker) to score true relevance. Filter out low-scoring chunks to keep the context window clean and focused. Metadata Filtering & Access ControlAttach fine-grained metadata (tenant IDs, security clearances, dates, and document categories) to every vector chunk. Enforce security-aware pre-filtering so users only retrieve data they are authorized to view.Context Window Optimization & CompressionStrip redundant text and implement prompt caching where supported by your LLM provider to reduce latency and cost. Summarize or compress lengthy retrieved passages if they approach token limits without adding new information. Rigorous Evaluation & Continuous MonitoringImplement automated evaluation frameworks (such as RAGAS or TruLens) to continuously measure faithfulness, answer relevance, and context precision. Log user feedback alongside retrieved chunks to systematically identify knowledge gaps in your vector database. Key Takeaways Garbage In, Garbage Out: Vector search is only as good as your initial document preprocessing and chunking strategy. Reranking is Non-Negotiable: Adding a cross-encoder reranker is the single highest-impact upgrade you can make to retrieval precision. Security First: Access control must be integrated at the retrieval layer, not patched onto the LLM response layer. CTA (Join AI Builders & Enthusiasts) Ready to build production-grade AI systems? Join the global Techawks AI Builders & Enthusiasts community to connect with fellow engineers, share architecture patterns, and scale your machine learning workflows. [Join AI Builders & Enthusiasts today!]
    0 Comments 0 Shares 42 Views 0 Reviews
More Results