

• Design Systems vs. Custom UI: Are Design Systems Killing Product Creativity or Accelerating Scale?
    The tension between standardized design systems and custom, bespoke UI components lies at the intersection of operational efficiency and distinctive user experience.


    To determine the right architectural balance for your product, it is essential to evaluate how both strategies function across different growth stages:


    1. Rigid Design Systems (Component-First Architecture)
    The Core Premise: Establishes a single source of truth using standardized tokens, reusable UI components (buttons, modals, inputs), and strict layout grids across web and mobile platforms.
    Where It Excels: Enterprise scaling and maintenance. Design systems eliminate redundant work, drastically reduce frontend technical debt, ensure accessibility compliance (WCAG) out of the box, and allow designers to build flows in minutes rather than hours.
    The Drawback: Homogenization. When teams treat the component library as a dogma rather than a foundation, they risk forcing user problems into existing components rather than designing custom, context-specific interactions that delight users.


    2. Custom UI & Bespoke Interactions (Experience-First Architecture)
    The Core Premise: Prioritizes custom animations, micro-interactions, and novel layout structures tailored specifically to the unique value proposition of a feature or brand landing page.
    Where It Excels: Brand differentiation and emotional resonance. Custom UI creates memorable, high-converting onboarding experiences and unique product hooks that stand out in crowded SaaS markets.
    The Drawback: High maintenance overhead. Every custom component increases engineering surface area, introduces cross-browser bugs, and complicates long-term UI maintenance.


    Actionable Advice for Product Leaders & UX Designers
    Rather than viewing design systems as an all-or-nothing constraint, top product teams employ a Tiered Governance Model:
    Standardize Core Mechanics (80%): Keep utility components—forms, navigation bars, tables, settings menus, and modal dialogs—strictly tied to your design system to maximize velocity.
    Allow Sandbox Experimentation (20%): Grant product teams explicit permission to break system guidelines for core "hero features" or onboarding flows where novel interactions directly drive activation.
    Build an Intake Pipeline: Establish a clear process where high-performing custom components are audited, refined, and eventually merged into the global design system.


    Key Takeaways
    Consistency Drives Usability: Standardized components reduce cognitive load for users by maintaining predictable interaction patterns across the platform.
    Systems Are Living Products: A design system should evolve based on user needs, not act as a restrictive boundary that suppresses innovation.
    Balance Efficiency with Experience: Use design systems to solve solved problems quickly so your team can focus creative energy on novel user challenges.


    CTA
    How does your team handle the boundary between rigid design system guidelines and bespoke feature design? Join Product, UX & Design to share your system governance models, debate component architecture, and collaborate with lead designers and product managers.
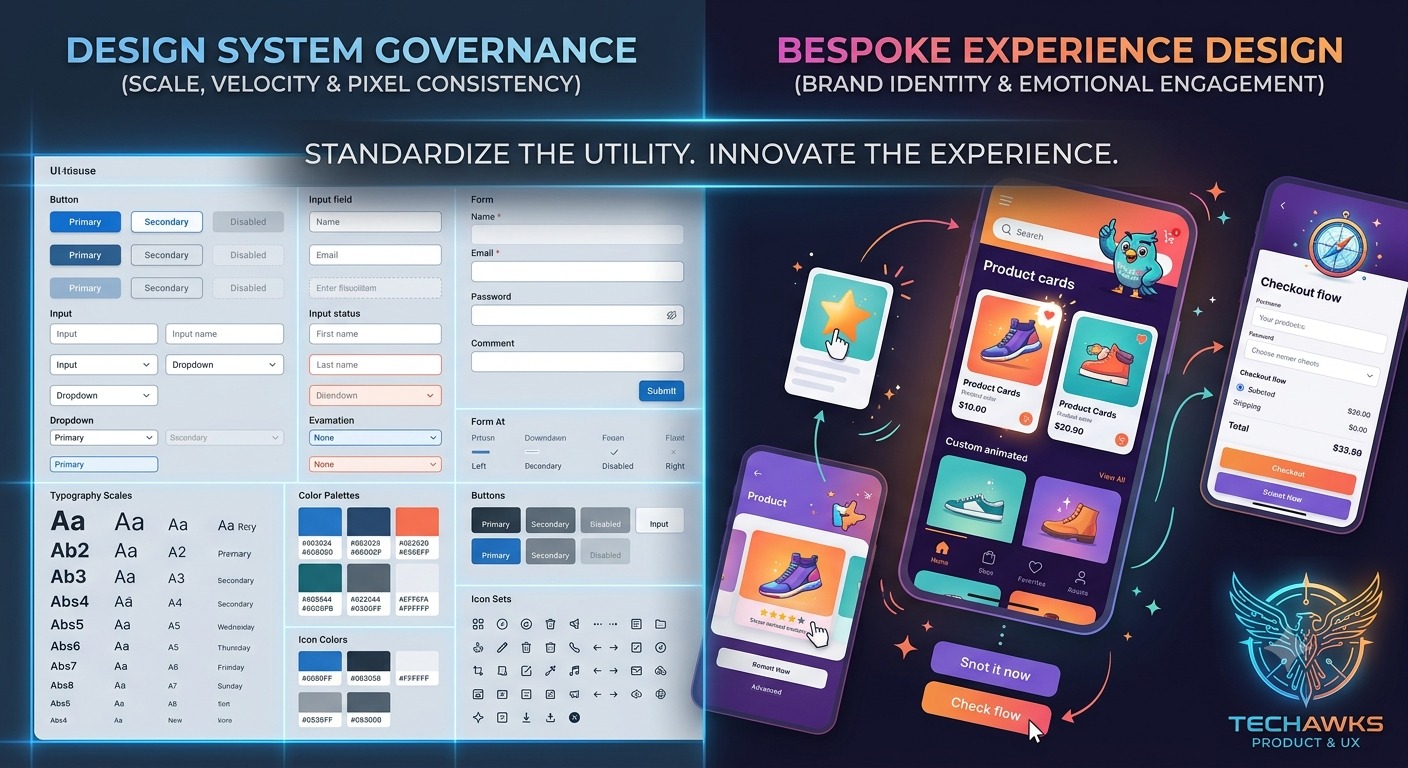
    Design Systems vs. Custom UI: Are Design Systems Killing Product Creativity or Accelerating Scale? The tension between standardized design systems and custom, bespoke UI components lies at the intersection of operational efficiency and distinctive user experience. To determine the right architectural balance for your product, it is essential to evaluate how both strategies function across different growth stages: 1. Rigid Design Systems (Component-First Architecture) The Core Premise: Establishes a single source of truth using standardized tokens, reusable UI components (buttons, modals, inputs), and strict layout grids across web and mobile platforms. Where It Excels: Enterprise scaling and maintenance. Design systems eliminate redundant work, drastically reduce frontend technical debt, ensure accessibility compliance (WCAG) out of the box, and allow designers to build flows in minutes rather than hours. The Drawback: Homogenization. When teams treat the component library as a dogma rather than a foundation, they risk forcing user problems into existing components rather than designing custom, context-specific interactions that delight users. 2. Custom UI & Bespoke Interactions (Experience-First Architecture) The Core Premise: Prioritizes custom animations, micro-interactions, and novel layout structures tailored specifically to the unique value proposition of a feature or brand landing page. Where It Excels: Brand differentiation and emotional resonance. Custom UI creates memorable, high-converting onboarding experiences and unique product hooks that stand out in crowded SaaS markets. The Drawback: High maintenance overhead. Every custom component increases engineering surface area, introduces cross-browser bugs, and complicates long-term UI maintenance. Actionable Advice for Product Leaders & UX Designers Rather than viewing design systems as an all-or-nothing constraint, top product teams employ a Tiered Governance Model: Standardize Core Mechanics (80%): Keep utility components—forms, navigation bars, tables, settings menus, and modal dialogs—strictly tied to your design system to maximize velocity. Allow Sandbox Experimentation (20%): Grant product teams explicit permission to break system guidelines for core "hero features" or onboarding flows where novel interactions directly drive activation. Build an Intake Pipeline: Establish a clear process where high-performing custom components are audited, refined, and eventually merged into the global design system. Key Takeaways Consistency Drives Usability: Standardized components reduce cognitive load for users by maintaining predictable interaction patterns across the platform. Systems Are Living Products: A design system should evolve based on user needs, not act as a restrictive boundary that suppresses innovation. Balance Efficiency with Experience: Use design systems to solve solved problems quickly so your team can focus creative energy on novel user challenges. CTA How does your team handle the boundary between rigid design system guidelines and bespoke feature design? Join Product, UX & Design to share your system governance models, debate component architecture, and collaborate with lead designers and product managers.
    0 Comments 0 Shares 2K Views 0 Reviews
  • How to Map Opportunity Solution Trees: A 4-Step Tutorial for User-Centric Product Discovery
    Created by product discovery expert Teresa Torres, the Opportunity Solution Tree (OST) is a visual framework that structures product discovery. It ensures your team explores multiple paths to reach an outcome, preventing premature commitments to unverified solutions.


    Follow this step-by-step tutorial to map your first Opportunity Solution Tree.


    Step 1: Define One Clear Target Outcome
    Start at the very top of your tree with a single, measurable metric you need to impact over the next quarter or sprint cycle.
    Bad Goal: "Build a better onboarding flow" (This is a solution, not an outcome).
    Clear Outcome: "Increase 7-day active user retention from 25% to 35%."
    Rule: Focus on one primary business or user engagement outcome per tree to maintain team alignment.


    Step 2: Uncover User Opportunities (Not Solution Demands)
    Branching down from your outcome, list Opportunities—the specific user needs, pain points, or desires that, if addressed, will drive your target outcome.
    How to gather them: Extract opportunities directly from qualitative customer interviews, session recordings, and support tickets.
    Example Opportunity: "I don't understand how to set up my workspace during initial signup."
    Rule: Frame opportunities from the user's perspective, avoiding any mention of UI elements or features.


    Step 3: Ideate Multiple Solutions for Each Opportunity
    Branching down from each opportunity, brainstorm 3–5 distinct Solutions.
    Why multiple solutions matter: Generating multiple ideas prevents "confirmation bias"—the trap of falling in love with your first idea and forcing it to work.
    Example Solutions for the signup pain point:
    A guided 3-step interactive onboarding wizard.
    A pre-populated workspace template tailored by industry.
    A 60-second video walkthrough embedded in the dashboard.


    Step 4: Define and Test Hidden Assumptions
    At the bottom of the tree, break down each candidate solution into testable Assumptions (Desirability, Usability, Feasibility, Viability).
    Example Assumption: "Users prefer interactive setups over static video tutorials."
    Action: Design low-cost experiments (clickable prototypes, fake-door tests, or 5-second usability tests) to validate assumptions before committing engineering resources to full production builds.


    Key Takeaways
    Connect Discovery to Strategy: OSTs ensure every feature idea directly traces back to an overarching business metric.
    Focus on Problems First: Mapping opportunities derived from real user research keeps product teams grounded in user needs rather than internal opinions.
    De-Risk with Experiments: Testing underlying assumptions at the bottom of the tree saves sprint capacity by filtering out weak solutions early.


    CTA
    Ready to structure your team's product discovery process? Join Product, UX & Design to download customizable OST templates, review real-world discovery case studies, and refine your UX strategy with seasoned product leaders.
    How to Map Opportunity Solution Trees: A 4-Step Tutorial for User-Centric Product Discovery Created by product discovery expert Teresa Torres, the Opportunity Solution Tree (OST) is a visual framework that structures product discovery. It ensures your team explores multiple paths to reach an outcome, preventing premature commitments to unverified solutions. Follow this step-by-step tutorial to map your first Opportunity Solution Tree. Step 1: Define One Clear Target Outcome Start at the very top of your tree with a single, measurable metric you need to impact over the next quarter or sprint cycle. Bad Goal: "Build a better onboarding flow" (This is a solution, not an outcome). Clear Outcome: "Increase 7-day active user retention from 25% to 35%." Rule: Focus on one primary business or user engagement outcome per tree to maintain team alignment. Step 2: Uncover User Opportunities (Not Solution Demands) Branching down from your outcome, list Opportunities—the specific user needs, pain points, or desires that, if addressed, will drive your target outcome. How to gather them: Extract opportunities directly from qualitative customer interviews, session recordings, and support tickets. Example Opportunity: "I don't understand how to set up my workspace during initial signup." Rule: Frame opportunities from the user's perspective, avoiding any mention of UI elements or features. Step 3: Ideate Multiple Solutions for Each Opportunity Branching down from each opportunity, brainstorm 3–5 distinct Solutions. Why multiple solutions matter: Generating multiple ideas prevents "confirmation bias"—the trap of falling in love with your first idea and forcing it to work. Example Solutions for the signup pain point: A guided 3-step interactive onboarding wizard. A pre-populated workspace template tailored by industry. A 60-second video walkthrough embedded in the dashboard. Step 4: Define and Test Hidden Assumptions At the bottom of the tree, break down each candidate solution into testable Assumptions (Desirability, Usability, Feasibility, Viability). Example Assumption: "Users prefer interactive setups over static video tutorials." Action: Design low-cost experiments (clickable prototypes, fake-door tests, or 5-second usability tests) to validate assumptions before committing engineering resources to full production builds. Key Takeaways Connect Discovery to Strategy: OSTs ensure every feature idea directly traces back to an overarching business metric. Focus on Problems First: Mapping opportunities derived from real user research keeps product teams grounded in user needs rather than internal opinions. De-Risk with Experiments: Testing underlying assumptions at the bottom of the tree saves sprint capacity by filtering out weak solutions early. CTA Ready to structure your team's product discovery process? Join Product, UX & Design to download customizable OST templates, review real-world discovery case studies, and refine your UX strategy with seasoned product leaders.
    0 Comments 0 Shares 2K Views 0 Reviews
  • Monolithic vs. Microservices Architecture: Choosing the Right Infrastructure Strategy for System Scalability
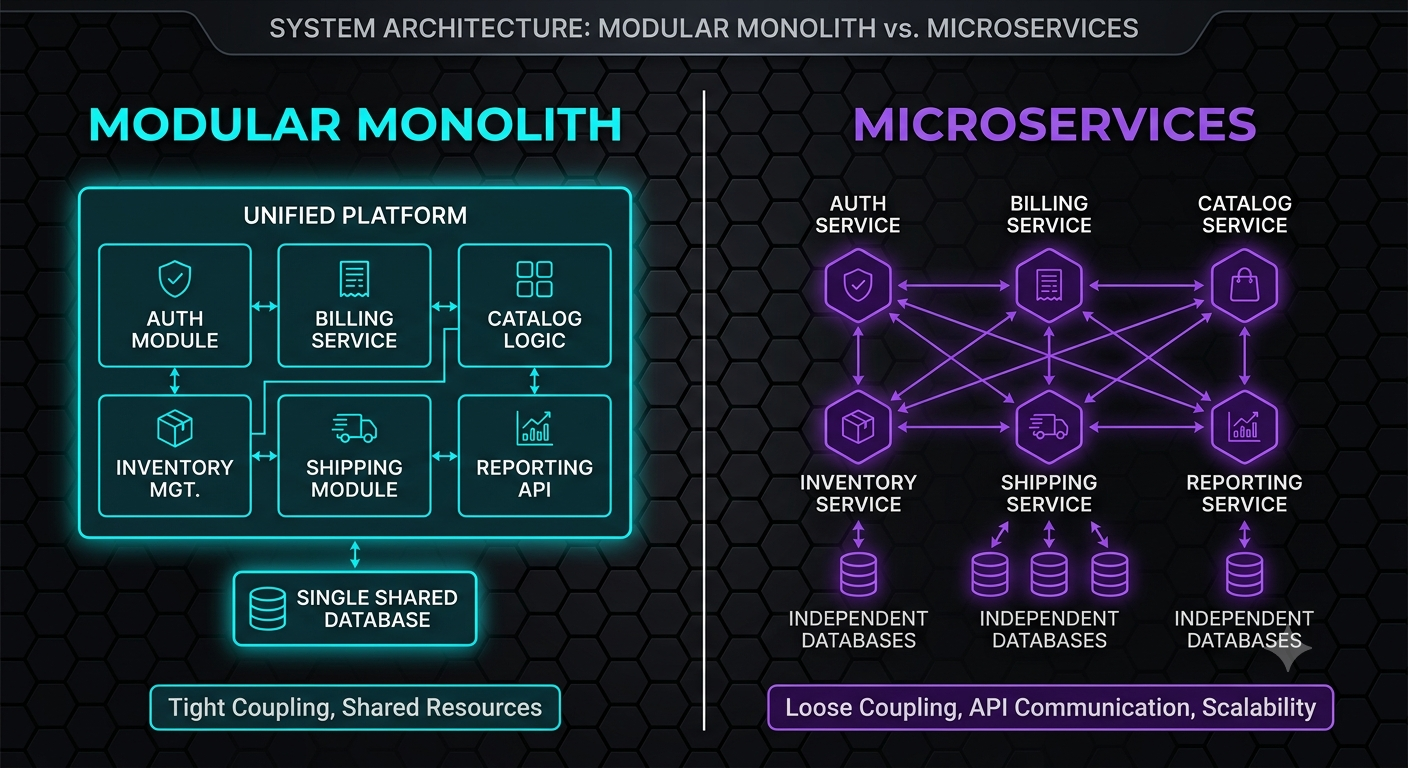
    Choosing between a Monolithic and Microservices architecture isn't about following trends—it's a trade-off between deployment simplicity and independent operational scalability.


    Here is an educational breakdown of how both architectural paradigms function and when to deploy each:


    1. Monolithic Architecture (Unified Codebase & Deployment)
    In a monolithic application, all functional modules (user authentication, payment processing, notification pipelines) reside within a single codebase and run on shared compute infrastructure.
    Core Characteristics: Tightly coupled components, single-deployment pipelines, shared databases, and straightforward local debugging.
    Best Used For: Early-stage applications, small engineering teams (under 15–20 developers), and domain models that are still actively evolving.
    Operational Advantages: Zero network latency between internal service calls, simple end-to-end testing, and low infrastructure overhead.
    The Challenges: A single failing component can bring down the entire runtime; scaling requires scaling the entire application rather than isolated hot paths.


    2. Microservices Architecture (Decoupled & Distributed Systems)
    Microservices break application features into loosely coupled, independently deployable services that communicate over lightweight network protocols (REST, gRPC, or event buses like Kafka).
    Core Characteristics: Domain-driven design, independent CI/CD pipelines, polyglot technology stacks, and decentralized data management (database-per-service pattern).
    Best Used For: Large organizations with distinct domain teams, complex enterprise applications with high concurrency, and systems where specific modules require independent autoscaling.
    Operational Advantages: High fault isolation, independent feature deployments, and fine-grained resource allocation per service.
    The Challenges: Operational overhead (requires robust Kubernetes orchestration, service meshes, and distributed logging), eventual data consistency complexities, and network serialization costs.


    Practical Guidance for Cloud Architects
    To avoid premature complexity while preserving room for growth, follow these three core guidelines:
    Start with a Modular Monolith: Build clean domain boundaries inside a unified codebase first. Clearly separated domain modules make future extraction into independent microservices straightforward when load demands it.
    Decompose Around Scalability Hotspots: Only extract a module into a microservice when it exhibits drastically different scaling characteristics (e.g., extracting a CPU-heavy media processing pipeline away from a low-latency web server).
    Invest in Platform Infrastructure First: Never migrate to microservices without established infrastructure fundamentals—specifically automated CI/CD, centralized log aggregation (ELK/OpenTelemetry), container orchestration (Kubernetes), and infrastructure-as-code (Terraform).


    Key Takeaways
    Complexity Has a Cost: Microservices solve organizational and scaling bottlenecks at the price of significantly higher infrastructure and operational complexity.
    Domain Clarity Over Service Count: Good microservices reflect well-defined domain boundaries; poorly defined boundaries lead to a distributed monolith with worst-case performance.
    Infrastructure Readiness is Mandatory: Solid CI/CD automation and observability must precede any architectural decomposition.


    CTA
    How is your team managing architectural trade-offs in the cloud this year? Join Cloud, DevOps & Open Source to discuss infrastructure strategies, review deployment pipelines, and collaborate with seasoned DevOps engineers.
    Monolithic vs. Microservices Architecture: Choosing the Right Infrastructure Strategy for System Scalability Choosing between a Monolithic and Microservices architecture isn't about following trends—it's a trade-off between deployment simplicity and independent operational scalability. Here is an educational breakdown of how both architectural paradigms function and when to deploy each: 1. Monolithic Architecture (Unified Codebase & Deployment) In a monolithic application, all functional modules (user authentication, payment processing, notification pipelines) reside within a single codebase and run on shared compute infrastructure. Core Characteristics: Tightly coupled components, single-deployment pipelines, shared databases, and straightforward local debugging. Best Used For: Early-stage applications, small engineering teams (under 15–20 developers), and domain models that are still actively evolving. Operational Advantages: Zero network latency between internal service calls, simple end-to-end testing, and low infrastructure overhead. The Challenges: A single failing component can bring down the entire runtime; scaling requires scaling the entire application rather than isolated hot paths. 2. Microservices Architecture (Decoupled & Distributed Systems) Microservices break application features into loosely coupled, independently deployable services that communicate over lightweight network protocols (REST, gRPC, or event buses like Kafka). Core Characteristics: Domain-driven design, independent CI/CD pipelines, polyglot technology stacks, and decentralized data management (database-per-service pattern). Best Used For: Large organizations with distinct domain teams, complex enterprise applications with high concurrency, and systems where specific modules require independent autoscaling. Operational Advantages: High fault isolation, independent feature deployments, and fine-grained resource allocation per service. The Challenges: Operational overhead (requires robust Kubernetes orchestration, service meshes, and distributed logging), eventual data consistency complexities, and network serialization costs. Practical Guidance for Cloud Architects To avoid premature complexity while preserving room for growth, follow these three core guidelines: Start with a Modular Monolith: Build clean domain boundaries inside a unified codebase first. Clearly separated domain modules make future extraction into independent microservices straightforward when load demands it. Decompose Around Scalability Hotspots: Only extract a module into a microservice when it exhibits drastically different scaling characteristics (e.g., extracting a CPU-heavy media processing pipeline away from a low-latency web server). Invest in Platform Infrastructure First: Never migrate to microservices without established infrastructure fundamentals—specifically automated CI/CD, centralized log aggregation (ELK/OpenTelemetry), container orchestration (Kubernetes), and infrastructure-as-code (Terraform). Key Takeaways Complexity Has a Cost: Microservices solve organizational and scaling bottlenecks at the price of significantly higher infrastructure and operational complexity. Domain Clarity Over Service Count: Good microservices reflect well-defined domain boundaries; poorly defined boundaries lead to a distributed monolith with worst-case performance. Infrastructure Readiness is Mandatory: Solid CI/CD automation and observability must precede any architectural decomposition. CTA How is your team managing architectural trade-offs in the cloud this year? Join Cloud, DevOps & Open Source to discuss infrastructure strategies, review deployment pipelines, and collaborate with seasoned DevOps engineers.
    0 Comments 0 Shares 2K Views 0 Reviews
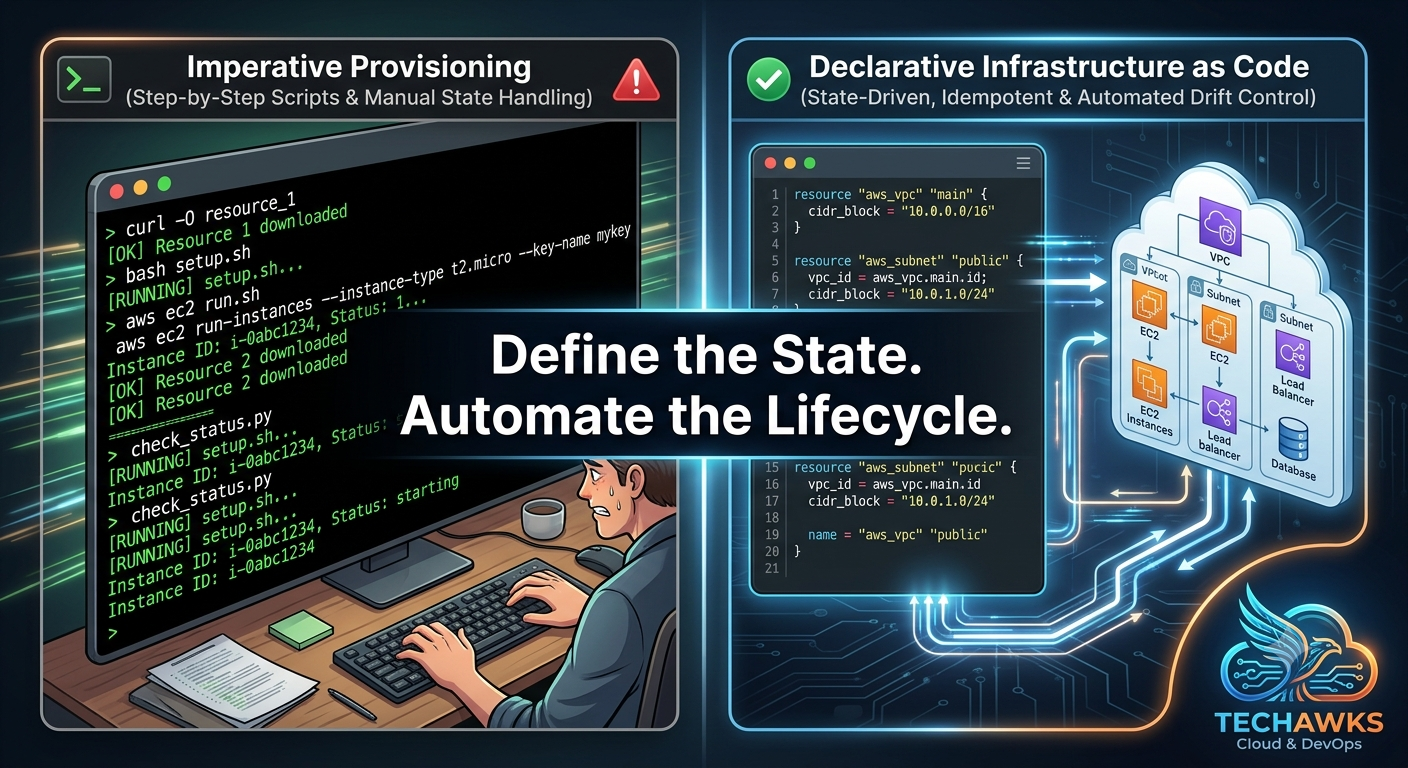
  • Declarative vs. Imperative Infrastructure: Is Code-Driven Automation Leaving Scripting Behind?
    The debate between Declarative Infrastructure as Code (IaC) and Imperative Infrastructure scripts shapes how cloud teams maintain reliability, prevent configuration drift, and manage deployment pipelines.


    Understanding where each approach excels allows cloud engineers to build resilient, automated infrastructure:


    1. Imperative Provisioning (Step-by-Step Execution)
    The Mechanism: You write scripts (using Bash, Python, or CLI commands like aws ec2 run-instances) that define the exact sequence of steps the cloud provider must execute to build infrastructure.
    Where It Succeeds: Quick one-off tasks, operational troubleshooting, and ad-hoc automation scripts where full state tracking is unnecessary.
    The Drawbacks: High operational fragility. Imperative scripts lack built-in state management. If a script fails halfway through execution, running it again often leads to duplicate resources, race conditions, or unhandled configuration errors.


    2. Declarative Infrastructure (State-Driven Configuration)
    The Mechanism: You write configuration files (using tools like Terraform, OpenTofu, or CloudFormation) that define the desired end state of your infrastructure. The underlying engine calculates the diff between reality and the configuration, executing only the necessary modifications.
    Where It Succeeds: Enterprise cloud management, automated CI/CD pipelines, and multi-environment consistency. It natively prevents configuration drift and enables version-controlled infrastructure history.
    The Drawbacks: Steeper initial learning curve, state file locks, and rigid abstractions that can complicate highly custom operational workflows.


    Actionable Advice for Cloud Engineers
    To maximize deployment speed while enforcing state reliability across environments, follow these practical rules:
    Adopt Declarative for Provisioning (90%): Use declarative IaC tools to manage all long-lived cloud resources (VPCs, subnets, Kubernetes clusters, IAM roles, and databases). This guarantees reproducibility across staging and production.
    Reserve Imperative for Orchestration & Hooks (10%): Use imperative scripts inside container entrypoints, CI/CD pipeline steps, or post-provisioning initialization tasks where sequential logic or external API calls are required.
    Automate Drift Detection: Schedule automated daily pipeline runs (terraform plan) to detect and alert on unauthorized manual changes made directly in the cloud console.


    Key Takeaways
    State Management is Critical: Declarative tools maintain an explicit state file, ensuring infrastructure changes are predictable, repeatable, and idempotent.
    Scripting Isn't Dead, Just Repositioned: Imperative scripting remains essential for operational glue and pipeline tasks, but should not manage core resource lifecycles.
    Version Everything: Treating declarative templates as software source code brings code review, automated testing, and easy rollback capabilities to cloud operations.


    CTA
    How is your team managing infrastructure state and automation pipelines this year? Join Cloud, DevOps & Open Source to share IaC architecture patterns, debate module structures, and collaborate with experienced DevOps professionals.
    Declarative vs. Imperative Infrastructure: Is Code-Driven Automation Leaving Scripting Behind? The debate between Declarative Infrastructure as Code (IaC) and Imperative Infrastructure scripts shapes how cloud teams maintain reliability, prevent configuration drift, and manage deployment pipelines. Understanding where each approach excels allows cloud engineers to build resilient, automated infrastructure: 1. Imperative Provisioning (Step-by-Step Execution) The Mechanism: You write scripts (using Bash, Python, or CLI commands like aws ec2 run-instances) that define the exact sequence of steps the cloud provider must execute to build infrastructure. Where It Succeeds: Quick one-off tasks, operational troubleshooting, and ad-hoc automation scripts where full state tracking is unnecessary. The Drawbacks: High operational fragility. Imperative scripts lack built-in state management. If a script fails halfway through execution, running it again often leads to duplicate resources, race conditions, or unhandled configuration errors. 2. Declarative Infrastructure (State-Driven Configuration) The Mechanism: You write configuration files (using tools like Terraform, OpenTofu, or CloudFormation) that define the desired end state of your infrastructure. The underlying engine calculates the diff between reality and the configuration, executing only the necessary modifications. Where It Succeeds: Enterprise cloud management, automated CI/CD pipelines, and multi-environment consistency. It natively prevents configuration drift and enables version-controlled infrastructure history. The Drawbacks: Steeper initial learning curve, state file locks, and rigid abstractions that can complicate highly custom operational workflows. Actionable Advice for Cloud Engineers To maximize deployment speed while enforcing state reliability across environments, follow these practical rules: Adopt Declarative for Provisioning (90%): Use declarative IaC tools to manage all long-lived cloud resources (VPCs, subnets, Kubernetes clusters, IAM roles, and databases). This guarantees reproducibility across staging and production. Reserve Imperative for Orchestration & Hooks (10%): Use imperative scripts inside container entrypoints, CI/CD pipeline steps, or post-provisioning initialization tasks where sequential logic or external API calls are required. Automate Drift Detection: Schedule automated daily pipeline runs (terraform plan) to detect and alert on unauthorized manual changes made directly in the cloud console. Key Takeaways State Management is Critical: Declarative tools maintain an explicit state file, ensuring infrastructure changes are predictable, repeatable, and idempotent. Scripting Isn't Dead, Just Repositioned: Imperative scripting remains essential for operational glue and pipeline tasks, but should not manage core resource lifecycles. Version Everything: Treating declarative templates as software source code brings code review, automated testing, and easy rollback capabilities to cloud operations. CTA How is your team managing infrastructure state and automation pipelines this year? Join Cloud, DevOps & Open Source to share IaC architecture patterns, debate module structures, and collaborate with experienced DevOps professionals.
    0 Comments 0 Shares 1K Views 0 Reviews
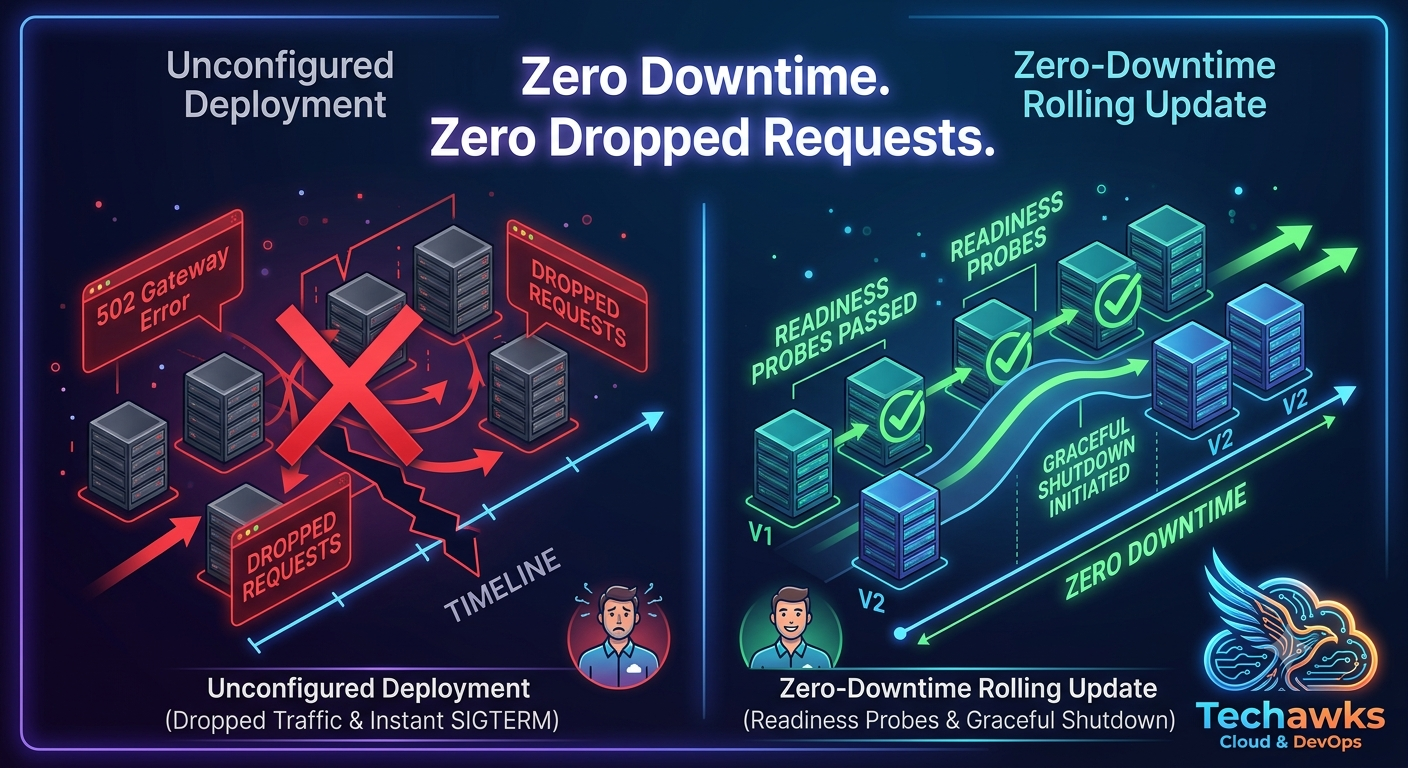
  • How to Zero-Downtime Deploy on Kubernetes: A Step-by-Step Rolling Update Tutorial
    A successful zero-downtime deployment relies on three core mechanics: progressive instance replacement, health probing, and graceful connection termination. Without explicit configurations, Kubernetes might kill old pods before new ones are ready, leading to dropped HTTP requests (502 Bad Gateway).


    Follow this 4-step workflow to implement fault-tolerant deployments:


    Step 1: Configure Rolling Update Strategy Parameters
    Define how many pods Kubernetes can terminate or create simultaneously during an update. In your Deployment manifest, set maxSurge and maxUnavailable:
    YAML
    spec:
    replicas: 4
    strategy:
    type: RollingUpdate
    rollingUpdate:
    maxSurge: 25% # Creates 1 new pod before terminating any old ones
    maxUnavailable: 0% # Guarantees 100% capacity remains active throughout the rollout


    Step 2: Implement Readiness and Liveness Probes
    Kubernetes needs to know when a newly spawned pod is actually prepared to accept traffic, not just when its container process starts.
    Readiness Probe: Ensures traffic is routed only after application dependencies (database connections, internal caches) are fully initialized.
    Liveness Probe: Detects deadlocks and restarts frozen containers.
    YAML
    spec:
    containers:
    - name: web-app
    image: app:v2.1.0
    readinessProbe:
    httpGet:
    path: /healthz/ready
    port: 8080
    initialDelaySeconds: 10
    periodSeconds: 5
    livenessProbe:
    httpGet:
    path: /healthz/live
    port: 8080
    initialDelaySeconds: 15
    periodSeconds: 10


    Step 3: Handle Graceful Shutdown with preStop Hooks
    When Kubernetes terminates an old pod, service endpoint updates propagate asynchronously across the cluster network. To prevent dropped connections during this propagation window, delay process termination using a preStop hook:
    YAML
    lifecycle:
    preStop:
    exec:
    command: ["/bin/sh", "-c", "sleep 15"]
    Why this works: The sleep command holds the container process alive while Kubernetes removes the pod IP from load balancer endpoints, ensuring in-flight HTTP requests complete cleanly.


    Step 4: Validate the Rollout and Set Auto-Rollback Rules
    Execute the update and monitor the rollout status in real time:
    Bash
    # Apply the updated manifest
    kubectl apply -f deployment.yaml
    # Monitor rollout progression step-by-step
    kubectl rollout status deployment/web-app-deployment
    # Undo the deployment immediately if probes fail or errors spike
    kubectl rollout undo deployment/web-app-deployment


    Key Takeaways
    Zero Downtime Requires Probes: Without explicit readinessProbe definitions, Kubernetes assumes a pod is ready immediately upon process start, routing live user traffic to uninitialized apps.
    Eliminate Drop-Offs with preStop Hooks: Adding a small sleep delay allows network routing tables to update before the application process receives SIGTERM.
    Zero Availability Loss: Setting maxUnavailable: 0% guarantees total operational capacity is preserved throughout the entire deployment cycle.


    CTA
    Struggling with deployment errors or service mesh traffic routing in production? Join Cloud, DevOps & Open Source to share Kubernetes manifests, troubleshoot cluster setups, and learn container orchestration best practices from field-tested DevOps engineers.
    How to Zero-Downtime Deploy on Kubernetes: A Step-by-Step Rolling Update Tutorial A successful zero-downtime deployment relies on three core mechanics: progressive instance replacement, health probing, and graceful connection termination. Without explicit configurations, Kubernetes might kill old pods before new ones are ready, leading to dropped HTTP requests (502 Bad Gateway). Follow this 4-step workflow to implement fault-tolerant deployments: Step 1: Configure Rolling Update Strategy Parameters Define how many pods Kubernetes can terminate or create simultaneously during an update. In your Deployment manifest, set maxSurge and maxUnavailable: YAML spec: replicas: 4 strategy: type: RollingUpdate rollingUpdate: maxSurge: 25% # Creates 1 new pod before terminating any old ones maxUnavailable: 0% # Guarantees 100% capacity remains active throughout the rollout Step 2: Implement Readiness and Liveness Probes Kubernetes needs to know when a newly spawned pod is actually prepared to accept traffic, not just when its container process starts. Readiness Probe: Ensures traffic is routed only after application dependencies (database connections, internal caches) are fully initialized. Liveness Probe: Detects deadlocks and restarts frozen containers. YAML spec: containers: - name: web-app image: app:v2.1.0 readinessProbe: httpGet: path: /healthz/ready port: 8080 initialDelaySeconds: 10 periodSeconds: 5 livenessProbe: httpGet: path: /healthz/live port: 8080 initialDelaySeconds: 15 periodSeconds: 10 Step 3: Handle Graceful Shutdown with preStop Hooks When Kubernetes terminates an old pod, service endpoint updates propagate asynchronously across the cluster network. To prevent dropped connections during this propagation window, delay process termination using a preStop hook: YAML lifecycle: preStop: exec: command: ["/bin/sh", "-c", "sleep 15"] Why this works: The sleep command holds the container process alive while Kubernetes removes the pod IP from load balancer endpoints, ensuring in-flight HTTP requests complete cleanly. Step 4: Validate the Rollout and Set Auto-Rollback Rules Execute the update and monitor the rollout status in real time: Bash # Apply the updated manifest kubectl apply -f deployment.yaml # Monitor rollout progression step-by-step kubectl rollout status deployment/web-app-deployment # Undo the deployment immediately if probes fail or errors spike kubectl rollout undo deployment/web-app-deployment Key Takeaways Zero Downtime Requires Probes: Without explicit readinessProbe definitions, Kubernetes assumes a pod is ready immediately upon process start, routing live user traffic to uninitialized apps. Eliminate Drop-Offs with preStop Hooks: Adding a small sleep delay allows network routing tables to update before the application process receives SIGTERM. Zero Availability Loss: Setting maxUnavailable: 0% guarantees total operational capacity is preserved throughout the entire deployment cycle. CTA Struggling with deployment errors or service mesh traffic routing in production? Join Cloud, DevOps & Open Source to share Kubernetes manifests, troubleshoot cluster setups, and learn container orchestration best practices from field-tested DevOps engineers.
    0 Comments 0 Shares 1K Views 0 Reviews
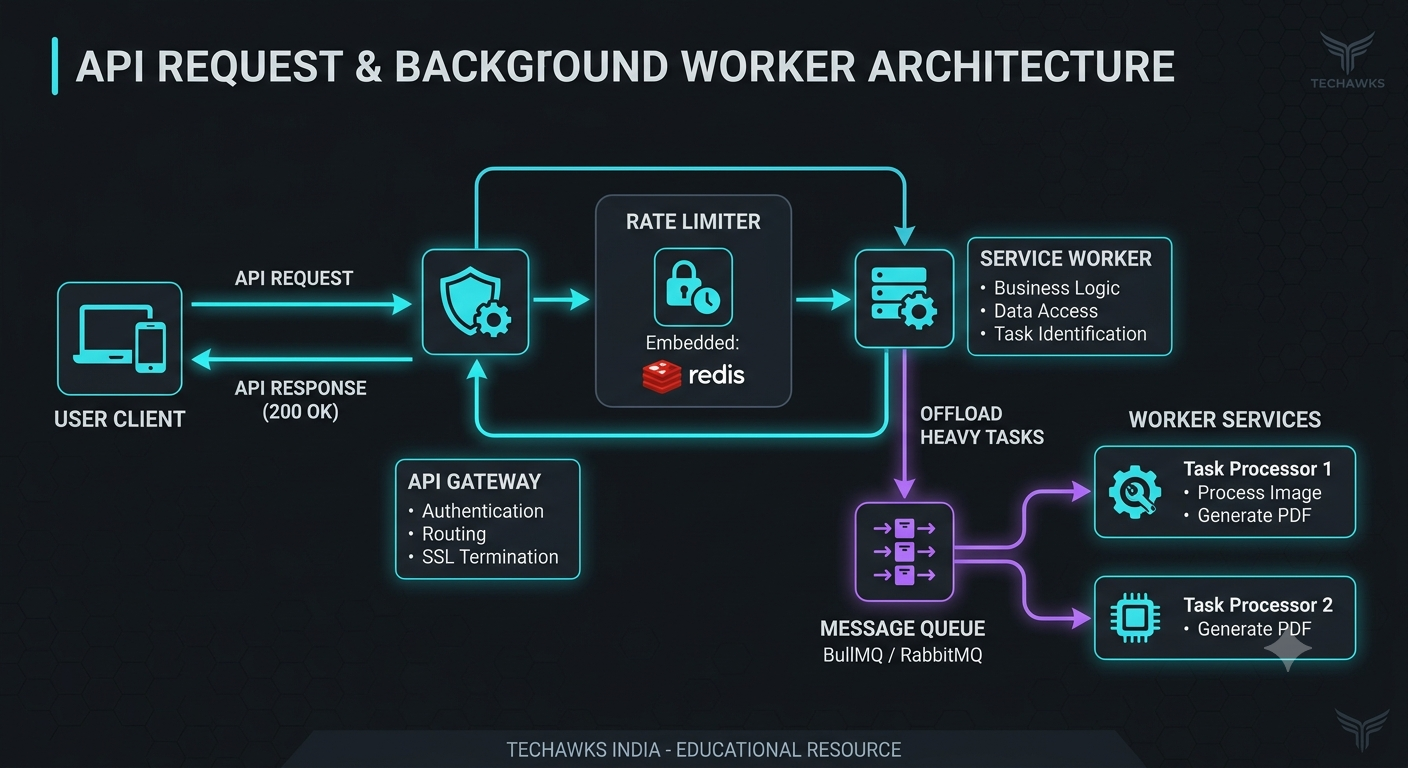
  • How to Build a Production-Ready API Architecture: 5 Non-Negotiable Rules.
    Building scalable backend systems isn't about using the trendiest framework—it’s about implementing sound design principles that stand up to real-world traffic. Whether you are building with Node.js, Go, or Python, here are five architectural rules every engineer should follow before deploying to production:


    Implement Rate Limiting Early
    Protect your infrastructure from both accidental loops and malicious denial-of-service attacks. Use token bucket or leaky bucket algorithms (via Redis) to enforce request limits per user or IP address.


    Standardize Error Handling and Status Codes
    Never return generic 500 Internal Server Error responses with unhelpful payloads. Use predictable HTTP status codes (e.g., 400 for client errors, 401 for unauthenticated requests, 429 for rate limits) paired with a standard JSON error schema:


    JSON
    "error":
    "code": "INVALID_PAYLOAD",
    "message": "Field 'email' must be a valid email address.",
    "timestamp": "2026-08-03T12:00:00Z"


    Decouple Heavy Workflows with Queues
    If an endpoint takes more than 200ms to process, it shouldn't be synchronous. Offload background tasks like sending emails, processing images, or generating PDFs to a message broker like RabbitMQ or BullMQ.


    Design for Idempotency
    Network drops happen. Ensure that mutating requests (like payment processing or creation endpoints) use idempotency keys. If a client retries a request due to a timeout, your system should yield the original response without duplicating the action.


    Log for Observability, Not Just Debugging
    Avoid console.log() statements. Use structured logging (JSON format) with trace IDs so you can track a single request’s lifecycle across multiple microservices.


    Key Takeaways
    Rate limiting prevents resource exhaustion before it starts.
    Predictable error structures simplify frontend integration and debugging.
    Asynchronous message queues keep response times low under heavy load.
    Idempotent endpoints guarantee data integrity during network failures.


    CTA (Join Techawks India)
    Level up your backend engineering skills with developers across the country. Join Techawks India today to access exclusive architecture breakdowns, code reviews, and tech discussions.
    How to Build a Production-Ready API Architecture: 5 Non-Negotiable Rules. Building scalable backend systems isn't about using the trendiest framework—it’s about implementing sound design principles that stand up to real-world traffic. Whether you are building with Node.js, Go, or Python, here are five architectural rules every engineer should follow before deploying to production: Implement Rate Limiting Early Protect your infrastructure from both accidental loops and malicious denial-of-service attacks. Use token bucket or leaky bucket algorithms (via Redis) to enforce request limits per user or IP address. Standardize Error Handling and Status Codes Never return generic 500 Internal Server Error responses with unhelpful payloads. Use predictable HTTP status codes (e.g., 400 for client errors, 401 for unauthenticated requests, 429 for rate limits) paired with a standard JSON error schema: JSON "error": "code": "INVALID_PAYLOAD", "message": "Field 'email' must be a valid email address.", "timestamp": "2026-08-03T12:00:00Z" Decouple Heavy Workflows with Queues If an endpoint takes more than 200ms to process, it shouldn't be synchronous. Offload background tasks like sending emails, processing images, or generating PDFs to a message broker like RabbitMQ or BullMQ. Design for Idempotency Network drops happen. Ensure that mutating requests (like payment processing or creation endpoints) use idempotency keys. If a client retries a request due to a timeout, your system should yield the original response without duplicating the action. Log for Observability, Not Just Debugging Avoid console.log() statements. Use structured logging (JSON format) with trace IDs so you can track a single request’s lifecycle across multiple microservices. Key Takeaways Rate limiting prevents resource exhaustion before it starts. Predictable error structures simplify frontend integration and debugging. Asynchronous message queues keep response times low under heavy load. Idempotent endpoints guarantee data integrity during network failures. CTA (Join Techawks India) Level up your backend engineering skills with developers across the country. Join Techawks India today to access exclusive architecture breakdowns, code reviews, and tech discussions.
    0 Comments 0 Shares 2K Views 0 Reviews
  • Monolith vs. Microservices in 2026: What’s the Right Choice for Indian Startups?
    Over the last few years, microservices became the default answer for backend design. But as many Indian engineering teams scale from early stage to series A and beyond, they are discovering that breaking a system into dozens of independent services too early introduces massive operational overhead, complex distributed tracing, and inflated cloud bills.


    Choosing the right architectural strategy isn't about following tech trends; it's about matching your system design to your team's size, domain clarity, and operational maturity. Here is how to evaluate where your team stands:


    The Modular Monolith Advantage
    If your engineering team is under 20 developers or your product domain is still evolving, a well-structured "Modular Monolith" is often the most practical path. You get fast deployment cycles, simple single-database transactions, and straightforward debugging while keeping code boundaries clean for future extraction.


    When to Transition to Microservices
    Microservices shine when different parts of your system have vastly different scaling requirements (e.g., high-throughput payment processing vs. low-traffic admin dashboards) or when separate domain teams need to deploy independently without blocking each other.


    The Hidden Cost of premature Abstraction
    Splitting services prematurely forces you to handle network latency, distributed transactions (Saga pattern), complex API versioning, and service mesh management before you even hit product-market fit.


    Instead of asking "Should we use microservices?", ask "What exact operational bottleneck are we solving by splitting this service right now?"


    Key Takeaways
    Start with a Modular Monolith unless clear organizational or scaling boundaries force a split.
    Microservices solve team autonomy and selective scaling challenges, not code quality issues.
    Distributed complexity should only be introduced when the cost of a monolithic deployment outweighs the operational cost of managing microservices.


    CTA (Join Techawks India)
    Where does your team stand on this debate? Have you recently migrated to microservices—or moved back to a monolith? Drop your thoughts in the comments below, and Join Techawks India to connect with senior engineers and tech leaders shaping backend architecture across the country.
    Monolith vs. Microservices in 2026: What’s the Right Choice for Indian Startups? Over the last few years, microservices became the default answer for backend design. But as many Indian engineering teams scale from early stage to series A and beyond, they are discovering that breaking a system into dozens of independent services too early introduces massive operational overhead, complex distributed tracing, and inflated cloud bills. Choosing the right architectural strategy isn't about following tech trends; it's about matching your system design to your team's size, domain clarity, and operational maturity. Here is how to evaluate where your team stands: The Modular Monolith Advantage If your engineering team is under 20 developers or your product domain is still evolving, a well-structured "Modular Monolith" is often the most practical path. You get fast deployment cycles, simple single-database transactions, and straightforward debugging while keeping code boundaries clean for future extraction. When to Transition to Microservices Microservices shine when different parts of your system have vastly different scaling requirements (e.g., high-throughput payment processing vs. low-traffic admin dashboards) or when separate domain teams need to deploy independently without blocking each other. The Hidden Cost of premature Abstraction Splitting services prematurely forces you to handle network latency, distributed transactions (Saga pattern), complex API versioning, and service mesh management before you even hit product-market fit. Instead of asking "Should we use microservices?", ask "What exact operational bottleneck are we solving by splitting this service right now?" Key Takeaways Start with a Modular Monolith unless clear organizational or scaling boundaries force a split. Microservices solve team autonomy and selective scaling challenges, not code quality issues. Distributed complexity should only be introduced when the cost of a monolithic deployment outweighs the operational cost of managing microservices. CTA (Join Techawks India) Where does your team stand on this debate? Have you recently migrated to microservices—or moved back to a monolith? Drop your thoughts in the comments below, and Join Techawks India to connect with senior engineers and tech leaders shaping backend architecture across the country.
    0 Comments 0 Shares 1K Views 0 Reviews
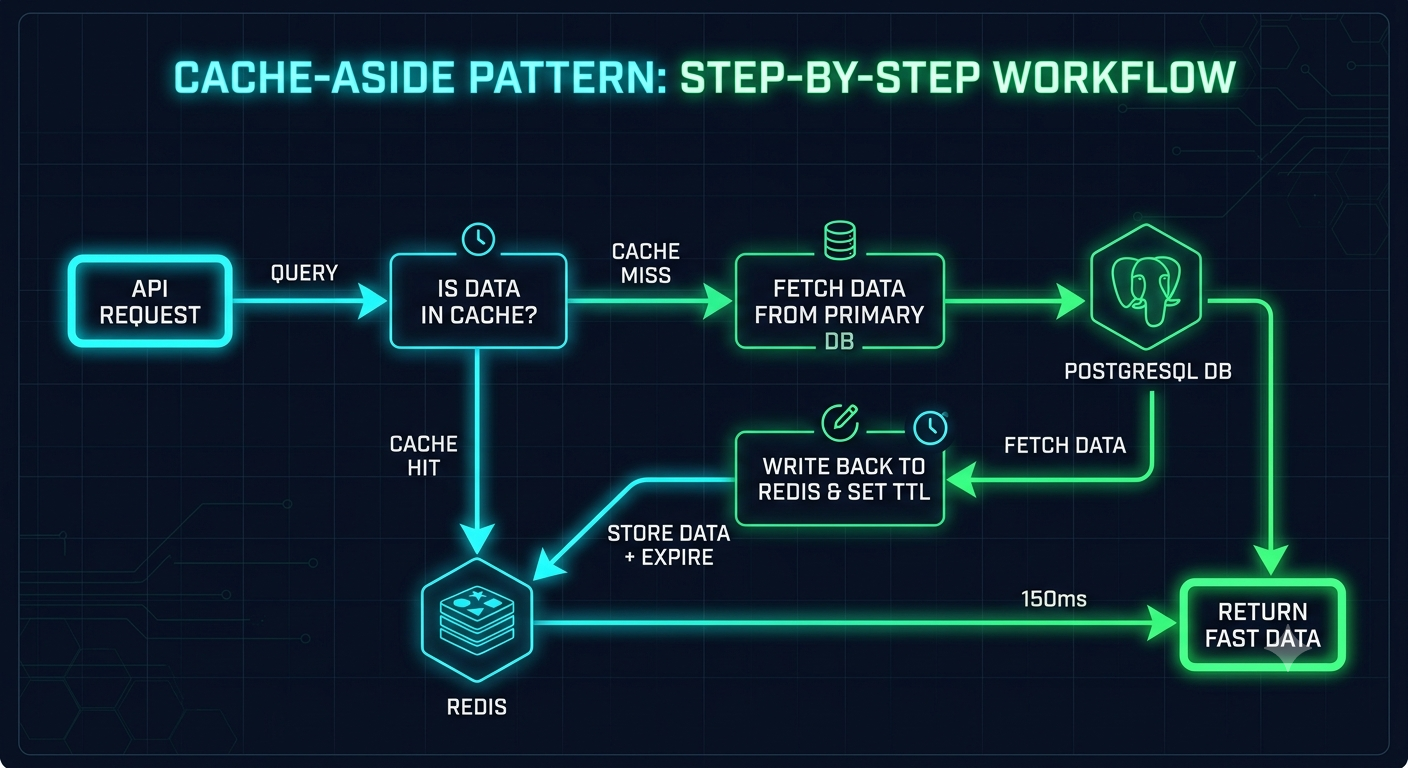
  • Step-by-Step: Setting Up Redis Caching for High-Traffic Database Queries
    When application traffic spikes, hitting your primary database for repeated, read-heavy data is a quick recipe for high latency and connection pool exhaustion. Implementing a cache-aside pattern with Redis drops your response times from hundreds of milliseconds to under 5ms.


    Here is a step-by-step tutorial on implementing the cache-aside pattern correctly:


    Identify the Hotspot Query
    Locate read-intensive queries where the underlying data doesn't change every second (e.g., user profiles, product catalogs, or system settings).


    Implement the Cache-Aside Logic
    Before querying your primary database, check if the data exists in Redis.
    Cache Hit: Return the data directly from Redis.
    Cache Miss: Query the primary database, write the result to Redis with a TTL (Time-To-Live), and return the response.
    JavaScript
    async function getUserProfile(userId) {
    const cacheKey = `user:${userId}`;
    // Step A: Check Redis
    const cachedData = await redis.get(cacheKey);
    if (cachedData) {
    return JSON.parse(cachedData); // Cache Hit


    // Step B: Fetch from Primary DB on Cache Miss
    const user = await db.users.findById(userId);

    // Step C: Write to Redis with a 1-hour TTL
    if (user) {
    await redis.setex(cacheKey, 3600, JSON.stringify(user));
    return user;


    Always Set an Explicit TTL
    Never store data indefinitely in Redis without an expiration time unless it is strictly static. Setting a TTL prevents stale data issues and ensures your Redis instance doesn't run out of memory.


    Handle Cache Invalidation Strategy
    When a user updates their profile data, write to the primary database and immediately delete or update the corresponding key in Redis (redis.del(cacheKey)). This prevents serving outdated records to your users.


    Key Takeaways
    Cache-aside reads from Redis first, falling back to the main database only on a cache miss.
    Expiration (TTL) is non-negotiable to prevent memory bloat and stale data accumulation.
    Explicitly invalidate cached keys whenever performing UPDATE or DELETE operations in the primary DB.


    CTA (Join Techawks India)
    Mastering backend performance requires practical, battle-tested patterns. Join Techawks India today to access more hands-on tutorials, code walkthroughs, and performance optimization guides built for developers.
    Step-by-Step: Setting Up Redis Caching for High-Traffic Database Queries When application traffic spikes, hitting your primary database for repeated, read-heavy data is a quick recipe for high latency and connection pool exhaustion. Implementing a cache-aside pattern with Redis drops your response times from hundreds of milliseconds to under 5ms. Here is a step-by-step tutorial on implementing the cache-aside pattern correctly: Identify the Hotspot Query Locate read-intensive queries where the underlying data doesn't change every second (e.g., user profiles, product catalogs, or system settings). Implement the Cache-Aside Logic Before querying your primary database, check if the data exists in Redis. Cache Hit: Return the data directly from Redis. Cache Miss: Query the primary database, write the result to Redis with a TTL (Time-To-Live), and return the response. JavaScript async function getUserProfile(userId) { const cacheKey = `user:${userId}`; // Step A: Check Redis const cachedData = await redis.get(cacheKey); if (cachedData) { return JSON.parse(cachedData); // Cache Hit // Step B: Fetch from Primary DB on Cache Miss const user = await db.users.findById(userId); // Step C: Write to Redis with a 1-hour TTL if (user) { await redis.setex(cacheKey, 3600, JSON.stringify(user)); return user; Always Set an Explicit TTL Never store data indefinitely in Redis without an expiration time unless it is strictly static. Setting a TTL prevents stale data issues and ensures your Redis instance doesn't run out of memory. Handle Cache Invalidation Strategy When a user updates their profile data, write to the primary database and immediately delete or update the corresponding key in Redis (redis.del(cacheKey)). This prevents serving outdated records to your users. Key Takeaways Cache-aside reads from Redis first, falling back to the main database only on a cache miss. Expiration (TTL) is non-negotiable to prevent memory bloat and stale data accumulation. Explicitly invalidate cached keys whenever performing UPDATE or DELETE operations in the primary DB. CTA (Join Techawks India) Mastering backend performance requires practical, battle-tested patterns. Join Techawks India today to access more hands-on tutorials, code walkthroughs, and performance optimization guides built for developers.
    0 Comments 0 Shares 1K Views 0 Reviews
  • Designing Resilient Distributed Systems: 4 Circuit Breaker Patterns Every US Engineering Team Should Master
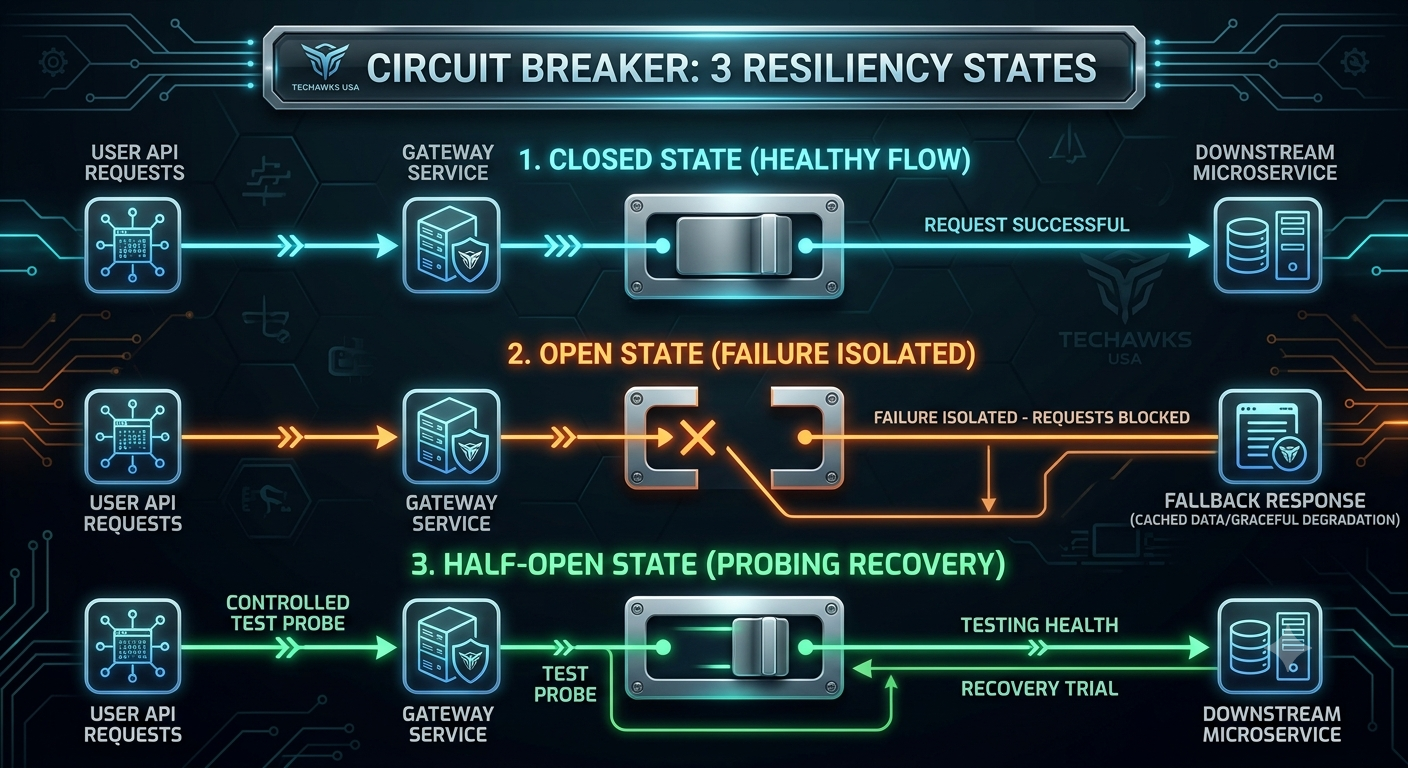
    In high-throughput, cloud-native architecture, failure is guaranteed. The true test of a engineering setup isn't whether services fail, but how gracefully the system degrades when they do. Implementing a circuit breaker pattern (using libraries like Resilience4j, Sentinel, or Istio/Envoy service meshes) prevents a single slow third-party API or database connection from consuming all application threads and crashing your entire platform.


    Here are four essential strategies for implementing circuit breakers effectively in production:


    Define Explicit Failure and Slow-Call Thresholds
    Do not trigger a trip solely on 5xx error responses. Configure your breaker to measure slow execution times (e.g., requests taking over 1.5s) alongside explicit network timeouts. If 50% of requests fail or time out within a 10-second rolling window, open the circuit immediately.


    Leverage the Half-Open State for Smooth Recovery
    Once a circuit opens, set a cool-down timer (e.g., 30 seconds) before transitioning to a Half-Open state. In this state, allow a limited trial batch of requests (e.g., 10 requests) through to test downstream health. If they succeed, reset to Closed; if any fail, revert to Open.


    Provide Meaningful Fallbacks
    An open circuit should never default to an unhandled crash for the end-user. Design predictable fallback responses:
    Cached Data: Return slightly stale data from an in-memory cache.
    Degraded UI: Hide optional widgets or recommendations while maintaining core functionality.
    Queued Execution: Accept payload writes asynchronously into a message broker for deferred processing.
    Pair Circuit Breakers with Distributed Tracing
    A tripped breaker is a symptom, not the root cause. Propagate W3C Trace Context or Jaeger headers through all requests so your observability tools can immediately pinpoint which downstream dependency triggered the isolation.


    Key Takeaways
    Circuit breakers isolate failing dependencies before resource exhaustion spreads across services.
    The Half-Open state enables automated, controlled recovery without manual operational intervention.
    Fallbacks protect user experience by offering graceful degradation instead of hard application failures.


    CTA (Join Techawks USA)
    Building scalable, fault-tolerant infrastructure demands practical systems engineering. Join Techawks USA today to collaborate with staff engineers, architects, and tech leaders driving innovation across the US tech ecosystem.
    Designing Resilient Distributed Systems: 4 Circuit Breaker Patterns Every US Engineering Team Should Master In high-throughput, cloud-native architecture, failure is guaranteed. The true test of a engineering setup isn't whether services fail, but how gracefully the system degrades when they do. Implementing a circuit breaker pattern (using libraries like Resilience4j, Sentinel, or Istio/Envoy service meshes) prevents a single slow third-party API or database connection from consuming all application threads and crashing your entire platform. Here are four essential strategies for implementing circuit breakers effectively in production: Define Explicit Failure and Slow-Call Thresholds Do not trigger a trip solely on 5xx error responses. Configure your breaker to measure slow execution times (e.g., requests taking over 1.5s) alongside explicit network timeouts. If 50% of requests fail or time out within a 10-second rolling window, open the circuit immediately. Leverage the Half-Open State for Smooth Recovery Once a circuit opens, set a cool-down timer (e.g., 30 seconds) before transitioning to a Half-Open state. In this state, allow a limited trial batch of requests (e.g., 10 requests) through to test downstream health. If they succeed, reset to Closed; if any fail, revert to Open. Provide Meaningful Fallbacks An open circuit should never default to an unhandled crash for the end-user. Design predictable fallback responses: Cached Data: Return slightly stale data from an in-memory cache. Degraded UI: Hide optional widgets or recommendations while maintaining core functionality. Queued Execution: Accept payload writes asynchronously into a message broker for deferred processing. Pair Circuit Breakers with Distributed Tracing A tripped breaker is a symptom, not the root cause. Propagate W3C Trace Context or Jaeger headers through all requests so your observability tools can immediately pinpoint which downstream dependency triggered the isolation. Key Takeaways Circuit breakers isolate failing dependencies before resource exhaustion spreads across services. The Half-Open state enables automated, controlled recovery without manual operational intervention. Fallbacks protect user experience by offering graceful degradation instead of hard application failures. CTA (Join Techawks USA) Building scalable, fault-tolerant infrastructure demands practical systems engineering. Join Techawks USA today to collaborate with staff engineers, architects, and tech leaders driving innovation across the US tech ecosystem.
    0 Comments 0 Shares 2K Views 0 Reviews
  • Serverless vs. Kubernetes: When Does the Cloud Migration Strategy Shift?
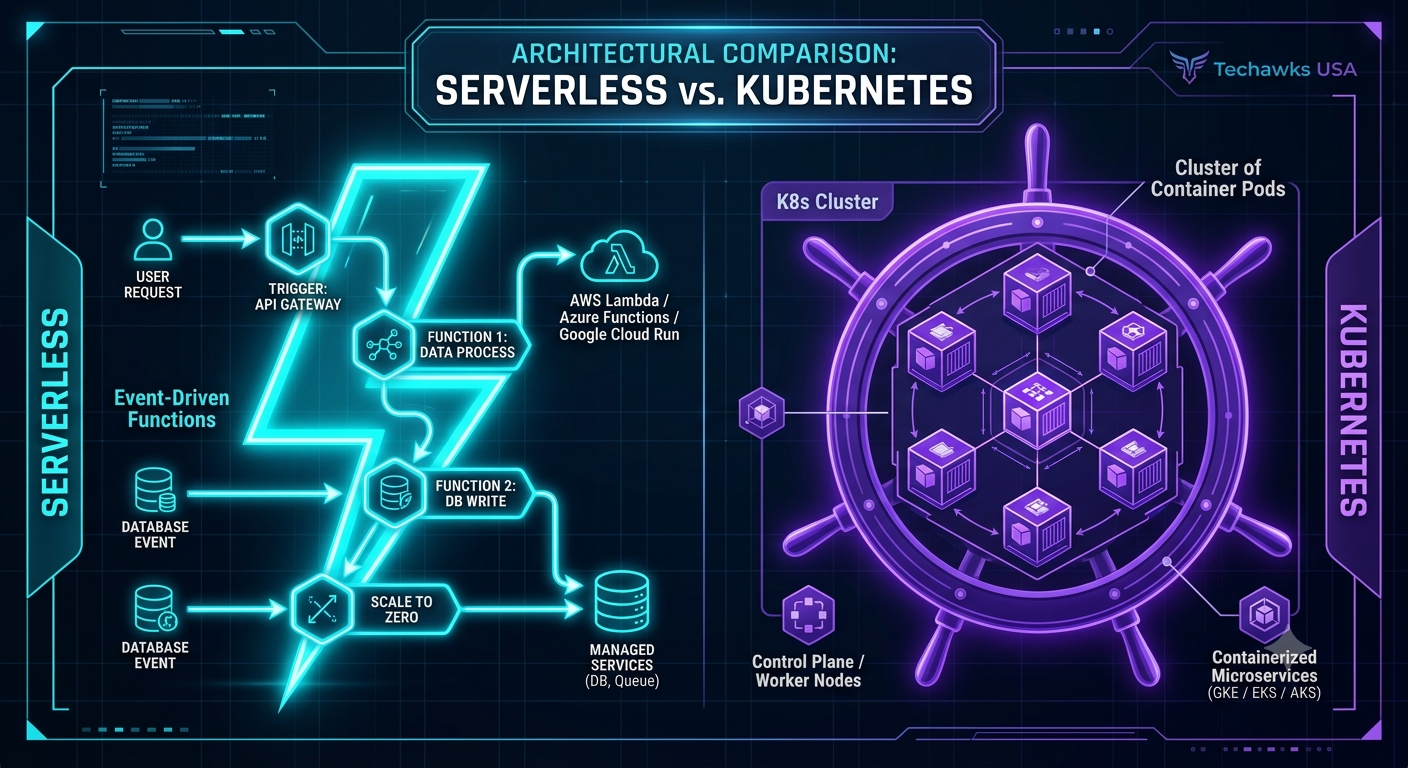
    Choosing between Serverless (AWS Lambda, Google Cloud Run) and Managed Kubernetes (EKS, GKE) remains one of the most critical infrastructure decisions for US engineering leaders. While serverless promises zero infrastructure management, its costs and limitations can compound rapidly as execution scale increases.


    To determine the optimal architecture for your team's current growth phase, evaluate these three core vectors:


    Traffic Patterns and Predictability
    Serverless excels with variable, unpredictable, or bursty traffic where scaling to zero saves significant operational costs. However, for baseline workloads with steady, predictable, high-throughput traffic, provisioned Kubernetes nodes yield far higher compute efficiency and lower per-request costs.


    Operational Overhead vs. Fine-Grained Control
    Kubernetes grants complete control over networking, service meshes, sidecars, and underlying runtime environments, but requires dedicated platform engineering resources to manage ingress, secrets, and cluster upgrades. Serverless shifts that maintenance burden entirely to the cloud provider, freeing your developers to focus purely on application logic.


    Cold Starts and Execution Lifetimes
    If your workload involves long-running jobs (over 15 minutes), heavy background compute, or strict sub-millisecond response latency, containerized environments on Kubernetes eliminate the cold-start penalty and execution timeouts inherent to function-as-a-service architectures.


    Rather than committing dogmatically to one paradigm, modern engineering teams often land on a hybrid approach: using Kubernetes for core microservices and leveraging serverless for event-driven async processing.


    Key Takeaways
    Serverless reduces time-to-market and operational overhead for variable, event-driven workloads.
    Managed Kubernetes provides predictable unit economics and fine-grained control at continuous high scale.
    Hybrid patterns allow engineering teams to balance developer velocity with compute cost optimization.


    CTA (Join Techawks USA)
    How is your organization managing the tradeoff between serverless speed and Kubernetes control? Share your architectural lessons learned in the comments, and Join Techawks USA to engage with cloud architects and tech leaders across the country.
    Serverless vs. Kubernetes: When Does the Cloud Migration Strategy Shift? Choosing between Serverless (AWS Lambda, Google Cloud Run) and Managed Kubernetes (EKS, GKE) remains one of the most critical infrastructure decisions for US engineering leaders. While serverless promises zero infrastructure management, its costs and limitations can compound rapidly as execution scale increases. To determine the optimal architecture for your team's current growth phase, evaluate these three core vectors: Traffic Patterns and Predictability Serverless excels with variable, unpredictable, or bursty traffic where scaling to zero saves significant operational costs. However, for baseline workloads with steady, predictable, high-throughput traffic, provisioned Kubernetes nodes yield far higher compute efficiency and lower per-request costs. Operational Overhead vs. Fine-Grained Control Kubernetes grants complete control over networking, service meshes, sidecars, and underlying runtime environments, but requires dedicated platform engineering resources to manage ingress, secrets, and cluster upgrades. Serverless shifts that maintenance burden entirely to the cloud provider, freeing your developers to focus purely on application logic. Cold Starts and Execution Lifetimes If your workload involves long-running jobs (over 15 minutes), heavy background compute, or strict sub-millisecond response latency, containerized environments on Kubernetes eliminate the cold-start penalty and execution timeouts inherent to function-as-a-service architectures. Rather than committing dogmatically to one paradigm, modern engineering teams often land on a hybrid approach: using Kubernetes for core microservices and leveraging serverless for event-driven async processing. Key Takeaways Serverless reduces time-to-market and operational overhead for variable, event-driven workloads. Managed Kubernetes provides predictable unit economics and fine-grained control at continuous high scale. Hybrid patterns allow engineering teams to balance developer velocity with compute cost optimization. CTA (Join Techawks USA) How is your organization managing the tradeoff between serverless speed and Kubernetes control? Share your architectural lessons learned in the comments, and Join Techawks USA to engage with cloud architects and tech leaders across the country.
    0 Comments 0 Shares 2K Views 0 Reviews